
SMT User Guide



Table of contents
1.4. ABOUT THE SMT USER GUIDE 6
2.1. SUPPORTED BROWSER AND DEVICES 7
2.3. HOW TO ACCESS SMT FOR THE FIRST TIME 11
2.5. HOW TO LOG IN (SMT offline app) 19
2.6. HOW TO SYNCHRONIZE THE OFFLINE APP 20
4.1.1. Viewing the global master data 23
4.1.2. Adding country specific items to the national master data 25
4.1.3. Editing country specific items on the national master data 29
4.1.4. Deleting country specific items from the national master data 30
4.1.5. Adding country specific target groups 31
4.1.6. Editing country specific target groups 33
4.1.7. Deleting country specific target groups 35
4.2.1. Adding national program immunization targets 37
4.2.2. Editing national program immunization targets 40
4.2.3. Deleting national program immunization targets 41
4.3.1. Managing the store hierarchy 42
4.3.2. Managing population and demographics 50
4.3.3. Managing required storage capacity 54
4.3.4. Managing expected vaccine coverage 56
4.3.5. Managing stock level & lead times parameters 59
4.4.1. Viewing the user list 61
4.4.2. Creating new user accounts 63
4.4.3. Managing user access requests 64
4.4.4. Editing user accounts 66
4.4.5. Deactivating user accounts 67
5. STORE OPERATOR FUNCTIONS 69
5.2.1. Understanding the Storage and Equipment screen 73
5.2.2. Registering storage space 74
5.2.3. Editing storage space 76
5.2.4. Deleting storage space 78
5.3.1. Understanding the arrivals screen 80
5.3.2. Registering new arrivals (manual process) 83
5.3.3. Registering new arrivals (automatic process) 87
5.4.1. Understanding the issuing screen 95
5.4.2. Registering distribution of supplies to other stores 98
5.4.3. Printing issue vouchers 102
5.4.4. Registering wastage 103
5.5.1. Registering temperature records 111
5.6. PHYSICAL COUNT AND ADJUSTMENTS 114
5.6.1. Registering a physical count 114
5.6.2. Registering adjustments 118
6.3. PHYSICAL COUNT AND ADJUSTMENTS REPORT 129
6.4. STOCK MANAGEMENT SUMMARY REPORT 133
6.6. STORAGE STATUS REPORT 141
6.7. ISC PERFORMANCE REPORT 145
6.7.1. Temperature and temperature alarm rate 147
6.7.2. Cold Chain Equipment (CCE) Functionality 149
6.7.3. Closed Vial Wastage 152
6.7.4. Full Stock Availability 154
6.7.6. Stocked According to Plan 158
6.7.7. Forecasted Demand vs Issues 161
6.8. SUPPLY ADEQUACY REPORT 163
6.9. COLD CHAIN EQUIPMENT REPORT 167
7.1. TROUBLESHOOTING ACCESS TO SMT 170
7.2. TROUBLESHOOTING ADMIN FUNCTIONS 176
7.3. TROUBLESHOOTING STORE OPERATOR 177
7.4. TROUBLESHOOTING REPORTS 180
Acronyms
AMD64: Advanced Micro Devices architecture, 64-bit
ARM64: Advanced RISC (Reduced Instruction Set Computer) Machine architecture, 64-bit
CBM: Cubic Meter
CC: Cold Chain
CCE: Cold Chain Equipment
EAPR: East Asia and Pacific Region
ECAR: Europe and Central Asia Region
ESAR: Eastern and Southern Africa Region
EVM: Effective Vaccine Management
FSA: Full Stock Availability
GB: Gigabytes
IA-32: Intel Architecture, 32-bit
iSC: Immunization Supply Chain
LACR: Latin America and the Caribbean Region
MB: Megabytes
MENA: Middle East and North Africa
RAM: Random Access Memory
ROSA: Regional Office for South Asia
SATP: Stocked According to Plan
SC: Supply Chain
SIA: Supplementary Immunization Activity
SMT: Stock Management Tool
SSE2: Streaming SIMD (Single Instruction, Multiple Data) Extensions 2
UCC: Ultra-cold chain
UNICEF: United Nations Children’s Fund
VVM: Vaccine Vial Monitor
WCAR: West and Central Africa Region
WHO: World Health Organization
WIC: Walk In Cooler
WIF: Walk In Freezer
INTRODUCTION
Contents of this chapter:
1.4. ABOUT THE SMT USER GUIDE 6
WHAT IS THE SMT?
The SMT is a Stock Management Tool, developed by UNICEF in partnership with WHO, used in multiple countries to manage immunization stocks and monitor the immunization supply chain.
The tool is intended to be used for stock management in vaccine stores at different levels of the supply chain (e.g. national vaccine store, regional vaccine stores, district vaccine stores, etc.). The SMT can also be used in vaccine stores at health facilities, but the platform does not collect any information on immunization services.
The SMT contains information on various vaccine management areas and cold chain and captures transactions of vaccines and supplies across storage facilities. In addition, SMT provides an overview of immunization supply chain performance through a visual display of key performance indicators.
More information can be found on the SMT information page: https://www.unicef.org/supply/introducing-vaccine-stock-management-tool-smt
WHY USE THE SMT?
- SMT is free for all users. Countries using the SMT do not need to pay for expensive annual licenses.
- Software upgrades as well as regular maintenance of the platform are covered by UNICEF.
- It is ready-to-use, facilitating implementation in countries with limited technical capacity to develop a custom solution.
- It is user friendly. The simple and intuitive interface makes it easy to introduce the SMT at all levels of the supply chain.
- It can be used online and offline. This flexibility enables users to make the most of the SMT functionalities even in locations where internet access is unreliable.
- Includes key performance indicators. Vaccine managers can identify gaps and weaknesses in the vaccine supply chain.
- All data is secured and confidential. Only users in country, authorized by the EPI management, are able access the data.
- Training is provided. Countries wishing to introduce the SMT receive technical guidance from UNICEF and WHO and have access to a variety of training resources and opportunities.
- Help is available. Users can access technical support through a tiered system, ensuring minimum down time when managing essential supplies.
HOW DOES IT WORK?
The SMT is a web-based application that connects a central system at national level with the different vaccine stores in a country. This provides data visibility across supply chain levels and allows users to collect and aggregate data from multiple locations and levels, facilitating monitoring and management of the vaccine supply chain.
For vaccine stores that do not have reliable internet connection, the SMT also offers an alternative desktop application, which can be installed in the users’ computer and used offline. This offline application can be synchronized with the central system when internet connection is available.
The SMT global application is managed by UNICEF Supply Division, who is responsible for the platform maintenance, resolution of technical problems and version updates. Data is stored in Azure Cloud storage. The cost of platform development and maintenance is borne by UNICEF Supply Division, so the SMT is free of charge for user countries.
The data entered on the SMT platform is encrypted and only accessible to users authorized by the platform administrators in each country. Access is provided through a secured username and password. The access level depends on the type of role each user has been allocated in the system (more information about user roles on section 3. Overview of user roles)
ABOUT THE SMT USER GUIDE
The SMT user guide is a reference document for SMT users in countries. This guide describes all functionalities available to country users (administrators and store operators) at all levels of the supply chain and provides step-by-step guidance on how to use them.
This document is intended to provide all the necessary information to use the SMT online and offline applications. The document assumes that the reader is well versed with effective vaccine stock management practices.
This user guide applies to the SMT application version released in August 2025.
GETTING STARTED
CONTENTS OF THIS CHAPTER
2.1. SUPPORTED BROWSER AND DEVICES 7
2.3. HOW TO ACCESS SMT FOR THE FIRST TIME 11
2.5. HOW TO LOG IN (SMT offline app) 19
2.6. HOW TO SYNCHRONIZE THE OFFLINE APP 20
This chapter provides relevant information for first time users to get started with the SMT application.
SUPPORTED BROWSER AND DEVICES
Online SMT (web app) minimum requirements:
Supported browsers:
- Microsoft Edge (latest version) Note: Internet Explorer and old Edge (not chromium) not supported.
- Safari (latest version, Mac only).
- Chrome (latest version).
- Firefox (latest version).
Supported devices:
- Desktops
- Laptops
- Tablets
- Mobiles (landscape mode)
Internet connection:
- 2mb download speed minimum
Offline SMT (desktop app) minimum requirements:
RAM: 2GB Minimum
Storage: 500GB Minimum
Processor: An Intel Pentium 4 processor or later that's SSE2 capable
Supported Platforms:
- macOS
- Not supported
- Windows
- Windows 7 and later are supported, older operating systems are not supported (and do not work).
- Both ia32 (x86) and x64 (amd64) binaries are supported for Windows (i.e. 32 bit and 64 bit machines).
- Supports Windows on Arm (arm64) devices.
- Linux
- The prebuilt binaries of Electron are built on Ubuntu 18.04.
SMT INSTALLATION
Online SMT
The online SMT platform is a web-based tool, so it does not require any installation. To access the SMT, simply open a browser from your computer/tablet/phone and go to www.smtplatform.org.
It is necessary to have a password protected account to have access to the data. If you already have a user account, review sections 2.3. How to access SMT for the first time and 2.4. How to login for further information.
Offline SMT
To access the offline version of the SMT, it is required that you have a user account that has been linked to an offline location in the system (refer to section 4.3. Store data for more information). It is not possible to use the online (web app) and offline (desktop app) with the same user settings.
If you have an offline user account, you will be able to download and install a desktop application on your computer. This application can be used offline as needed, and the data can be synchronized with the online system when internet access is available.
To download and install the SMT offline desktop app follow the steps below (internet connection is required for this process):
- STEP 1. Go to section 2.3. How to access SMT for the first time and complete all the steps to set up your new account
- STEP 2. Once your account is set up, you will receive a welcome message and be prompted to download the app. Click on “Download EXE”
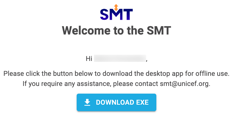
- STEP 3. If your computer prompts you to select what to do with this file, select “Save”. Once the download is completed, a file called SMT Setup should be available in your downloads folder.
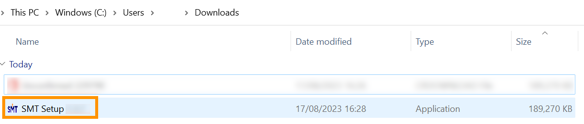
- STEP 4. Double click on this file to start the installation process.
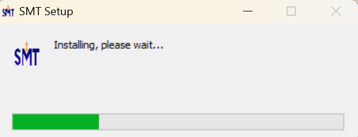
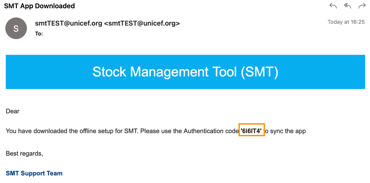
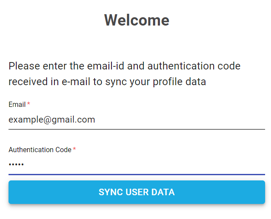
- STEP 5. Once the installation is completed, the SMT application will open. To synchronize the data for the first time, you will be requested to enter your email address and a 6-character code that you have received by email when downloading the SMT app.
- Find your 6-digit code in your mail inbox. Note that the quotation marks (‘ ‘) are not part of the code, only the numbers/letters.
- Type your email address and 6-character code and click “Sync user data”
- A green pop-up window with the message “Data synchronized successfully” will appear
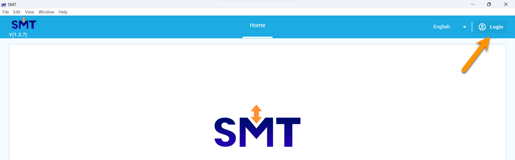
- STEP 6. Click on the “Login” button on the top right corner to continue.
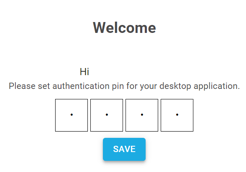
- STEP 7. You will be prompted to choose a 4-digit pin for your SMT application (a number that you will have to enter every time you want to log in). Write your chosen personal pin and click “Save”.
The installation process has been finalized. For more information on how to log into the app, refer to section 2.5. How to log in (SMT offline app).
HOW TO ACCESS SMT FOR THE FIRST TIME
This section describes the process of logging into the SMT for the first time. This process is slightly different depending on the type of email account each user has. Follow the steps 1-3 below, then on step 4, follow the process that corresponds to your email type (e.g. UNICEF, Gmail, etc)
Note: Access to the SMT requires that the user has an account created in the system by one of the administrators of the platform. If an account has been created for you, you should have received a confirmation email from smt@unicef.org with details. If you are unsure whether you have an SMT account or not, contact one of the SMT focal point(s) in your country or get in touch with smt@unicef.org for support.
- STEP 1. Open your browser and go to www.smtplatform.org
- STEP 2. Click on the “Login” button on the top right corner of the screen
- STEP 3. Read the instructions and click on the “Proceed to login” button when you are ready to continue
- STEP 4. The next step will depend on the type of email address associated to your SMT account:
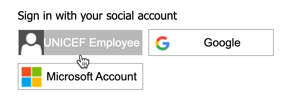
- UNICEF email address:
Click on the “UNICEF employee” button
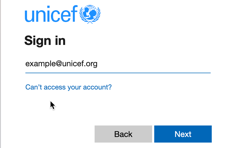
Enter your UNICEF email address and click “Next”
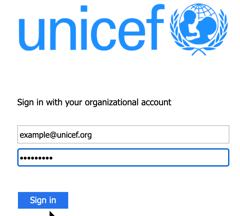
Enter your UNICEF password and click “Sign in”
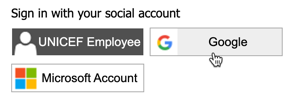
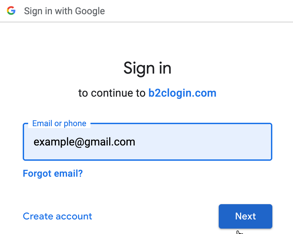
- Gmail or other Google email address:
Click on the “Google” button
Type your email address and click “Next”, then enter your Gmail password and click “Next”
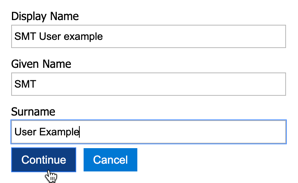
Write your personal details (name, surname) and click “Continue”
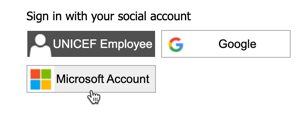
- Microsoft email address (e.g. outlook.com, hotmail.com, live.com):
Click on the “Microsoft Account” button
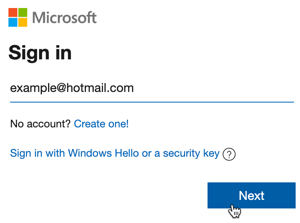
Write your email address and click “Next”, then enter your email password and click “Sign in”
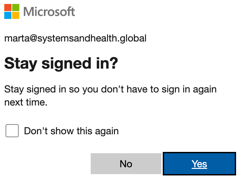
If you are using a personal computer, you can choose to stay signed in by clicking the “Yes” button, so you don’t need to sign in again next time. For security purposes, if you are using a shared or public computer, click “No”
- Other (e.g. Yahoo, gov email, etc)
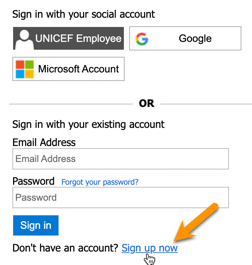
Click on the “Sign up now” link at the bottom of the page
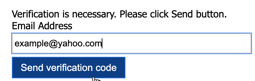
Write your email address and click “Send verification code”
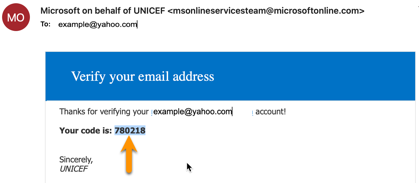
You should have received a new email with a 6-digit verification code. Go to your email inbox and check the code. (check your spam inbox if you don’t find the email)
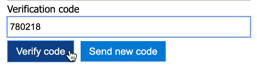
Go back to the SMT sign up page, type in or paste the 6-digit code and click “Verify code”
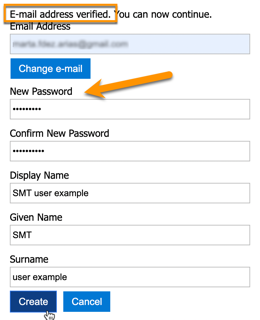
Your email address is now verified. The next step is to create a personal password. Type in your password and personal details and then click “Create”
- STEP 5. Once your new account is set up correctly you will have access to the SMT platform and will see a welcome message. If you have more than one user role (e.g. administrator and store operator), select the role you want to use and click “Apply”
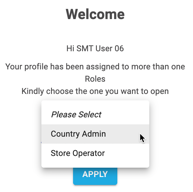
Note: If you have been given an offline user account by the administrator, at the end of this set up process you will see a message prompting you to download the offline app. Refer to section 2.2 SMT Installation to continue
HOW TO LOG IN
This section describes the login process that has to be completed each time a user wants to access the SMT platform. It assumes the user has already completed the set-up process described in section 2.3. How to access the SMT for the first time. This process is slightly different depending on the type of email account each user has. Follow the steps 1-3 below, then on step 4, follow the process that corresponds to your email type (e.g. UNICEF, Gmail, etc)
Note: If you are using the SMT offline app, refer to section 2.5. How to log in (SMT offline app)
- STEP 1. Open your browser and go to www.smtplatform.org
- STEP 2. Click on the “Login” button on the top right corner of the screen
- STEP 3. Read the instructions and click on the “Proceed to login” button when you are ready to continue
- STEP 4. The next step will depend on the type of email address associated to your SMT account:
- UNICEF email address:
Click on the “UNICEF employee” button
Enter your UNICEF email address and click “Next”
Enter your UNICEF password and click “Sign in”
- Gmail or other Google email address:
Click on the “Google” button
Type your email address and click “Next”, then enter your Gmail password and click “Next”
- Microsoft email address (e.g. outlook.com, hotmail.com, live.com):
Click on the “Microsoft Account” button
Write your email address and click “Next”, then enter your email password and click “Sign in”
If you are using a personal computer, you can choose to stay signed in by clicking the “Yes” button, so you don’t need to sign in again next time. For security purposes, if you are using a shared or public computer, click “No”
- Other (e.g. Yahoo, gov email, etc)
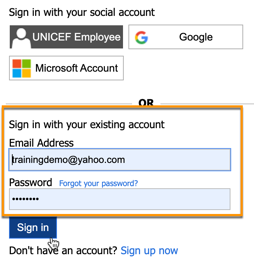
In the fields provided, write your email address and the password you have previously created (see section 2.3. How to access SMT for the first time), then click the “Sign in” button
- STEP 5. You will see a welcome message. If you have more than one user role (e.g. administrator and store operator), select the role you want to use and click “Apply”
HOW TO LOG IN (SMT offline app)
This section describes the login process that has to be completed each time a user wants to access the SMT offline application.
Note: To use the SMT offline app, the user should have completed the installation and set-up process. Refer to section 2.2 SMT Installation for more information.
- STEP 1. On your desktop, locate the SMT icon and double click to open the application
- STEP 2. Click on the “Login” button on the top right corner of the screen
- STEP 3. Type your 4-digit personal pin and click “Login”
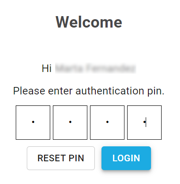
You can now start using the SMT application offline.
HOW TO SYNCHRONIZE THE OFFLINE APP
When using the SMT offline application, the data entered will be saved locally in your computer. When you have access to internet connection, you can synchronize your system with the national database (to share your data and have access to the latest data of other locations) by following the steps below.
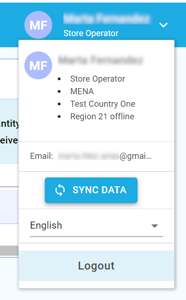
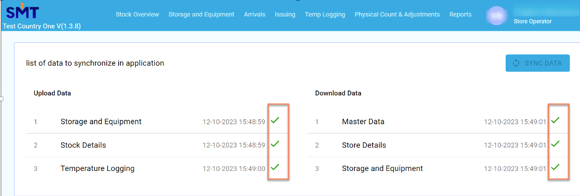
- STEP 1. Once you are logged into the application, click on your name in the top right corner of the screen. Then click on the “Sync data” button.
- STEP 2. You will be able to see the date and time of the last synchronization. Click on the “Sync data” button to proceed.
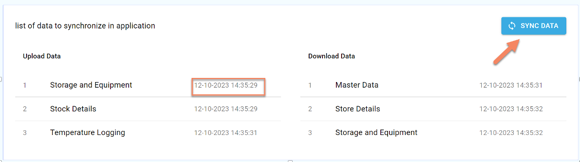
Once each data set is synchronized, a green tick mark will appear. The date and time of the synchronization will be reflected accordingly.
OVERVIEW OF USER ROLES
CONTENTS OF THIS CHAPTER
Access to the SMT is provided through a password protected personal account. Users have access to different sets of data and functionalities depending on the role that has been assigned to them in the system. User roles can be grouped into 2 main categories, administrators and store operators.
It is possible for one user to have more than one user role (e.g. country administrator AND national store operator)
ADMINISTRATOR ROLES
Administrators are users that have the ability to set up SMT the system and all its parameters, such as the master data of vaccines and supplies, immunization program targets for the country, the lists and details of supply chain levels and vaccine stores, and the account details and access rights for other users.
Note: administrator accounts can only be accessed through the SMT web application online. The SMT offline app does not support administrator functions.
- Global administrators: Global administrators are the platform support team at global level. These are staff from UNICEF Supply Division. Their role is to maintain the global database of vaccines and supplies and to provide access and support to country administrators. They do not have access to countries data or reports. To get in touch with the SMT global administrators, users can contact smt@unicef.org.
- Country administrators: Country administrators are responsible for setting up the SMT parameters for their own country. Their role includes management of the country specific master list of vaccines and supplies, setting up immunization targets and vaccine needs in the system, entering population and vaccine store data, and creating user accounts for other users in the country. Administrators can also visualize stock data for all vaccine stores in their country and generate supply chain performance reports.
- Read-only country administrators: This role provides access to all the screens and functionalities of the country administrators but does not allow the user to enter or modify any data, only view the data and generate reports.
- Subnational administrators: Subnational administrators have access to the same functionalities as the country administrators but for a specific subnational area (e.g. region, province), except for managing the master lists and the country immunization targets, which are managed only at national level.
More information on the administrator role and how to use each functionality can be found on chapter 4. Administrator functions.
STORE OPERATOR ROLES
Store operators are users that work in a vaccine store and utilize the SMT to record information related to their immunization stocks, transactions, and cold chain equipment. This type of user is always associated with one specific vaccine store (e.g. operator of national vaccine store, operator of vaccine store district A, etc.). Store operators cannot modify SMT parameters.
Note: store operator accounts can be accessed through the SMT web application online or through the SMT offline app, depending on the vaccine store to which the operator is associated. The functionalities are the same in both applications.
- Store operators: This role allows the user to monitor vaccine stocks and supplies, monitor available cold chain equipment and storage space available, record arrivals or issues of stock from/to other facilities, track tracer temperature records and conduct inventory counts. Store operators can also visualize data for other vaccine stores below them in the supply chain and generate reports.
- Read-only store operators: This role provides access to all the screens and functionalities of the store operator but does not allow the user to enter or modify any data, only view the data and generate reports.
More information on the store operator role and how to use each functionality can be found on chapter 5. Store operator functions.
ADMINISTRATOR FUNCTIONS
CONTENTS OF THIS CHAPTER:
This chapter describes the functionalities available to users with the role of “administrator”. Some of the functionalities, such as 4.1. Master data and 4.2. Program data are only available for Country Administrators (i.e. users with administrator role at national level), while 4.3. Store data and 4.4. Users are available to all administrators, including those at subnational locations.
MASTER DATA
Master data is the functionality that allows users to manage the details of vaccines and supplies available in the SMT system. The SMT operates using a global master data, which is managed by the global SMT administrators in UNICEF Supply Division. This master data contains the full list of vaccines and cold chain equipment that have been prequalified by WHO, the list of correspondent manufacturers, and a list of the most common immunization supplies. The global list can be viewed by administrators in countries but cannot be modified by them. However, country administrators can add country-specific products to their own master list.
Note: The global master data follows the standard international names for vaccines found on the prequalification list of WHO. Therefore, the vaccine names and acronyms on the global master data will show in English, even if the administrator uses the SMT platform in any of the other available languages.
Viewing the global master data
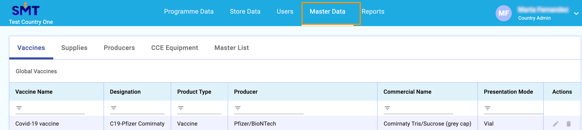
- STEP 1. Once you are logged into the application as a Country Administrator, click on the “Master Data” tab on the top menu.
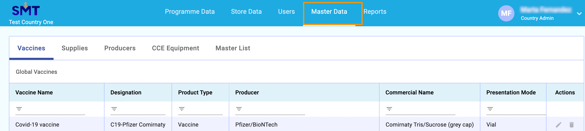
- STEP 2. Select the type of item that you want to visualize (e.g. vaccines, supplies, etc.) to view the table of global products.
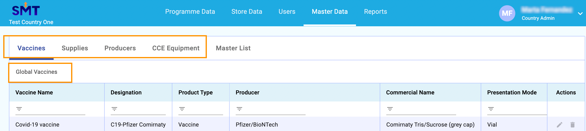
- STEP 3. Review the full list of items available by using the navigating buttons to change the page,
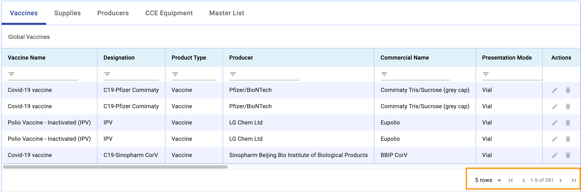
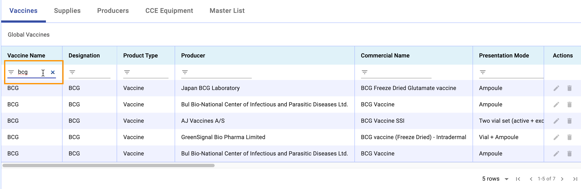
or search and filter specific items by typing into the blank fields provided.
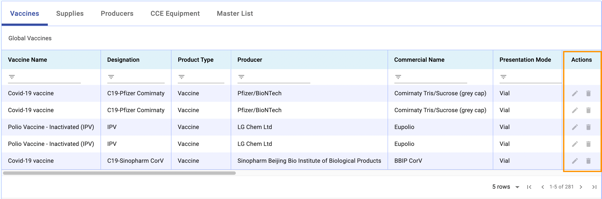
Note: The “Actions” buttons are disabled as the global master list cannot be edited or deleted by country administrators.
Adding country specific items to the national master data
This functionality allows users to add new products and equipment to their master data at country level. Before adding a new product and to avoid duplications, review the global list to ensure the product is not already available. Once a new product is created by the country administrator, it will become visible to all SMT users in that country, but it will not affect the global list.
Note: For details on how to add country specific target groups for immunization, refer to 4.1.5. Adding country specific target groups.
- STEP 1. Once you are logged into the application as a Country Administrator, click on the “Master Data” tab on the top menu.
- STEP 2. Select the type of item that you want to visualize (e.g. vaccines, supplies, etc) and then scroll down until you see the table for “Country specific products”.
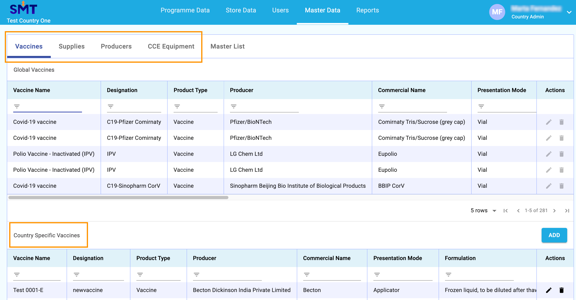
- STEP 3. Review the list of country specific products already created to make sure no duplicates are created. If the product you wish to add is not on the list, click the “Add” button.
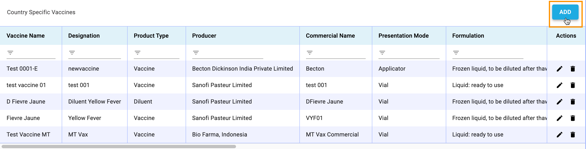
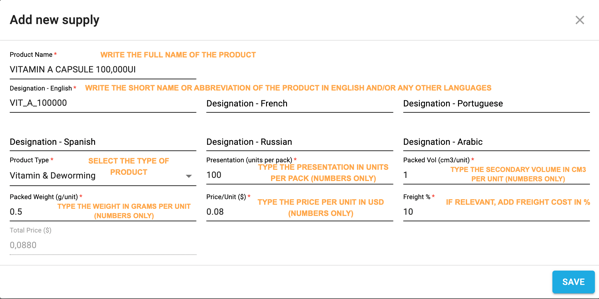
- STEP 4. Complete the details of the product. Note that all fields with a red asterisk (*) are mandatory. Some fields such as the name of the product or the commercial name are open, so the user must type in the information. Some other fields such as the product type are restricted, and the user must choose from the options available on the drop-down menu.
Follow the examples below depending on the type of item you are adding:
- Vaccines
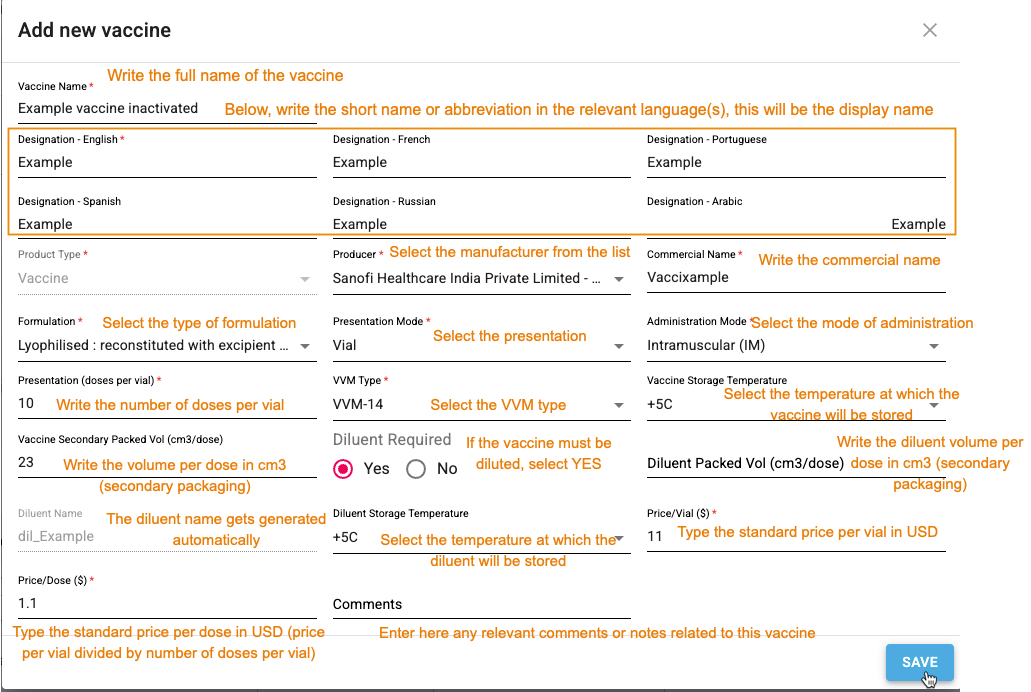
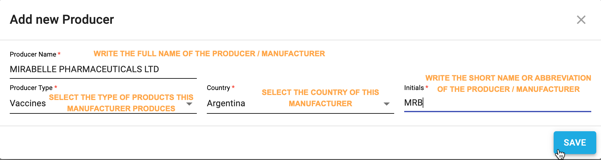
Note: If the vaccine manufacturer does not appear on the dropdown menu, add the new manufacturer before adding the new vaccine by following example c below.
- Other supplies
- Producers (manufacturers)
- Cold Chain Equipment (CCE)
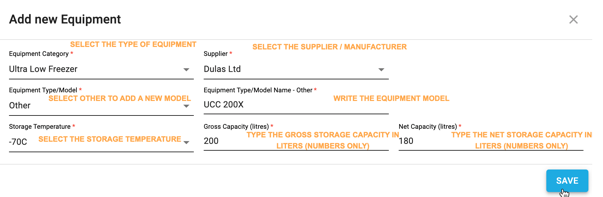
- STEP 5. Once the details of the new item have been entered, review that all the information is correct and click the “Save” button. A green pop-up window with the message “Data saved successfully” should appear.

- STEP 6. Verify that the new item is now visible on the list of country specific products.

Editing country specific items on the national master data
Once a new country specific product has been created by a country administrator, it is possible to modify the details by using the editing functionality. This process can be carried out by the same user who created the item, or by any other user with country administrator rights.
- STEP 1. On the country specific item list, click on the “Edit” action button on the right column
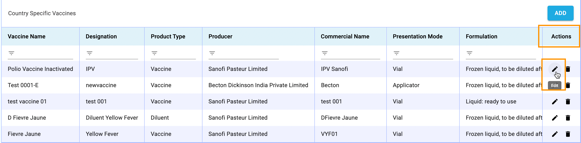
- STEP 2. A new window will open with all the details of the item. Modify the information as needed, then when finished click “Update”
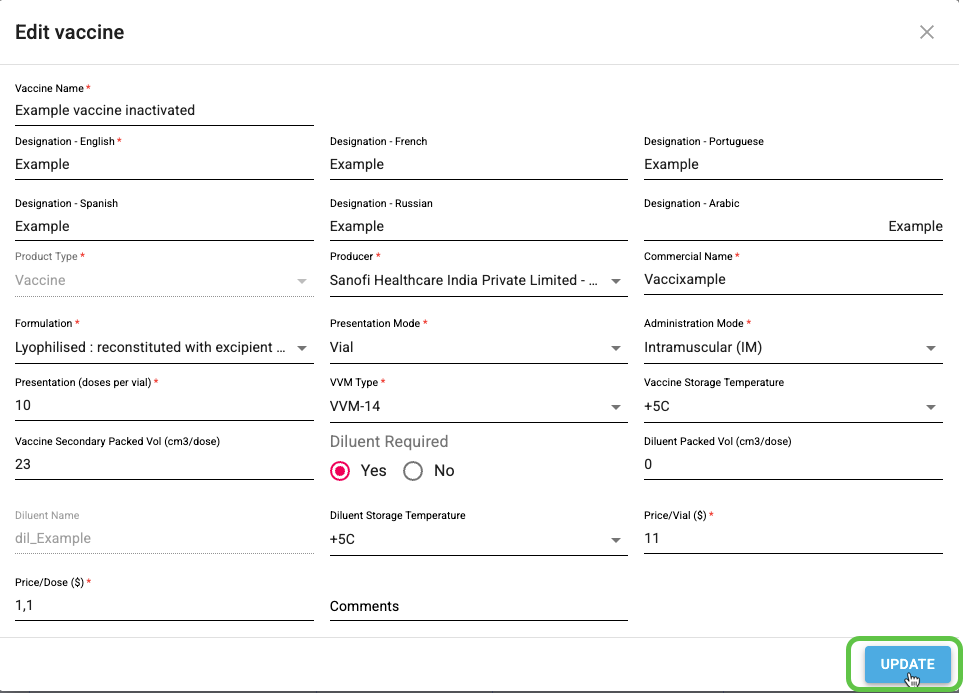
A green pop-up window with the message “Data updated successfully” should appear.

- STEP 3. Verify that the updated information is now reflected on the list of country specific products.
Deleting country specific items from the national master data
Once a new country specific product has been created by a country administrator, it is possible to remove it from the master list by using the delete functionality. This process can be carried out by the same user who created the item, or by any other user with country administrator rights.
- STEP 1. On the country specific item list, click on the “Delete” action button on the right column
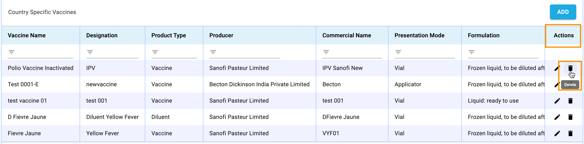
- STEP 2. A pop-up will open asking the user to confirm. If you wish to continue with the deletion process, click “Yes”. Otherwise, cancel.
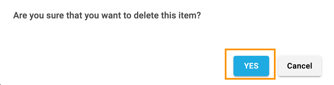
A green pop-up window with the message “Data deleted successfully” should appear.

Note: The delete functionality can only be used if the item has not yet been used. If a SMT store operator has registered any transactions of the item, this product can no longer be deleted from the master data and the following message will show.
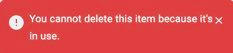
- STEP 3. Verify that the item is no longer showing on the list of country specific products.
Adding country specific target groups
This functionality allows users to add specific target groups for the country’s immunization program, in addition to the standard groups already existing in the SMT master list (e.g. live births, surviving infants, etc.).
Note: This process will just create the name of a new target group on the master data. To manage the population values associated with each target group, refer to section 4.3.2. Managing population and demographics
- STEP 1. On the master data tab, select the “Master List” option and review the list of available target groups.
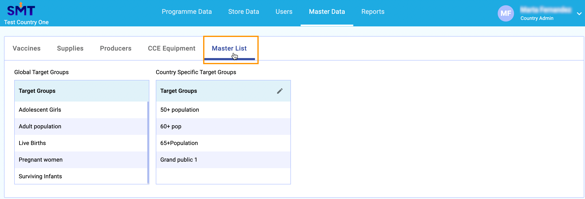
- STEP 2. To add a new group, click on the “Edit” button
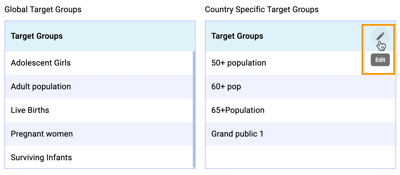
Then select “Add new”
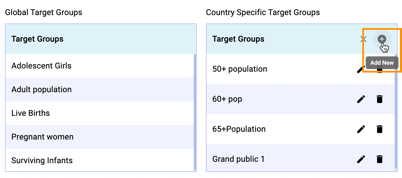
- STEP 3. On the new window, write the name you want to assign to the new target group, then click “Save”.
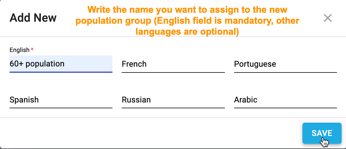
A green pop-up window with the message “Data saved successfully” should appear.
- STEP 4. Verify that the new target group shows on the list.
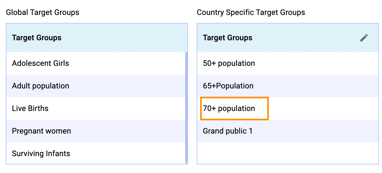
Editing country specific target groups
Once a new country specific target group has been created by a country administrator, it is possible to modify the name of the group by using the editing functionality. This process can be carried out by the same user who created the item, or by any other user with country administrator rights.
- STEP 1. On the master data tab, select the “Master List” option and review the list of available target groups.
- STEP 2. To edit one of the country specific groups, click on the “Edit” button
Then select “Edit” again
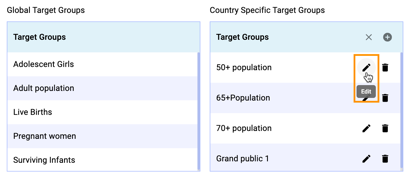
- STEP 3. On the editing window, modify the details of the target group as needed, then click “Update”.
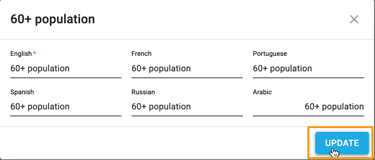
A green pop-up window with the message “Data updated successfully” should appear.

- STEP 4. Verify that the edits are reflected on the list.
Deleting country specific target groups
Once a new country specific target group has been created by a country administrator, it is possible to remove it from the master list by using the delete functionality. This process can be carried out by the same user who created the item, or by any other user with country administrator rights.
- STEP 1. On the master data tab, select the “Master List” option and review the list of available target groups.
- STEP 2. To delete one of the country specific groups, click on the “Edit” button.
Then select “Delete”.
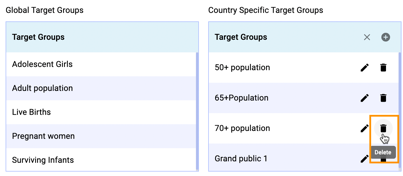
- STEP 3. A pop-up will open asking the user to confirm. If you wish to continue with the deletion process, click “Yes”. Otherwise, cancel.
A green pop-up window with the message “Data deleted successfully” should appear.
Note: The delete functionality can only be used if the item has not yet been used. If this target group is already associated with a vaccine on the program data, the group can no longer be deleted, and the following message will show.

- STEP 4. Verify that the item is no longer showing on the list of country specific target groups.
PROGRAM DATA
Program data is the functionality that allows administrators to define the program immunization targets at national level for each year. The user should enter the details of the routine and supplementary immunization plans, and, if desired, the details of other child survival interventions linked to the immunization program, such as vitamin A supplementation. The information needs to be entered annually.
The information entered under the program data tab will be used by the SMT to calculate key parameters needed across the platform, such as the annual needs for each vaccine. Therefore, it is essential that the details of all vaccines that will be used in the country during the current year are reflected on the program data tab.
Store operators at different supply chain levels will still be able to manage vaccines that are not included in the program data, however, the platform will not provide stock alerts and some reports will not generate correctly for those items, as the key data for the calculations will be missing.
Adding national program immunization targets
- STEP 1. Once you are logged into the application as a Country Administrator, click on the “Program Data” tab on the top menu.

- STEP 2. From the dropdown menu on the right, select the year for which you want to introduce the immunization program data. Note that it is possible to enter program data for the current year and for the following one. It is also possible to view program data for past years, but the past data cannot be modified.
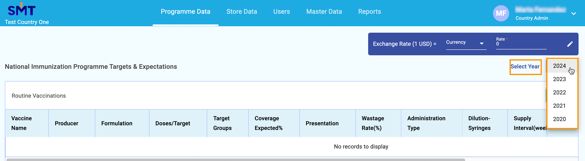
- STEP 3. If some program data has already been entered for the year selected, review the list to make sure no duplicates are created. To add a new item, click the “Add” button.

- STEP 4. Complete the details of each program target. Note that all fields with a red asterisk (*) are mandatory. Some fields are open, so the user must type in the information. Some other fields are restricted, and the user must choose from the options available on the drop-down menu.
Follow the examples below depending on the type of item you are adding:
- Routine vaccinations
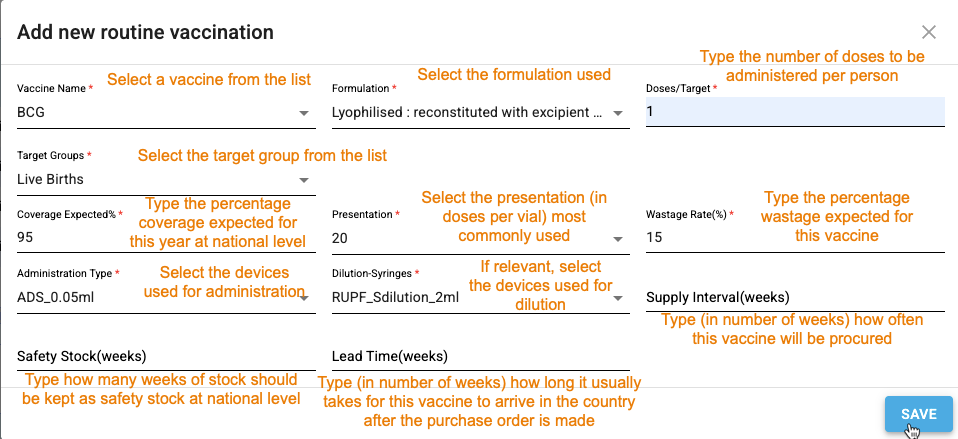
- Supplementary vaccinations
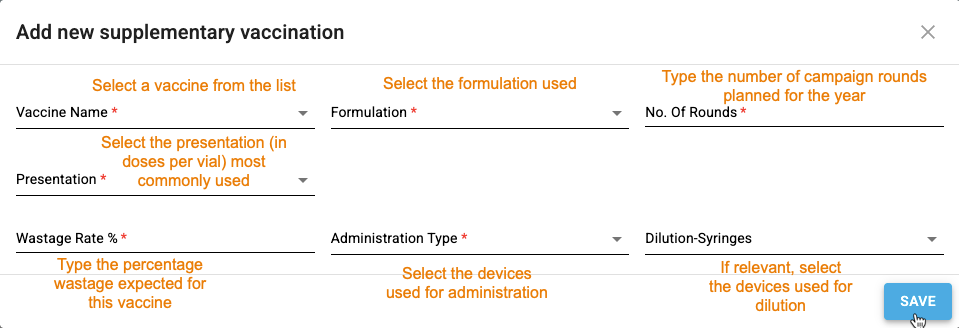
- Other child survival interventions
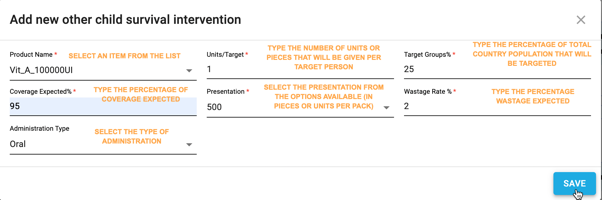
Notes:
- The dropdown menus on the Program Data reflect what is available on the SMT Master Data. If you are trying to add a vaccine, immunization device or target group that does not show on the dropdown list, it will have to be added to the master data first. Refer to chapter 4.1. Master data, sections 4.1.2 Adding country specific items and 4.1.5. Adding country specific target groups.
- If more than one presentation is used for the same vaccine (e.g. 10 doses per vial, and 20 doses per vial), simply select one of them. Do not enter the same vaccine more than once for the same purpose (e.g. routine), as the calculation of annual requirements will be doubled.
- The Supply Interval, Safety Stock and Lead time information is optional. These fields can be used to define specific parameters per vaccine, if different from other items. If these fields are left blank, the platform will use the parameters defined for national level under the Store Data tab (refer to 4.3.5 Stock levels and lead times for more information).
- STEP 5. Once all the details have been entered, review that all the information is correct and click the “Save” button. A green pop-up window with the message “Data saved successfully” should appear.
- STEP 6. Verify that the new line is now visible on the Program Data.

Editing national program immunization targets
Once a new immunization program target has been created by a country administrator, it is possible to modify the details by using the editing functionality. This process can be carried out by the same user who created the item, or by any other user with country administrator rights.
- STEP 1. On the program data list you wish to edit, click on the “Edit” action button on the right column.

- STEP 2. A new window will open with all the details of the item. Modify the information as needed, then when finished click “Update”.
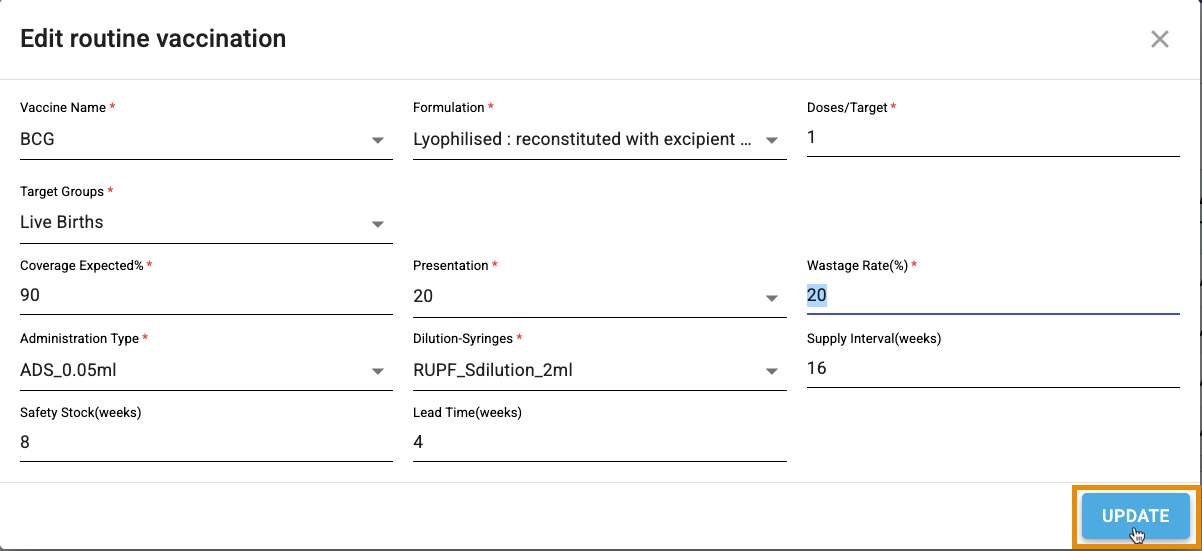
A green pop-up window with the message “Data updated successfully” should appear.

- STEP 3. Verify that the updated information is now reflected on the program data list.
Deleting national program immunization targets
Once a new immunization program target has been created by a country administrator, it is possible to remove it from the program data by using the delete functionality. This process can be carried out by the same user who created the item, or by any other user with country administrator rights.
- STEP 1. On the country specific item list, click on the “Delete” action button on the right column.

- STEP 2. A pop-up will open asking the user to confirm. If you wish to continue with the deletion process, click “Yes”. Otherwise, cancel.
A green pop-up window with the message “Data deleted successfully” should appear.
- STEP 3. Verify that the item is no longer showing on the program data list.
STORE DATA
Store data is the functionality that allows administrators to manage the settings for the different locations where the SMT will be used, from creating vaccine stores and supply chain connections in the system, to managing population details and other parameters at each store.
Managing the store hierarchy
The store hierarchy is the list and details of vaccine stores in a country. Customizing the store hierarchy in the SMT is a prerequisite to start operating the SMT in the country, as this will be needed to assign store operators to each location and to correctly record stock transactions between stores.
This process consists of 4 actions:
- Creating a new store hierarchy
- Customizing SMT supply chain levels
- Modifying the store hierarchy
- Exporting the store hierarchy
Follow the steps below to understand each one of the actions.
- Creating a new store hierarchy
- STEP 1. Once you are logged into the application as a Country Administrator, click on the “Store data” tab on the top menu. The screen “Store Hierarchy” will appear.

- STEP 2. Download a new hierarchy file by clicking on the button “Download template”. An Excel file should start downloading in your computer.

- STEP 3. On your Downloads folder, locate the file called “Hierarchy import file” and open it

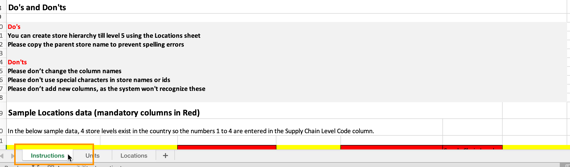
- STEP 4. On the Excel file, click on the “Instructions” tab on the bottom left and carefully read the step-by-step process to fill the data, as well as the Do’s and Don’ts.
- STEP 5. After understanding the hierarchy file instructions, click on the “Locations” tab and start completing the data for your country.
- Columns C (Parent Facility Name), E (Facility Name) and F (Supply Chain Level Code) with red column heading are mandatory.
- Column K (Total Population) with orange column heading is not mandatory but it is advisable to complete it if the population data is available. Note that a data validation rule is in place to ensure that the population entered for a store is not higher than the population of the parent store. The file upload will not go through unless this condition is met.
- The rest of columns with yellow heading are not necessary for the SMT and can be left blank.
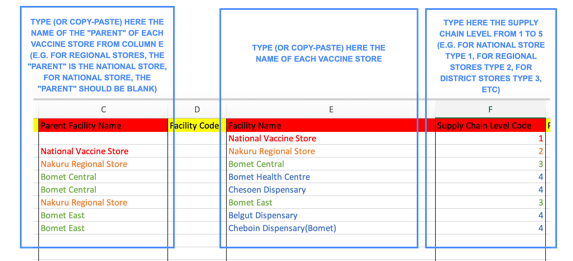
Note: the SMT hierarchy template follows the same structure as the hierarchy file for the EVM. If your country has recently completed a EVM assessment, you can simply copy-paste the facility data from one file to another. However, note that the supply chain level coding is different, and the SMT file only accepts numbers from 1 to 5 on column F.
- STEP 6. After completing all the necessary data, save the Excel hierarchy file in your computer.
- STEP 7. Return to the SMT application, Store Hierarchy tab, and click on “Import Hierarchy”.

Select your file, wait until the preview shows on the pop-up window and a green message appears, then click “Submit”
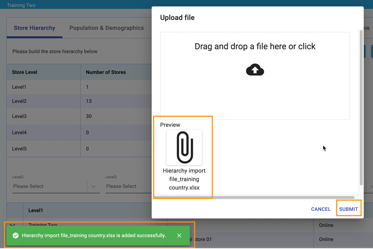
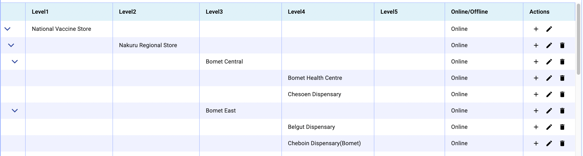
- STEP 8. Once the file finishes uploading (it can take a few minutes, depending on the size of the file and the speed of the internet connection), review the store hierarchy to ensure it displays correctly on the SMT screen and the vaccine stores are showing at the correct supply chain level and under the correct “parent” store.
- STEP 9 (optional). If a mistake was made, and some of the store names, supply chain levels or connections between stores are not correct, utilize the “Delete Store Hierarchy” button to erase the current hierarchy, edit and correct the Excel file, and go back to previous steps to re-upload the corrected file.
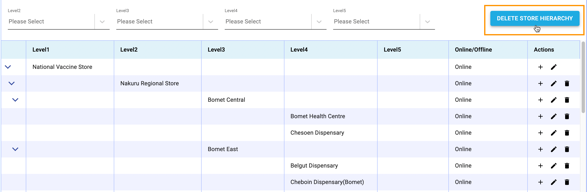
Note: The full hierarchy file deletion process can only be completed when creating the store hierarchy for the first time, when store operators and stock transactions are not registered in the system yet. Once the vaccine stores have operators and/or transactions associated with them, the store hierarchy can no longer be deleted.
- Customizing SMT supply chain levels
- STEP 1. On the Store Hierarchy screen, once the full store hierarchy has been uploaded, review the table on the top left that will display the summary of the supply chain levels and number stores per level. By default, all supply chain levels are active.
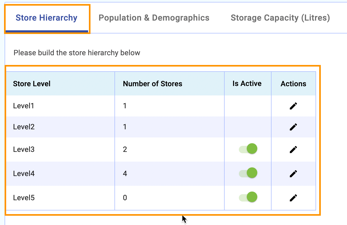
- STEP 2. Customize the name of each level by clicking on the action “Edit” button on the right.
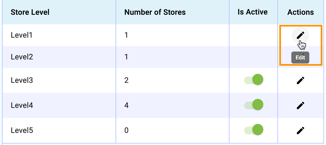
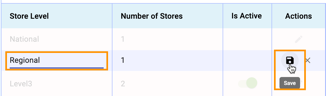
Write the name you want to assign to each level (e.g. level 1= national, level 2= regional, etc.) then click the “Save” icon.
- STEP 3. Use the “Is Active” button to determine which supply chain levels will use the SMT application. For example, if at the beginning the SMT will only be used at national and regional levels, deactivate all the other levels. Only the active levels will show across the SMT application. Additional levels can be activated at a later stage if the SMT is rolled out.
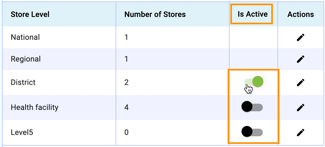
- STEP 4. Verify that the store hierarchy correctly shows the updated supply chain level names and that it only displays active stores.

- Modifying the store hierarchy
Once a store hierarchy file has been uploaded and the supply chain levels customized, the SMT is ready to be used. However, it is also possible to modify the existing hierarchy by following the steps below.
- STEP 1. On the store hierarchy, locate the store(s) you want to modify and click on the relevant action button on the right column. The following actions are available: Add new store / Edit / Delete.

- STEP 2. Follow the examples below depending on the type of action you want to complete:
- Adding a new store:
On the parent store line, click on the “Add new store” button. (For example, to create a new district store under a specific region, locate the regional store, then click “Add new store”)

Enter the details of the new store, then click “Create”
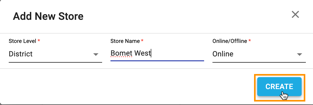
Verify that the new store has been created correctly on the hierarchy

- Editing store details
Locate the store you want to modify, then click “Edit”

On the pop-up window, change the store details as needed:
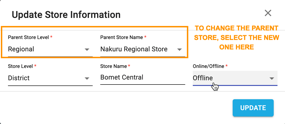
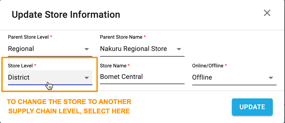
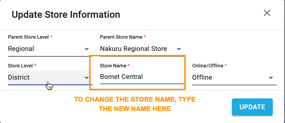
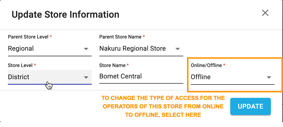
After editing all the necessary information, click “Update”. Then verify that the updated details show correctly on the hierarchy.

- Deleting a store
Locate the store you want to remove from the hierarchy, then click “Delete”

The SMT will ask for confirmation. To continue with the deletion process, click “Save”, otherwise Cancel.

Verify that the store has been removed from the store hierarchy.
Note: The deletion process can only be completed when the store does not have any store operators associated, does not have store levels underneath, and does not have any recorded transactions. If the store already has data associated, it cannot be deleted, and the following message will appear.
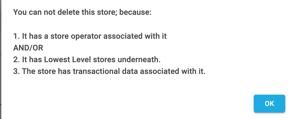
- Exporting the store hierarchy
Once the store hierarchy is created on the SMT, it is possible to export it in an Excel form. This functionality can serve to facilitate review of the store details, make it possible to share with others and also in cases where the hierarchy is needed for other purposes or platforms outside the SMT (e.g. it can serve for EVM assessment, as it follows a similar format).
- STEP 1. Once you are logged into the application as a Country Administrator, click on the “Store data” tab on the top menu. The screen “Store Hierarchy” will appear.
- STEP 2. Download the full hierarchy file with all the store details by clicking on the button “Export hierarchy”. An Excel file should start downloading in your computer.

- STEP 3. On your Downloads folder, locate the file called “Store hierarchy dd-mm-yyyy” and open it.
Managing population and demographics
This functionality allows users to set up population data for each one of the locations where the SMT will be used. This data will be used to estimate vaccine needs for each store. The data needs to be updated yearly.
This process consists of 2 actions:
- Entering total population for each store
- Setting up demographic details for each target group
Follow the steps below to understand each one of the actions.
- Entering total population for each store
- STEP 1. Once you are logged into the application as a Country Administrator, go to “Store data” tab on the top menu and click on “Population and demographics”.

- STEP 2. Select the year for which you want to review and/or enter population data. The data can be entered and modified for the current year and the following one. For past years, it can be reviewed but not edited.
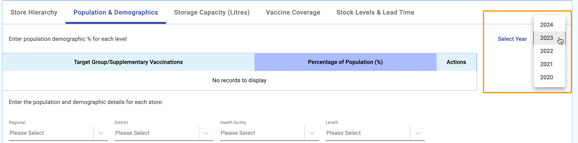
- STEP 3. Scroll down to see the store hierarchy details. If the population data has been uploaded as part of the hierarchy import file, the figures will automatically show on this screen. (For more information on this process, refer to section 4.3.1. Managing the store hierarchy)

- STEP 4. If the total population values are blank or are incorrect, it is possible to enter or correct them manually. Click on the “Edit” button on the action column.

- STEP 5. On the pop-up window, enter or edit the total population for the selected vaccine store, then click “Save”.
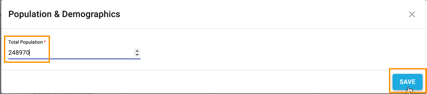
A green pop-up message saying “Data saved correctly” should appear. Review that the population is now showing correctly on the hierarchy.

Note: To minimize data entry errors and improve accuracy, a data validation is enforced on this process. The population values for parent stores should always be greater than the population values for stores below them. For example, population for a regional store should be higher than the population for each district store within that region. If you see the message below, review your population figures to ensure they are correct and re-enter.
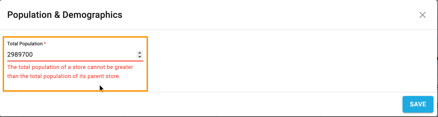
- Setting up demographic details for each target group
- STEP 1. On the “Population and demographics” screen, review the table on top of the screen displaying the vaccination target groups for the year.
This information is linked to the program data entered for the year. If the table is empty, refer to section 4.2.1. Adding national program immunization targets and complete this information.
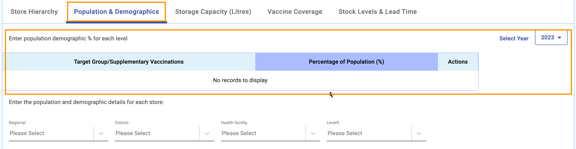
If the program data has been entered correctly, the table should display the list of target groups (for routine vaccination) and vaccine names (for supplementary activities).
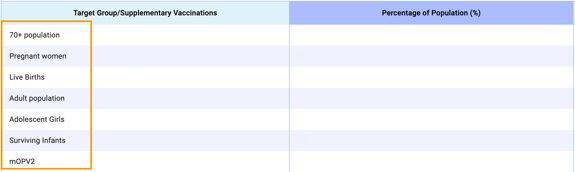
- STEP 2. To set up the percentage of population that corresponds to each target group, click on the “Edit” button on the right column.

- STEP 3. Enter the % value (numbers only from 0 to 100) then click “Save”.

Repeat for each target group until the table is completed
- STEP 4. Review that the population figures have been recalculated for each location based on these percentages and show correctly on the store hierarchy below.
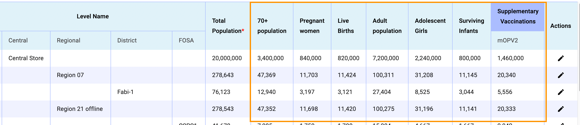
- STEP 5 (optional). If needed, the population figures for target groups of specific locations can be manually edited. Click the “Edit” button on the Action column.
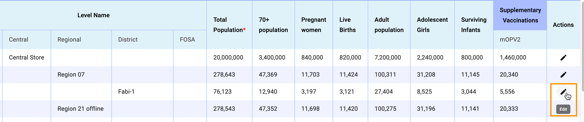
Edit the necessary values for the location, then click “Save”.
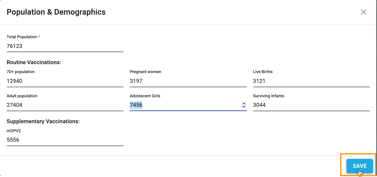
The message “Data updated successfully” will appear. Review that the new values are reflected correctly on the screen.

Managing required storage capacity
This functionality allows administrators to set up the required storage capacity for each vaccine storage location. This is a theoretical value that will serve as a reference for the store operators to compare with the actual storage capacity.
Required storage capacity | Actual storage capacity |
Theoretical value calculated based on immunization program targets and population estimates for each location | Real value calculated adding the storage capacity of functional equipment and storage space in each location |
Entered in SMT by the administrator – Store Data tab | Entered in SMT by the store operator – Storage and Equipment tab |
This section describes the process for the administrators to enter the required capacity. For more information on how to set up the actual storage capacity refer to the Store Operator chapter of this guide, section 5.2. Storage and equipment.
- STEP 1. Once you are logged into the application as a Country Administrator, go to “Store data” tab on the top menu and click on “Storage capacity”

- STEP 2. From the dropdown menu on the right, select the year for which you want to introduce the storage capacity data. Note that it is possible to enter data for the current year and for the following one. It is also possible to view data for past years, but the past data cannot be modified.
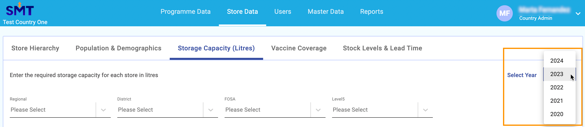
- STEP 3. Locate the store for which you want to introduce the storage capacity data. You can do so by scrolling down the screen, or by selecting from the filtering menus on top of the hierarchy table.
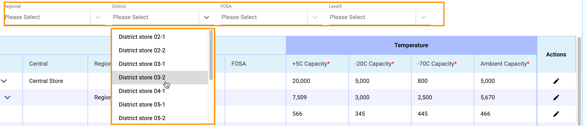
- STEP 4. On the selected store, click on the “Edit” button on the right column.

- STEP 5. Type in the estimated required capacity of this store for each of the temperature categories (+5C / -20C / -70C / ambient). The values need to be expressed in Liters.
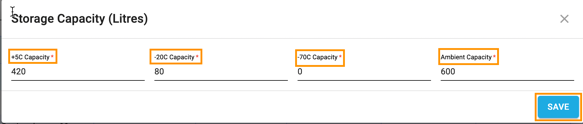
When finished, click “Save”. A green pop-up window with the message “Data Updated Successfully” should appear.
- STEP 6. Verify that the data is correctly reflected on the table

Note: The estimated required capacity needs to be manually entered in the SMT. Users must either manually calculate the values or obtain them from a separate tool, such as the WHO Inventory Gap Analysis (IGA).
Managing expected vaccine coverage
This functionality allows administrators to set up the expected vaccine coverage for each routine immunization activity on the national program. This is a theoretical value that will serve for the calculation of annual needs for each vaccine. The information needs to be entered annually.
Note: The key purpose of the SMT is to manage vaccine stocks at storage locations and therefore it does not offer any functionality to record service delivery activities at health facilities or vaccination points. Thus, actual vaccination coverage is not recorded in the SMT platform.
- STEP 1. Once you are logged into the application as a Country Administrator, go to “Store data” tab on the top menu and click on “Vaccine coverage”.

- STEP 2. From the dropdown menu on the right, select the year for which you want to introduce the data. Note that it is possible to enter expected coverage for the current year and for the following one. It is also possible to view data for past years, but the past data cannot be modified.
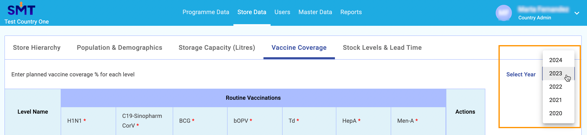
- STEP 3. On the top table, the list of routine vaccinations for the selected year should appear. This data is linked to the routine immunization targets entered on the Programme Data tab.

If this is blank, review section 4.2.1. Adding national program immunization targets and complete the necessary data for the year.
- STEP 4. If the list of all vaccinations is correctly shown on the table, you can proceed to enter the estimated coverage values for each supply chain level using the “Edit” button on the right column.
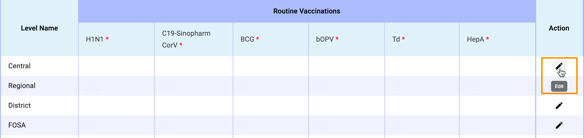
- STEP 5. On the pop-up window, enter the expected coverage values for each vaccination. These values should be expressed in percentage (numbers from 0 to 100)
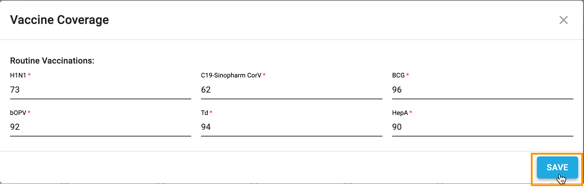
When finished, click “Save”. A green pop-up window with the message “Data updated successfully” should appear.
Repeat this process until the data for all vaccines and supply chain levels is completed.
- STEP 6 (optional). The values entered on the top table will be applied across all storage facilities. However, it is possible to edit values for specific locations as needed.
Locate the store for which you want to introduce the storage capacity data. You can do so by scrolling down the screen, or by selecting from the filtering menus on top of the hierarchy table.
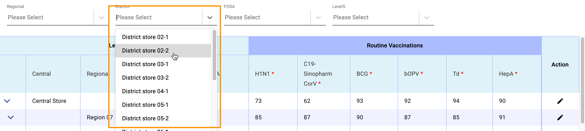
Click on the “Edit” button on the right column

Edit the expected coverage values for that location as needed. Then click “Save”
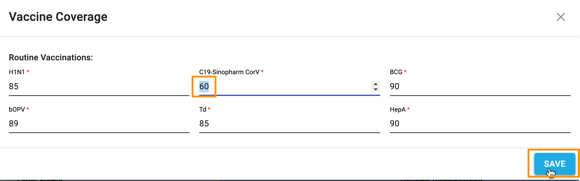
A green pop-up window with the message “Data Updated Successfully” should appear.
Verify that the updated data for that specific location is correctly reflected on the table.

Managing stock level & lead times parameters
This functionality allows administrators to set up the supply intervals, safety stock and lead times for each supply chain level. This value will serve for the calculation of minimum and maximum stock levels and will inform stock alerts. The information needs to be entered annually.
Note: Through this functionality, the user can set up generic values for each supply chain level. It is also possible to customize the values for the national level per vaccine, through the Program Data tab. Refer to section 4.2.1. Adding national program immunization targets for more details.
- STEP 1. Once you are logged into the application as a Country Administrator, go to “Store data” tab on the top menu and click on “Stock Levels & Lead Time”.

- STEP 2. From the dropdown menu on the right, select the year for which you want to introduce the data. Note that it is possible to set up values for the current year and for the following one. It is also possible to view data for past years, but the past data cannot be modified.

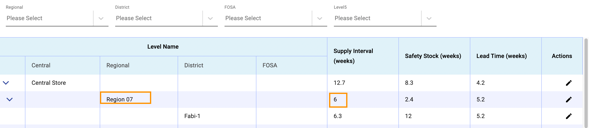
- STEP 3. On the table on top of the page, to enter the data for each supply chain level click the “Edit” button on the right column.
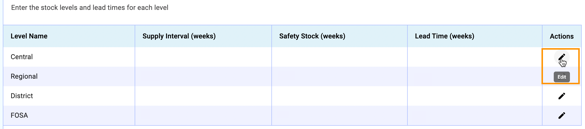
- STEP 3. Type the values for each supply chain level.
- Supply interval: Define the frequency of stock procurement or replenishment at each level (in number of weeks)
- Safety stock: Define the minimum quantity that should be always kept in storage as safety stock (in number of weeks) at each supply chain
- Lead time: Define the time (in weeks) that elapses between a store placing a vaccine order and the arrival of the stock, for each supply chain level

When finished, click “Save”. A green pop-up window with the message “Data updated successfully” should appear.
- STEP 4 (optional). The values entered on the top table will be applied across all storage facilities. However, it is possible to edit values for specific locations as needed.
Locate the store for which you want to introduce the data. You can do so by scrolling down the screen, or by selecting from the filtering menus on top of the hierarchy table.
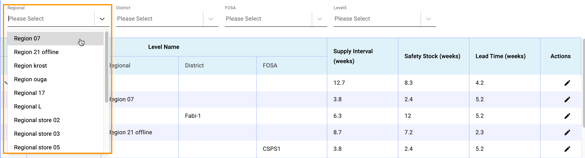
Click on the “Edit” button on the right column.

Edit the parameters for that location as needed. Then click “Save”.

A green pop-up window with the message “Data Updated Successfully” should appear.
Verify that the updated data for that specific location is correctly reflected on the table.
USERS
This functionality allows administrators to manage SMT access for other users. Administrators at national level can view and manage access for all users across the country, while administrators at subnational level can only view and manage access for users within their subnational area.
Viewing the user list
Administrators can monitor the full list of users that have access to the SMT, including the access level, user role and location of each. The data can be visualized on the SMT user screen and can also be exported in an Excel format.
- STEP 1. Once you are logged into the application as an Administrator, click on the “Users” tab on the top menu.

- STEP 2. From the tabs available on the Users screen, select the type of user list you want to review.
- Active: List shows all users with current access to the SMT platform in the country (or subnational area)
- Inactive: List shows users with past access to the SMT platform but currently deactivated by an administrator
- All users: Full list of active and inactive users
- Access requested: List of users whose access has been requested by the global administrator and is pending approval by the administrator at country level

- STEP 3. Use the navigation buttons to review the list and user details as needed
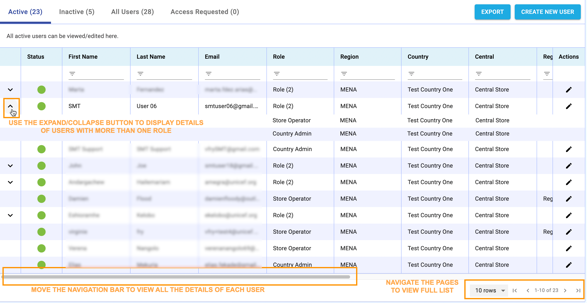
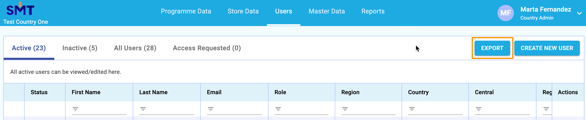
- STEP 4. If needed, export the user list in Excel format by clicking the “Export” button. This will export the list that the user is visualizing on the screen (i.e. active / inactive / all users /access requested)
Creating new user accounts
Administrators are responsible for creating accounts for other users within their own country, such as store operators and/or additional administrators. Subnational administrators can also create users within their respective locations.
- STEP 1. Once you are logged into the application as an Administrator, click on the “Users” tab on the top menu, then click on “Create new user”. A new user window will open.
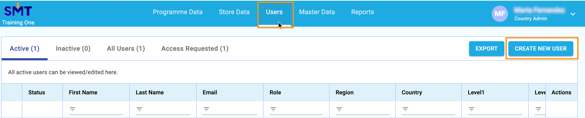
- STEP 2. Complete all the details of the user, such as the name, email address and the type of role the person will be assigned in the system, following the example below. You can assign up to 2 roles per user (e.g. national administrator AND national store operator).
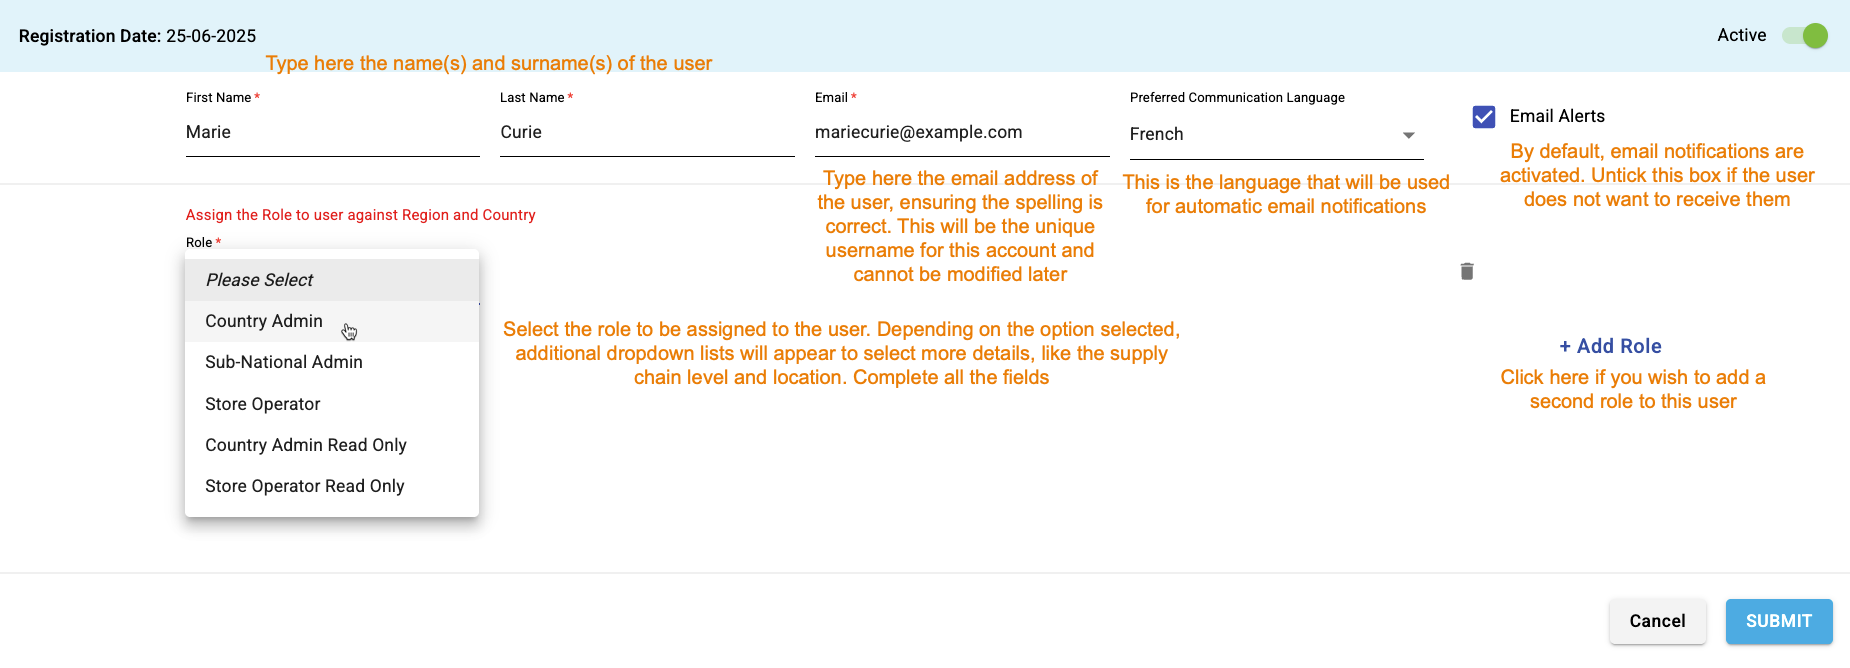
- STEP 3. After all the user details are completed, review that everything is correct and click “Submit”. A green pop-up window with the message “Data saved successfully” should appear. The user will receive an email notification with their account details (unless email notifications are deactivated).
- STEP 4. Verify that the new user account is now showing correctly on the user list.
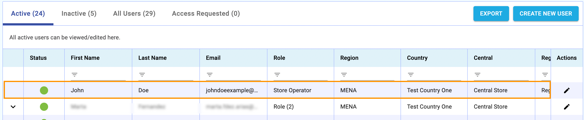
Managing user access requests
For some specific types of accounts, such as the “Read-Only Country Administrators”, it is possible to provide access to more than one country for the same user. This type of setup can be useful for WHO/UNICEF staff working at regional level who might need to have access to SMT data to provide technical support to multiple countries.
In this specific case, and under request, a multi-country read-only SMT account can be created at the global level, by the global administrators of the SMT platform. However, it remains the responsibility of the country administrators at local level to approve or reject access to the SMT data of their country, following the process below.
- STEP 1. When a global administrator requests access to your country’s SMT for a regional user, all the country administrators will receive an email notification with the information.
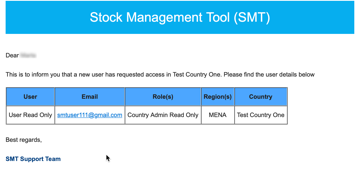
Review the account details and, if relevant, discuss and agree with the other country administrators if the read-only access should be granted to this user.
- STEP 2. On the SMT platform, log in as administrator, go to the Users tab and click on “Access Requested”. The details of all users pending approval will be listed here.
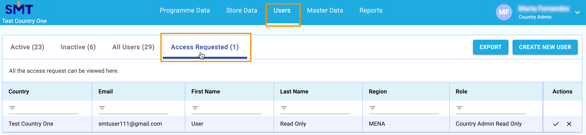
- STEP 3. Review the details of each account and follow the examples below to Approve OR Reject the access.
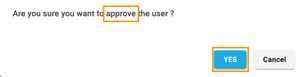
- Approve: If the user should have access to the SMT as a Read Only Country Administrator, the access request can be authorized by clicking on the “Approve” button on the right.

A pop-up will open asking the user to confirm. If you wish to continue with the approval, click “Yes”. Otherwise, cancel.
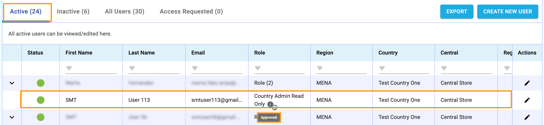
A pop-up window will show with the message “User approved successfully”.
Review that the user has moved from the “Access requested” to the “Active” list.
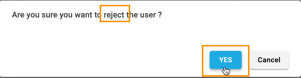
- Reject: If the user should NOT have access to the SMT as a Read Only Country Administrator, the access request can be denied by clicking on the “Reject” button.

A pop-up will open asking the user to confirm. If you wish to continue with the rejection, click “Yes”. Otherwise, cancel.
A pop-up window will show with the message “User rejected successfully”.
Review that the user has disappeared from the “Access requested” list.

Editing user accounts
Once a new user account has been created by a country administrator, it is possible to modify some of the details by using the editing functionality. This process can be carried out by the same user who created the account, or by any other user with administrator rights.
- STEP 1. On the user list, locate the user and click on the “Edit” action button on the right column.
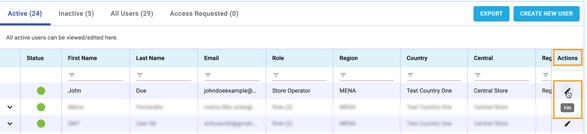
- STEP 2. On the user page, edit the account details as needed. To change the type of user role, remove the current role and assign a different one. Note that the email address field is grayed out, as this cannot be changed.
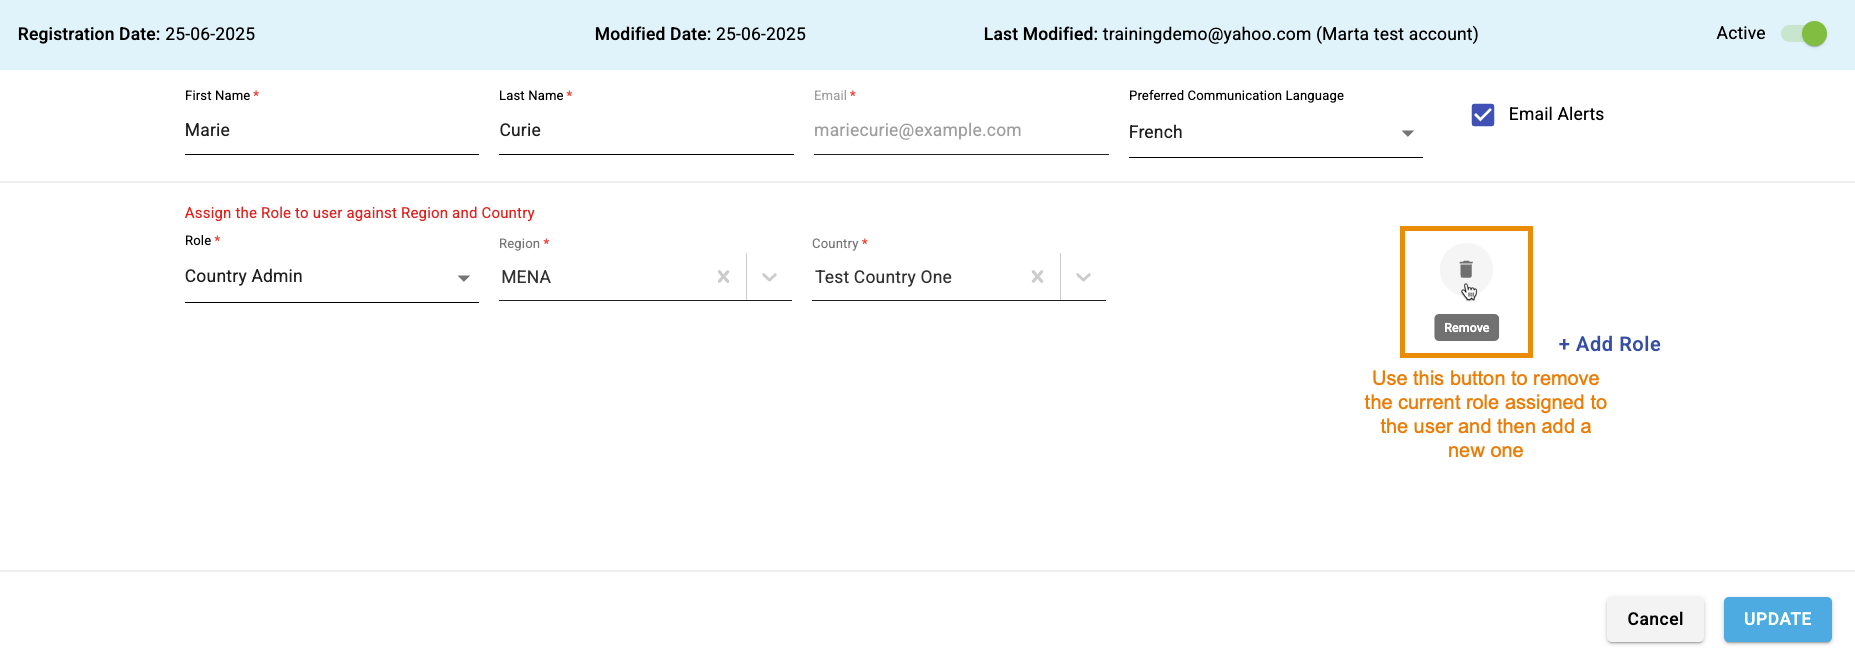
Note: Since the email address is not editable, if a user requests to have access with a different email, a separate account needs to be created.
- STEP 3. Verify that the new information entered is correct and when finished click “Update”. A green pop-up window with the message “Data updated successfully” should appear. The user will receive an email notification with the new details (unless mail notifications are deactivated).
- STEP 4. Verify that the user account with the updated details is showing correctly on the user list.
Deactivating user accounts
Once a new user account has been created by a country administrator, it is not possible to delete it. However, it is possible for the administrator to deactivate the account. Once the account is deactivated the user will no longer be able to access the SMT.
- STEP 1. On the user list, locate the user and click on the “Edit” action button on the right column.
- STEP 2. On the user page, click on the “Active” button to change the status.
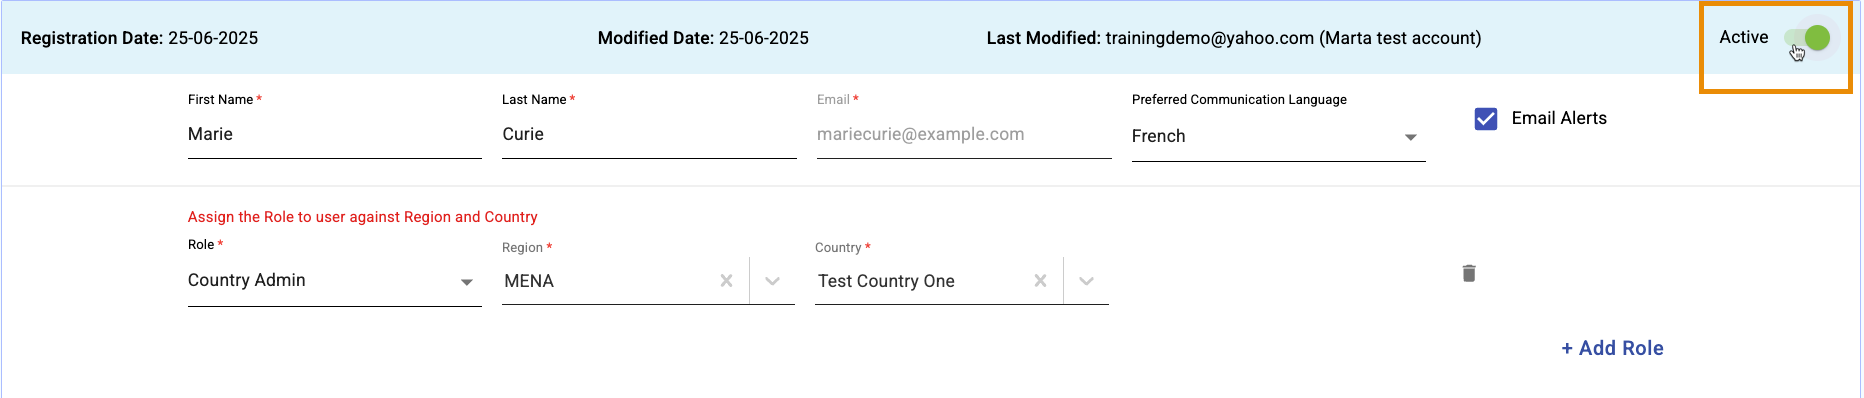
- STEP 3. Verify that the active status is now gray (inactive), then click “Update”.
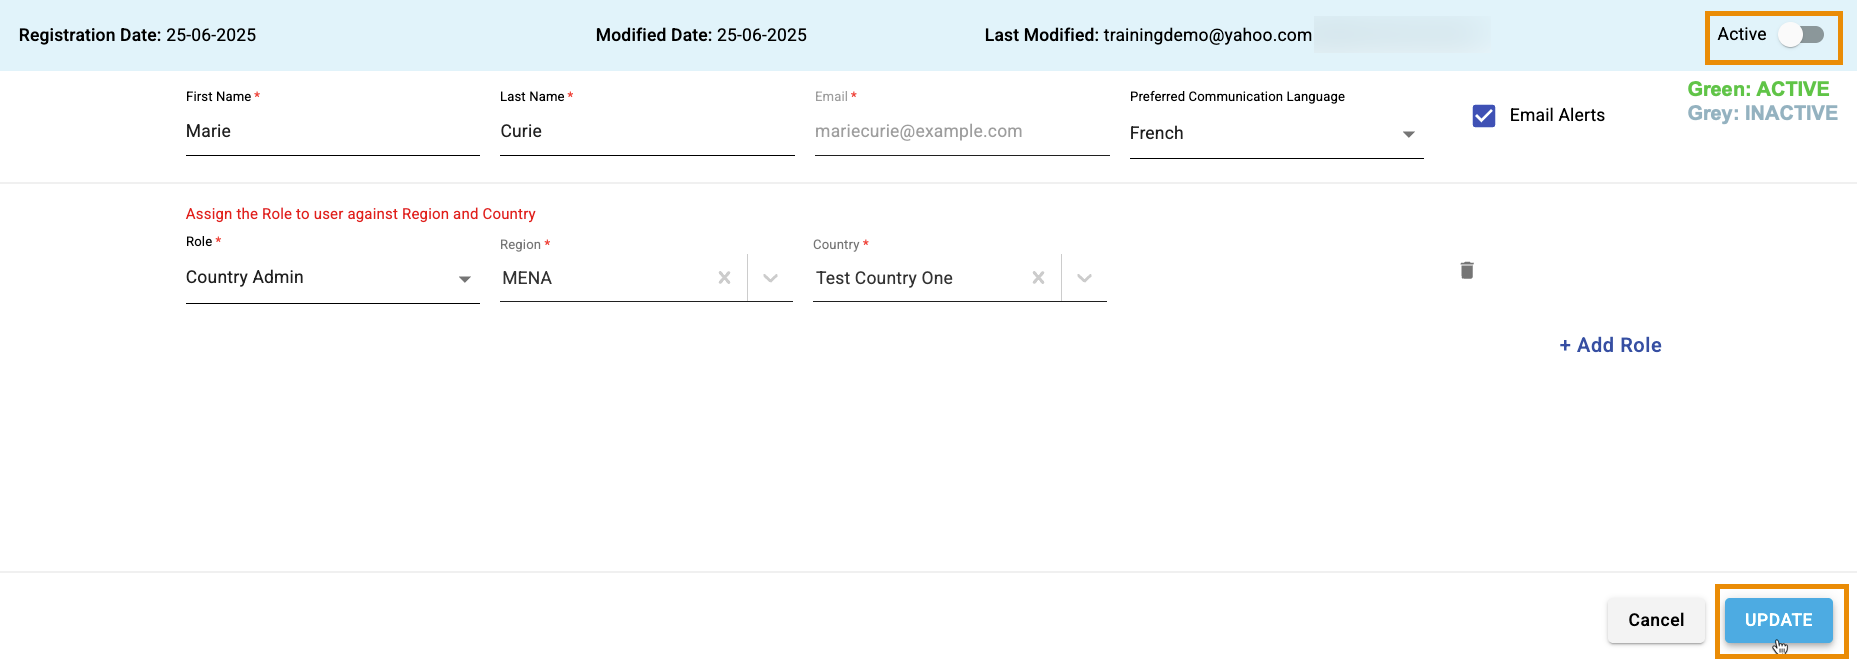
A green pop-up window with the message “Data updated successfully” should appear.
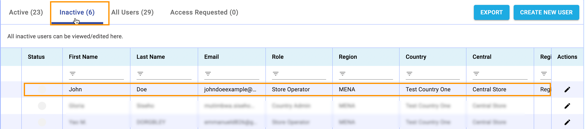
- STEP 4. Verify that the user account has been moved from the Active to the Inactive user list.
STORE OPERATOR FUNCTIONS
CONTENTS OF THIS CHAPTER:
5.6. PHYSICAL COUNT AND ADJUSTMENTS 114
This chapter describes the functionalities available to users with the role of “store operator”. Store operators can only manage the functionalities described within the vaccine store to which they are assigned. All the functionalities are the same for all operators at all supply chain levels.
The functionalities of the store operator can be accessed through the online SMT web application or through the offline SMT desktop application. The processes described in this chapter apply to both systems, except for “Automatic Arrivals” described on section 5.3.
For users accessing the SMT via the offline app, the data registered during each transaction will be saved in their local computer. Offline users must synchronize their data when they have access to an internet connection. For more details on this, refer to section 2.6 How to synchronize the offline app.
STOCK OVERVIEW
The stock overview is the functionality that allows store operators to have a general overview of all the items in stock in their vaccine store, at any given time. It is a read-only screen intended to provide information on the current status of stocks, but no data can be entered through this screen. The overview gets updated every time a transaction of supplies is logged from the arrivals, issuing or physical count and adjustment functionalities.
Note: If the stock overview is blank, it means that no transactions have been registered yet for this vaccine store. Refer to the next sections of this chapter to know how to register stock movements.
- STEP 1. Access the SMT as a store operator. The stock overview will be the landing page after you log in. You can return to it at any time by clicking on the “Stock Overview” tab on the top menu.

- STEP 2. On the left table, scroll down to see all products available on the vaccine store. The products are divided into 3 categories (vaccines / diluents / supplies) and arranged alphabetically within each category.
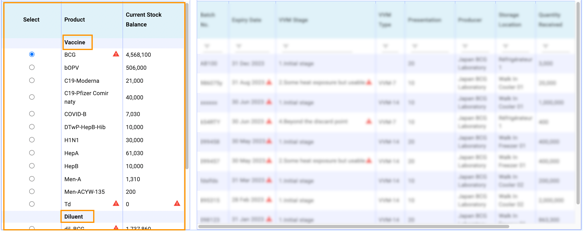
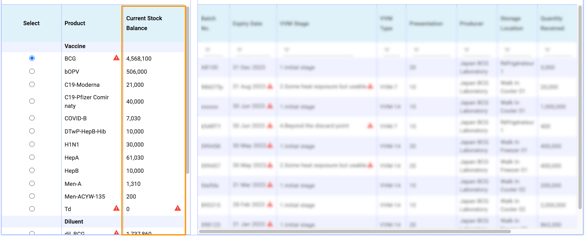
On the third column, the current stock quantity of each item is displayed (in doses for vaccines and diluents, in units or pieces for supplies). This figure represents the total quantity available of that product (i.e. a sum of all available batches of the product).
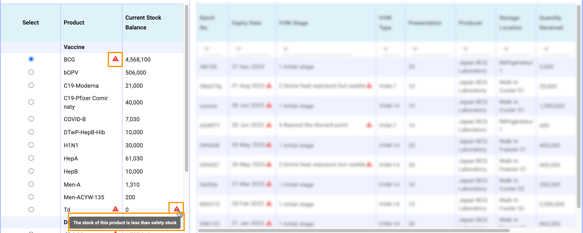
The red triangle represents a stock alert. There are 3 conditions that trigger stock alerts:
- The expiry date of one or more batches is less than 90 days
- The VVM stage of one or more batches is not initial state
- The total quantity of the product is below recommended safety level
Alerts related to expiry or VVM are displayed next to the product name. If the alert is related to the total stock quantity, the red triangle will display next to the stock level value.
Note: Alerts related to stock quantity will only be calculated if the product has been entered by the administrator as part of the immunization program for the year, and if all necessary parameters such as population data and estimated coverage are completed. Likewise, products with stock zero will only display on this screen if the products are registered as part of the immunization program targets for the year on the Program Data. Refer to chapter 4. Administrator functions for more details.
- STEP 3. To obtain more detailed information of one specific product, use the “Select” button. The details of all batches available for that product will be displayed on the table on the right.
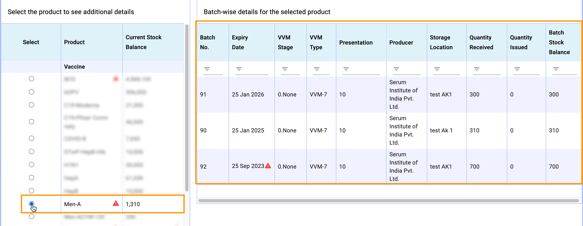
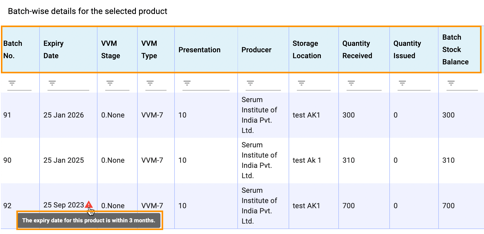
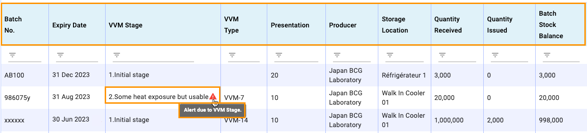
The table on the right allows the store operator to review the details of each batch available, such as batch number, expiry date, VVM type and stage, presentation (in doses per vial), producer or manufacturer, storage location within the vaccine store, and quantities (total received, total issued, current batch balance). This view also includes the details of batch-level alerts.
Example of expiry date alert
Example of VVM alert
STORAGE AND EQUIPMENT
This functionality provides information on key stock management parameters and allows operators to manage the space available for the storage of vaccines and other supplies.
Understanding the Storage and Equipment screen
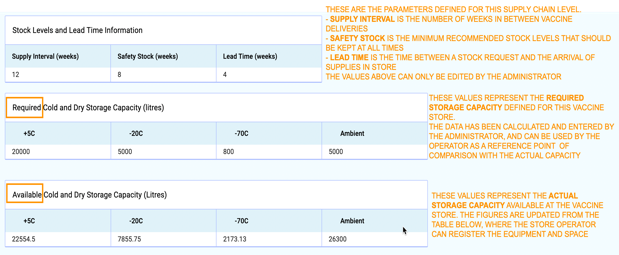
The Storage and Equipment screen is divided into 2 main parts. The top part of the screen is read-only and allows the store operator to review some key parameters. The bottom part of the screen is the functionality that allows the user to register storage space.
- STEP 1. Access the SMT as a store operator. Click on the “Storage and Equipment” tab on the top menu.

Part 1: Reference values (read-only)
Part 2: Storage space management (data entry)
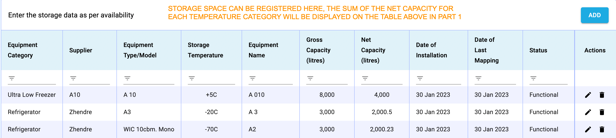
Refer to the following sections of this chapter for more information on how to manage storage space on this screen.
Registering storage space
To set up a vaccine store in the SMT, the first step for the store operator is to define the storage space available for vaccines and other immunization supplies. This is a pre-requisite for the registration of stock transactions such as arrival or issues.
- STEP 1. Access the SMT as a store operator and click on the “Storage and Equipment” tab on the top menu.

- STEP 2. Scroll down to the bottom of the page to see the list of already registered storage space. If no storage space has been registered yet, the list will be empty and the values on the table above it (available capacity in liters) will show zero.
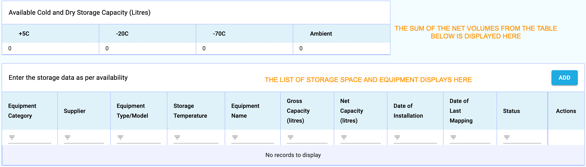
- STEP 3. To register a new equipment or space, click on the “Add” button on the right corner.

- STEP 4. On the pop-up window, enter the details of the equipment or space, following the example below.
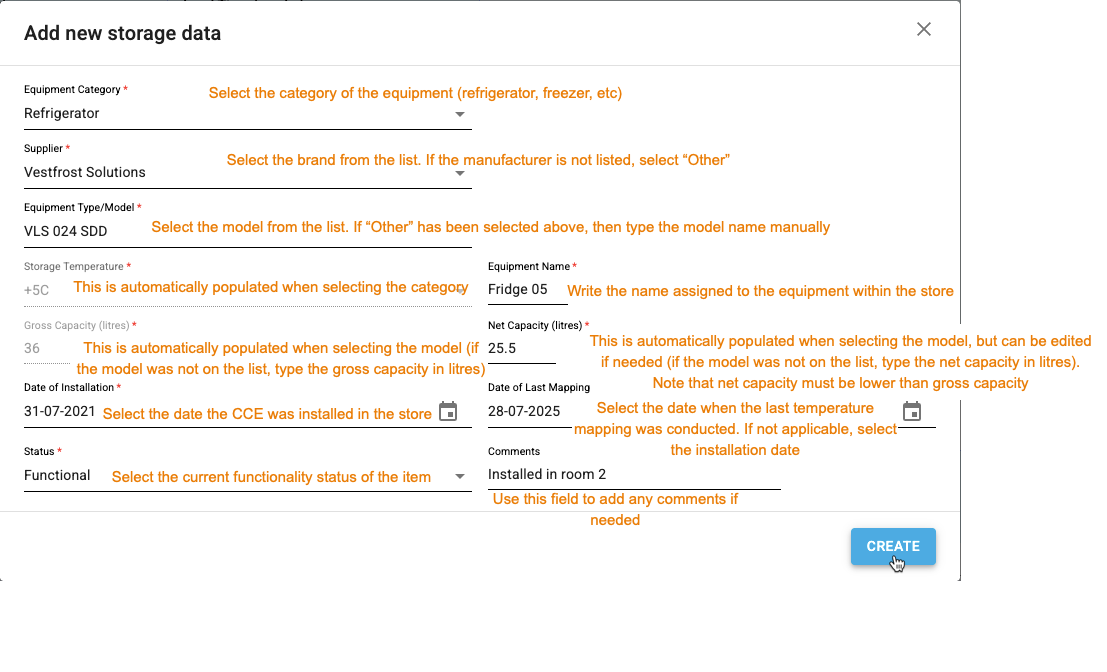
When all the details are completed, click “Create”. A green pop-up with the message “Data saved successfully” should appear.
- STEP 5. Verify that the new equipment shows on the list, and that the table above with the available capacity in liters has been updated accordingly.
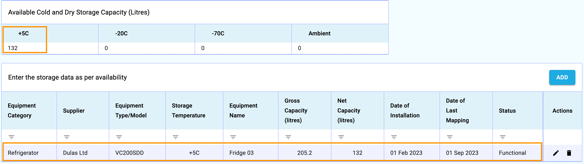
- STEP 6. Repeat the process until all the cold chain equipment and dry storage available in your vaccine store has been registered.
Editing storage space
Once a cold chain equipment or storage space has been registered, it is possible to modify its details using the editing functionality. Store operators can use this functionality to assign a different identifying name to the equipment, to change the net capacity when baskets or shelves are rearranged, or to change the functionality status when needed, for example.
- STEP 1. Access the SMT as a store operator and click on the “Storage and Equipment” tab on the top menu.

- STEP 2. Scroll down to the bottom of the page to see the list and review the details of already registered storage space. By default, the table will show 5 rows, if needed, use the navigation buttons on the bottom right corner to display more rows or advance to the next page to view more items.
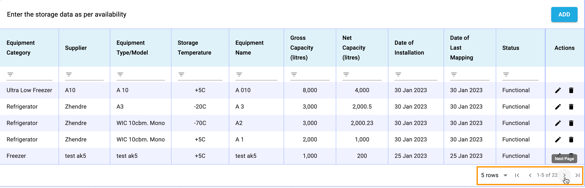
- STEP 3. Locate the item whose details need to be modified and click the “Edit” button on the right column.
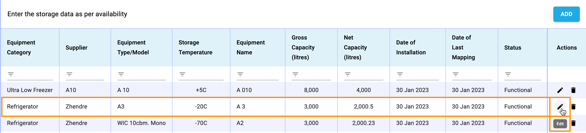
- STEP 4. On the pop-up window, edit the necessary details (for example, to change functionality status to “non functional” or to “decommissioned”).
Note that, in order to change functionality status to “decommissioned”, the CCE must not be in use.
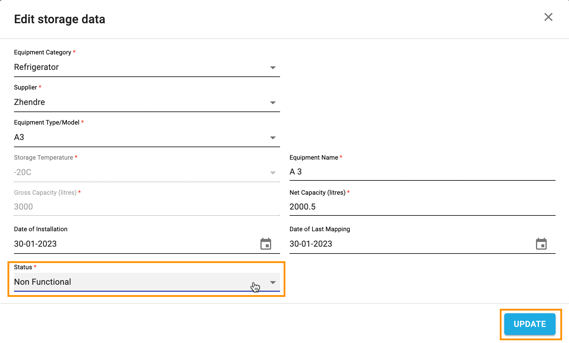
When finished, click “Update”. A green pop-up with the message “Data updated successfully” should appear.
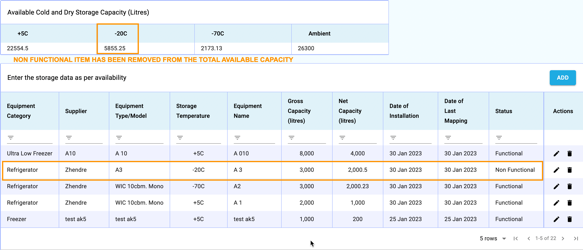
- STEP 5. Verify that the new information shows correctly on the list. If the edit involves a change on net capacity or functionality status, verify that the table above with the total available capacity in liters has been updated accordingly.
If the item has been listed as “Decommissioned”, it will completely disappear from the list of available storage space on this screen. However, it will still show on the CCE inventory report.
Deleting storage space
Once a cold chain equipment or storage space has been registered, it is possible to remove it from the list by using the delete functionality.
- STEP 1. Access the SMT as a store operator and click on the “Storage and Equipment” tab on the top menu.
- STEP 2. Scroll down to the bottom of the page to see the list and review the details of already registered storage space. By default, the table will show 5 rows, if needed, use the navigation buttons on the bottom right corner to display more rows or advance to the next page to view more items.
- STEP 3. Locate the item that needs to be removed from the list and click the “Delete” button on the right column.
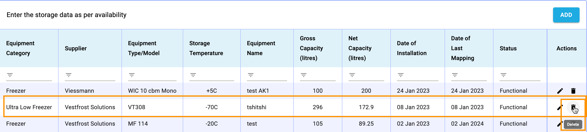
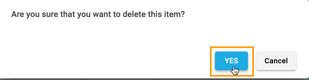
- STEP 4. The SMT will ask for confirmation to continue. If you wish to proceed with the deletion process, click “Yes”, otherwise cancel.
A green pop-up with the message “Data deleted successfully” should appear.
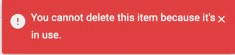
Note: It is only possible to delete storage space when it is not yet in use. For example, if the item has been registered twice by mistake, it is possible to delete the duplicate. However, if the item is already in use within the SMT for the storage of supplies, it can no longer be deleted, and the following message will appear.
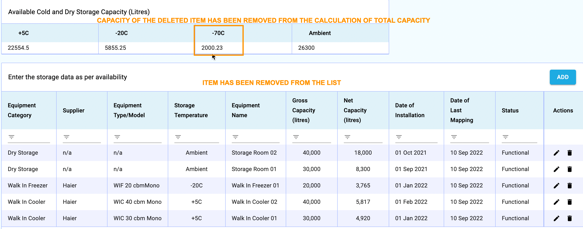
- STEP 5. Verify that the deleted item has been removed from the list. Verify that the table above with the total available capacity in liters has been updated accordingly.
ARRIVALS
Arrivals is the functionality that allows store operators to register and monitor positive stock transactions (i.e. stock entries) in their vaccine store. Under the screen called “arrivals” on the SMT the user will find 3 types of transactions:
- Entries of available starting balance when setting up the SMT
- Entries of new stock into the store (arriving from the supplier or another store)
- Entries of stock surplus found after a physical count
This section 5.3. describes how to operate in the first and second scenarios. For more information on how to operate when finding surplus of stock during a physical count, refer to section 5.6. Physical count and adjustments.
Understanding the arrivals screen
The arrivals screen allows SMT store operators to review the full log of all arrival transactions registered in their vaccine store.
Note: If the user is accessing the online SMT via the web app, this screen will show in real time all the transactions registered by themselves or any other store operator within the same vaccine store.
For the users assigned to offline stores and accessing the SMT via the desktop app, they will only see their own transactions until they synchronize the data. If multiple operators are working offline in the same location, it is important to coordinate data entry activities and to synchronize the data frequently to avoid duplication of transactions.
- STEP 1. Access the SMT as a store operator. Click on the “Arrivals” tab on the top menu.

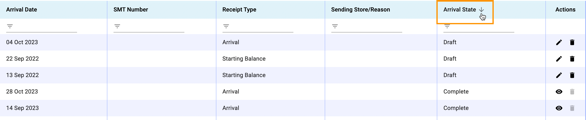
- STEP 2. Scroll down to see the list of arrivals. By default, the transactions are arranged by date, but it is possible to sort them by Arrival State (for example, to see first any draft items).
If needed, use the navigation buttons on the bottom right corner to advance to the next page and see more transactions.
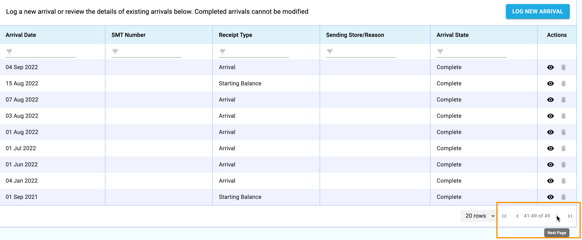
- STEP 3. Review the different details of each transaction
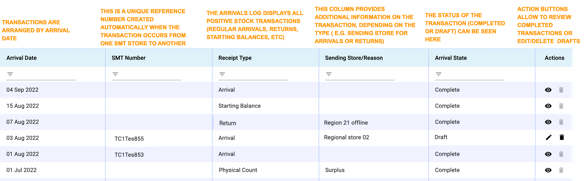
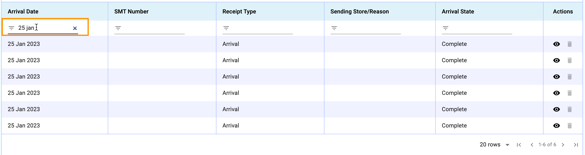
If needed, use the search and filter fields on top of the table to look for specific transactions (e.g. by date, by reference number, by type, etc.)
- STEP 4. Use the view button to open the transaction and review each product line within the arrival.
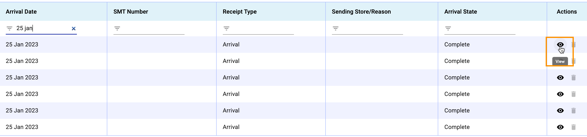
Review the details of each product lines for more information on what was on the arrival.
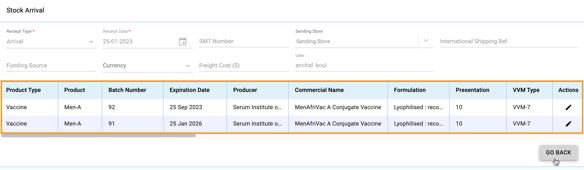
Note: It is also possible to review the full log of arrival transactions through the reports’ functionality. Refer to section 6.1. Arrival reports for more information.
Registering new arrivals (manual process)
The manual arrival functionality allows operators to register the details of new products on their vaccine store. It can be used to:
- Register the starting balance of products when using the SMT for the first time
- Register the physical arrival of products from a store not using the SMT (e.g. arrival of supplies in the national store from the international supplier)
- Register the arrival of products when either the issuing or receiving store is using the offline SMT application.
Note: When both issuing and receiving stores are using the online SMT application, the details of products arriving will be seen automatically by the receiving store once the issuing store has registered the transaction. This process is called “automatic arrivals” and is described in section 5.3.3.
|
Manual processing of arrivals |

- STEP 1. Access the SMT as a store operator. Click on the “Arrivals” tab on the top menu.
- STEP 2. Review the list of arrivals already registered to avoid creating duplicates. If the transaction is not on the list and you want to register it, click on the “Log New Arrival” button.

- STEP 3. On the new window, complete the transaction details. The fields Receipt Type and Receipt Date are mandatory, the other fields are optional and can be completed for future reference or left blank.
(1/2)
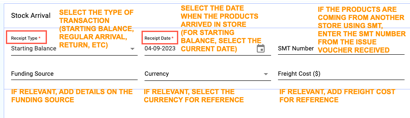
(2/2)
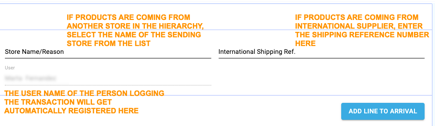
- STEP 4. After the generic details have been completed, click on “Add Line to Arrival”.
- STEP 5. Enter the details of each product on the arrival, following the example below. Some of the fields such as product type, name etc. are linked to the master data, and the user must select from a given list of options. Other fields like the batch number or quantity are open and the user must type the information.
The fields marked in red are mandatory. The rest of information is optional and can be completed for reference or left blank.
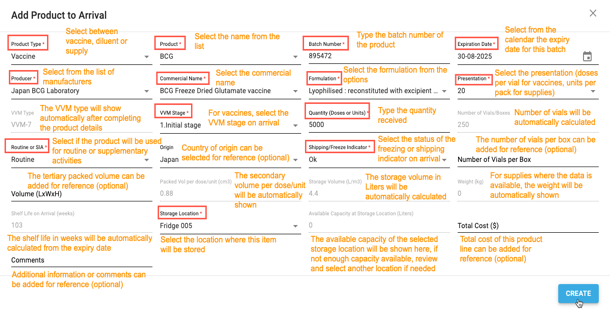
- STEP 6. Once all the relevant information has been completed, click on “Create”. To minimize data entry errors and alert of potential stock risks, a warning message will be shown under certain conditions, such as short expiry date, advanced VVM stage, alert shipping indicator or insufficient storage capacity.
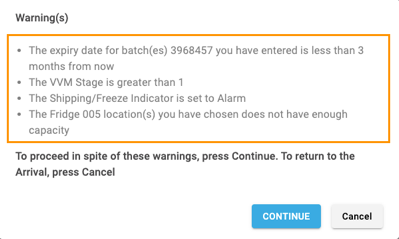
If any of these warning messages are shown, click on the “Cancel” button to go back and review the information to ensure no data entry errors have been made and to make any necessary changes. If all the information is correct, click on “Continue” to register the product line.
- STEP 7. Repeat the Steps 4-6 until all the product lines have been registered. Note that if the arrival contains different batches of the same product, each batch must be registered as a separate product line.
- STEP 8. After entering all the product lines have been correctly registered, the transaction is ready to be saved.
Click on “Save as a draft and go back” if you wish to save the information but want to be able to edit it at a later stage. The data will be saved on the arrivals screen, but the new products will not be registered on the stock while the transaction is on draft stage.
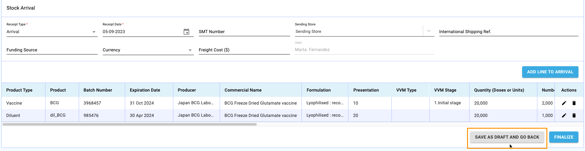
Click on “Finalize” if you are sure that all information entered on the new arrival is correct and you want the stock levels of your vaccine store to be updated accordingly. Once a transaction has been finalized, the data cannot be edited or deleted.
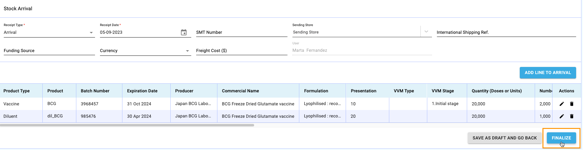
- STEP 9. On the arrivals main screen, verify that the new transaction that you have registered has been added to the arrivals list with the correct status (i.e. Draft or Completed).

Remember that while the arrival stays in draft mode it can still be modified. However, the stock details will not be updated on the stock overview until the transaction is finalized and marked complete.
- STEP 10. If the transaction is completed, click on “Stock overview” to verify that the arrival of products is correctly reflected on the stock of your vaccine store.
Registering new arrivals (automatic process)
The automatic arrival functionality allows operators to review and approve the registration of new products coming from another store using the SMT. It can be used to:
- Register the arrival of products when both the issuing AND receiving store are using the online SMT application.
Note: This process only works for transactions between vaccine stores using the online SMT web app. For other types of transactions, manual processing of arrivals is required. Refer to section 5.3.2 for more detail.
|
Automatic processing of arrivals |
- STEP 1. To review and register an automatic arrival in your online SMT store, another online SMT store must have first issued supplies to you using the SMT Issuing functionality. Refer to section 5.4. Issuing for more information.
Once another online store has issued supplies to your online store, you will see a notification on the top right corner of the screen, next to our username. Click on the bell icon to open.

On the notification panel, the date and reference number of each arrival will be shown. Click on the relevant SMT number to open the arrival and review the details.

Note that the notifications disappear once they have been read. If you cannot find the relevant transaction on the notifications panel, it is also possible to retrieve the automatic arrivals directly on the arrival screen, searching for “pending” transactions and clicking on the “Edit” button.

- STEP 2. Once the transaction is opened, you will be able to see the details completed by the sending store. However, some information needs to be completed by you (the receiving store) before saving the transaction. Select the type of arrival (e.g. regular arrival, emergency, return, others) and, if needed, edit the receipt date.
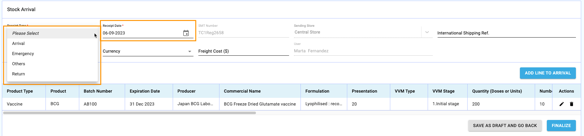
- STEP 3. Scroll down to see the list of products completed by the sending store. For each product line, click on the “Edit” button to open.
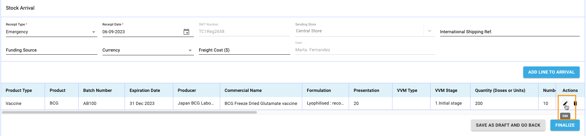
- STEP 4. Verify the information on the screen against the physical product received to ensure that everything matches. In case of any discrepancies, manually correct the information.
After verifying all data, select the Storage Location where the item will be stored.
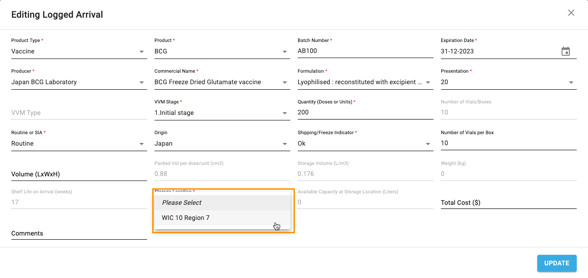
- STEP 5. Click on the “Update” button to register the changes.
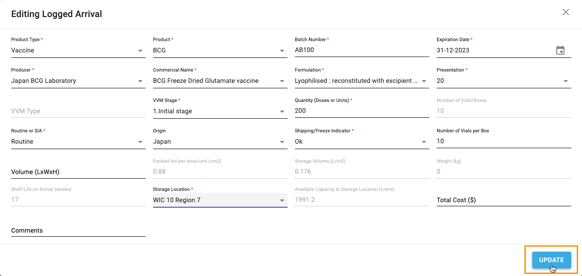
Under certain conditions (i.e. short expiry date, advanced VVM stage, alert shipping indicator or insufficient storage capacity) a warning message will be shown under certain conditions.
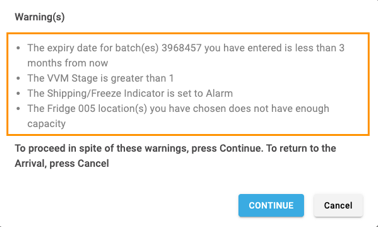
If any of these warning messages are shown, click on the “Cancel” button to go back and review the information, or click on “Continue” to register the product line if all the information is correct.
- STEP 6. Repeat the process with each product line, to ensure that the details entered by the sending store match what has been received, and that the storage location of each product is registered correctly. Once finished, the arrival is ready to be saved.
Click on “Save as a draft and go back” if you wish to save the information but want to be able to edit it at a later stage. The data will be saved on the arrivals screen, but the new products will not be registered on the stock while the transaction is on draft stage.
Click on “Finalize” if you are sure that all information entered on the new arrival is correct and you want the stock levels of your vaccine store to be updated accordingly. Once a transaction has been finalized, the data cannot be edited or deleted.
- STEP 7. On the arrivals main screen, verify that the new transaction that you have registered has been added to the arrivals list with the correct status (i.e. Draft or Completed).
Remember that while the arrival stays in draft mode it can still be modified. However, the stock details will not be updated on the stock overview until the transaction is finalized and marked complete.
- STEP 8. If the transaction is completed, click on “Stock overview” to verify that the arrival of products is correctly reflected on the stock of your vaccine store.
Editing arrivals
If an arrival transaction has been saved as a “Draft”, it is possible to retrieve it and modify its details. Once an arrival has been finalized and is registered as “Complete” it can no longer be edited. However, it is possible to add notes and comments to it.
Note: For online SMT, store operators can see and edit transactions entered by themselves and other operators from the same store. For offline SMT, each operator will only be able to see and modify their own transactions, until each user completes synchronization with the online system.
- STEP 1. Log in as a store operator and click on the “Arrivals” tab to see the list of previously registered transactions.

- STEP 2. Scroll down, use the page navigation buttons or the filtering option to locate the draft transaction you want to modify. Then click the “Edit” button on the right.

If the transaction is already marked as complete, the edit button will not be available. Click on the “View” button instead.

- STEP 3. On the transaction screen, review the arrival details and modify them as needed. To review and modify specific product lines, click on the “Edit” button of each line.
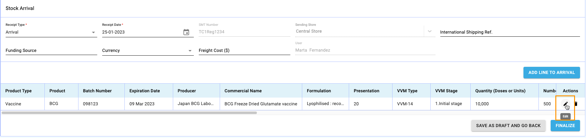
- STEP 4. Edit the details of each product line as needed, then click “Update” when finished.
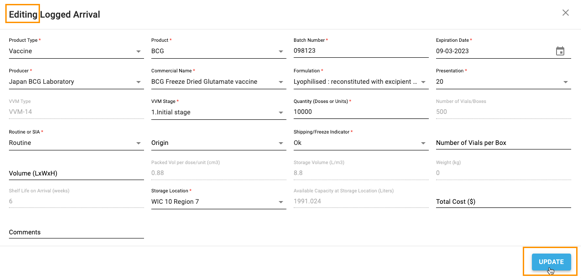
For “draft” transactions, all details can be edited and updated. For transactions with status “complete”, only notes and comments can be added.
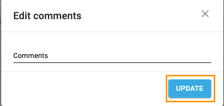
- STEP 5. After the updates have been made, click on “Finalize” to complete the transaction. (or save again as draft if more modification will be needed).
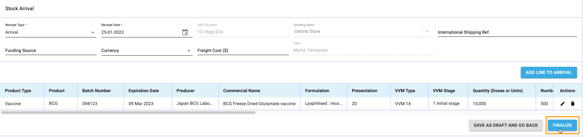
- STEP 6. On the arrivals main screen, verify that the edited transaction is now showing on the arrivals list with the correct status.
- STEP 7. If the transaction is completed, click on “Stock overview” to verify that the arrival of products is correctly reflected on the stock of your vaccine store.
Deleting arrivals
If an arrival transaction has been saved as a “Draft”, it is possible to retrieve it and delete it fully or partly. Once an arrival has been finalized and is registered as “Complete” it can no longer be deleted.
Note: For online SMT, store operators can delete draft transactions entered by themselves and other operators from the same store. For offline SMT, each operator will only be able to see and delete their own draft transactions, until each user completes synchronization with the online system.
- STEP 1. Log in as a store operator and click on the “Arrivals” tab to see the list of previously registered transactions.

- STEP 2. Scroll down, use the page navigation buttons or the filtering option to locate the draft transaction you want to delete.

- STEP 3
- To completely delete the draft transaction, click the “Delete” button on the right.

Note: if the transaction is already marked as complete instead of draft, the delete button will not be available.
- To delete only specific product lines, click on the “Edit” button first.

then click the “Delete” button on the product line.
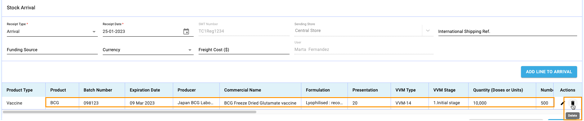
- STEP 4. After clicking on the delete button the SMT will ask for confirmation. Click on the “Yes” button to continue with the deletion process, otherwise cancel.
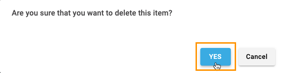
A green pop-up window with the message “Data deleted successfully” should appear.
- STEP 5. On the arrivals main screen, verify that the deleted transaction has been removed from the list.
ISSUING
Issuing is the functionality that allows store operators to register and monitor negative stock transactions (i.e. stock exits) in their vaccine store. Under the screen called “issuing” on the SMT the user will find 3 types of transactions:
- Exits of stock being issued to another store
- Exits of stock due to wastage
- Registration of stock found missing during a physical count
This section 5.4. describes how to operate in the first and second scenarios. For more information on how to operate when finding missing stock during a physical count, refer to section 5.6. Physical count and adjustments.
Understanding the issuing screen
The issuing screen allows SMT store operators to review the full log of all issuing transactions registered in their vaccine store.
Note: If the user is accessing the online SMT via the web app, this screen will show in real time all the transactions registered by themselves or any other store operator within the same vaccine store.
For the users assigned to offline stores and accessing the SMT via the desktop app, they will only see their own transactions until they synchronize the data. If multiple operators are working offline on the same location, it is important to coordinate data entry activities and to synchronize the data frequently to avoid duplication of transactions.
- STEP 1. Access the SMT as a store operator. Click on the “Issuing” tab on the top menu.

- STEP 2. Scroll down to see the list of issuing transactions. By default, the transactions are arranged by date, but it is possible to sort them by Issue State (for example, to see first any draft items). It is also possible to filter by date and issue state.

If needed, use the navigation buttons on the bottom right corner to advance to the next page and see more lines.
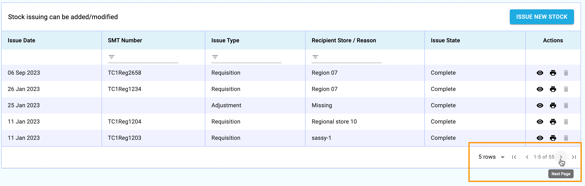
- STEP 3. Review the different details of each transaction
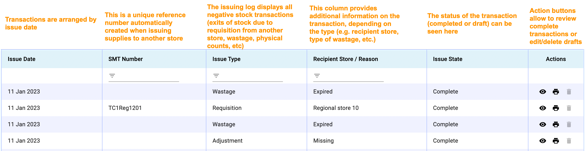
If needed, use the search and filter fields on top of the table to look for specific transactions (e.g. by date, by reference number, by type, etc.)
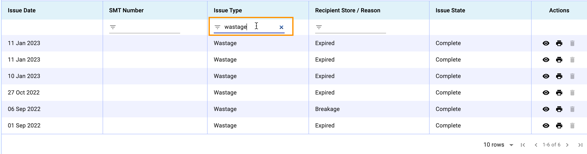
- STEP 4. Use the view button to open and review the products and additional details of the transaction.

Review the details of each product line for more information on what was issued out.
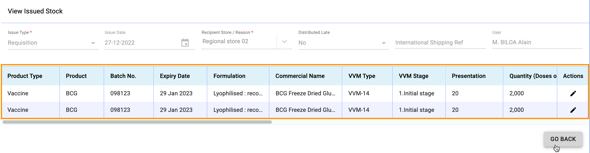
Note: It is also possible to review the full log of issuing transactions through the reports’ functionality. Refer to section 6.2. Issuing reports for more information.
Registering distribution of supplies to other stores
The issuing functionality allows operators to register the details of products that have been taken out of their vaccine stock. It can be used to:
- Register the distribution of products to another store (e.g. requisition from a lower store)
- Register products being discarded as wastage (e.g. due to expiry, VVM change, etc)
This section describes the process of sending supplies to another store. The process of registering wastage is described in section 5.4.4. Registering wastage.
- STEP 1. Access the SMT as a store operator. Click on the “Issuing” tab on the top menu.
- STEP 2. Review the list of issues already registered to avoid creating duplicates. If the transaction is not on the list and you want to register it, click on the “Issue New Stock” button.

- STEP 3. On the new window, select “Requisition” as the issue type and then complete the rest of transaction details. The fields Issue Type, Issue Date and Recipient Store, in red, are mandatory, the other fields are optional and can be completed for future reference or left blank.
(1/2)
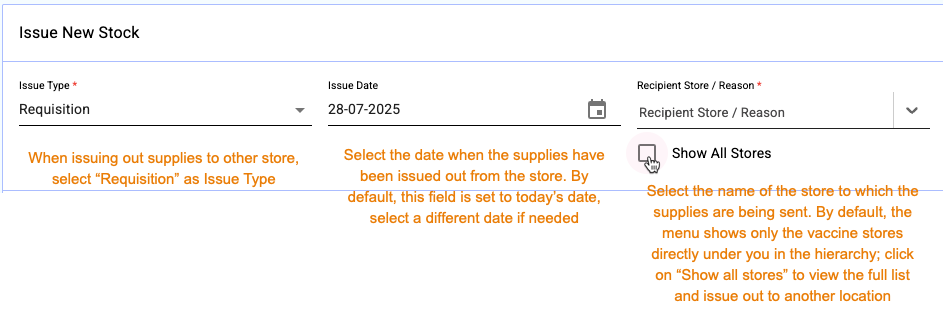
(2/2)
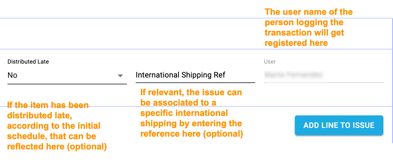
- STEP 4. After the generic details have been completed, click on “Add Line to Issue”.
- STEP 5. Enter the details of each product on the issue, following the example below. The product type, name and batch number are linked to the list of stock available in your store, so you must select from a given list of options.
The fields marked in red are mandatory.
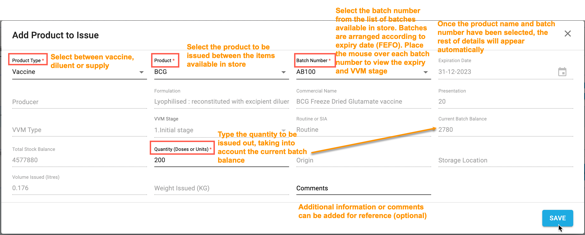
- STEP 6. Once all the relevant information has been completed, click on “Save”. To minimize data entry errors and alert of potential stock risks, a warning message will be shown under certain conditions, such as short expiry date, advanced VVM stage, or low stock.
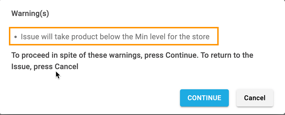
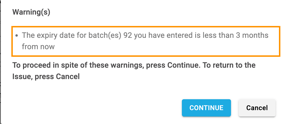
If any of these warning messages are shown, click on the “Cancel” button to go back and review the information to ensure no data entry errors have been made and to make any necessary changes. If all the information is correct, click on “Continue” to register the product line.
Note: If the user tries to issue stock that is already expired or has VVM stage unusable using “requisition” as issue type, the transaction will be blocked. Such items can only be registered using “wastage” as issue type.
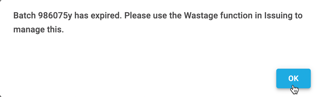
- STEP 7. Repeat the Steps 4-6 until all the product lines have been registered. Note that if the transaction contains different batches of the same product, each batch must be registered as a separate product line.
- STEP 8. After entering all the product lines have been correctly registered, the transaction is ready to be saved.
Click on “Save as a draft and go back” if you wish to save the information but want to be able to edit it at a later stage. The data will be saved on the issuing screen, but the products will not be subtracted from the stock while the transaction is on draft stage.
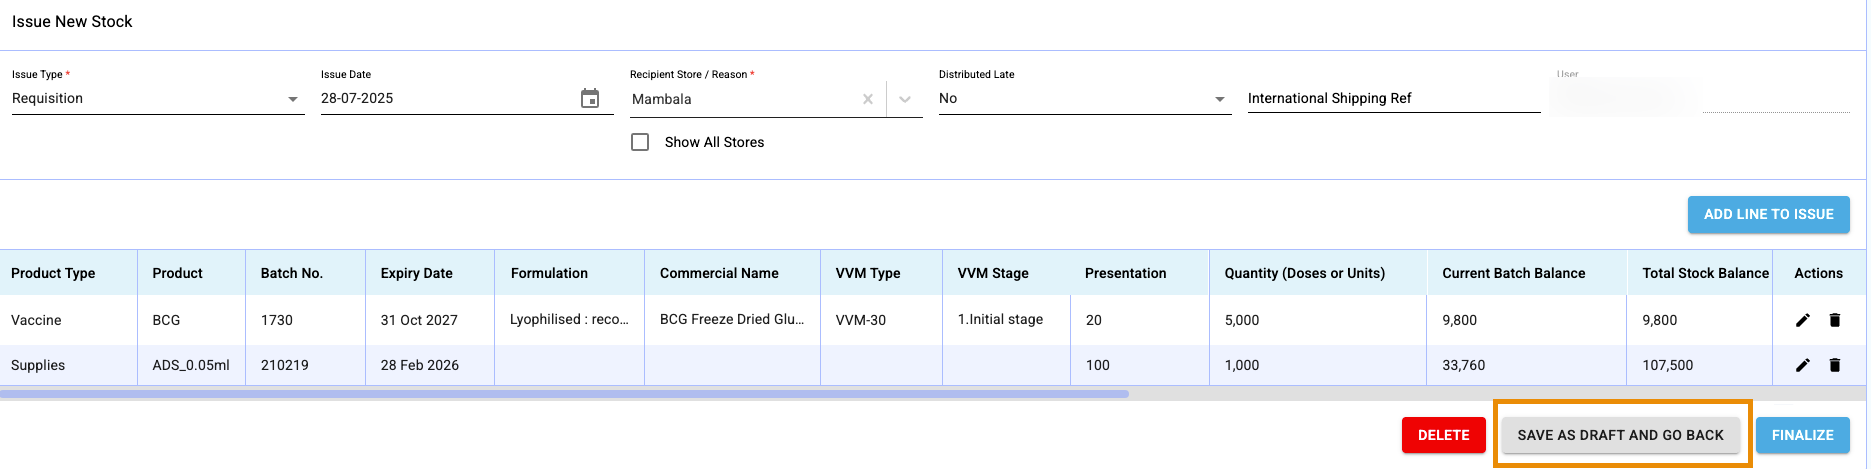
Click on “Finalize” if you are sure that all information entered on the issue screen is correct and you want the stock levels of your vaccine store to be updated accordingly. Once a transaction has been finalized, the data cannot be edited or deleted.
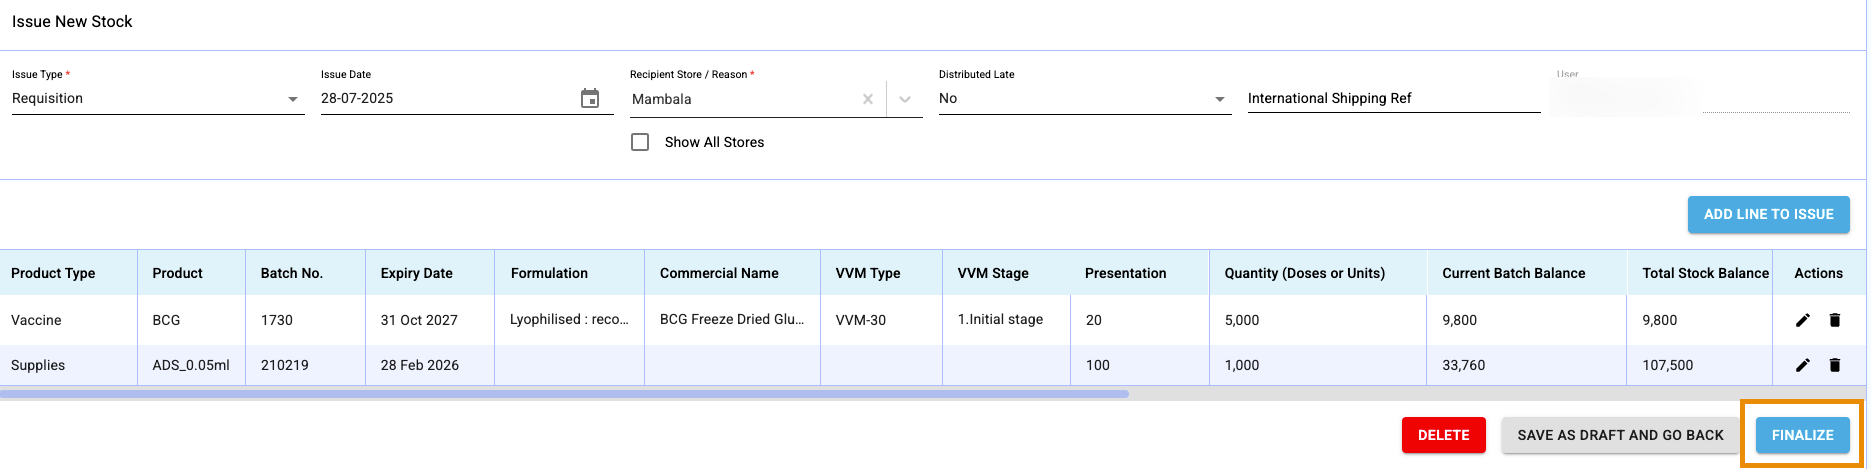
If the lines entered are incorrect and/or you want to completely cancel the transaction and not save any data, click on the ”Delete” button. Note that the data cannot be recovered after this action.
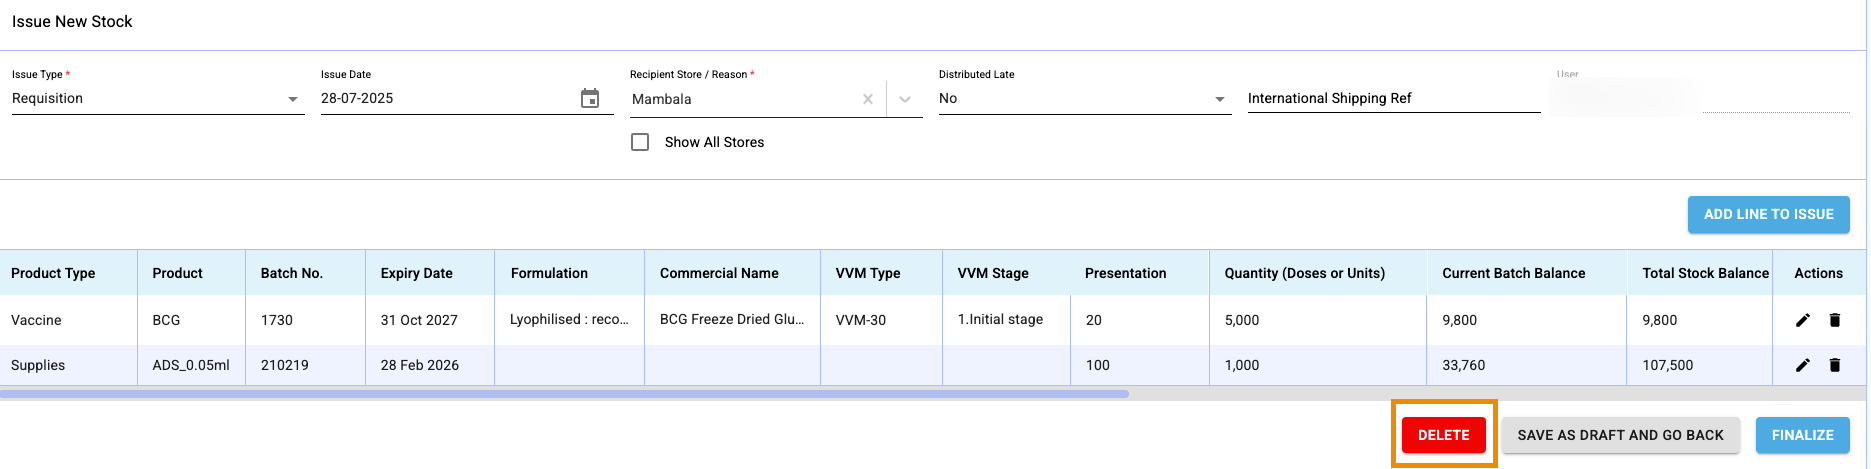
- STEP 9. On the Issuing main screen, verify that the transaction that you have registered has been added to the list with the correct status (i.e. Draft or Completed).

Remember that while the transaction stays in draft it can still be modified. However, the stock levels will not be updated until the transaction is finalized and marked complete.
- STEP 10. If the transaction is completed, click on “Stock overview” to verify that the product exit has been correctly reflected and the stock levels of your vaccine store are updated accordingly.
Note: If you are using the online SMT app and sending supplies to another store using the online SMT app, once the issuing transaction has been finalized, the recipient store will receive a notification with the details you have just registered.
Printing issue vouchers
To facilitate preparation of supplies for distribution as well as tracking of goods, the SMT offers the option to print an issue voucher.
For stores with long lists of supplies to be prepared for distribution, it is recommended that the issue vouchers are printed when the transactions are in draft mode, as pick and pack lists. Once the items are prepared and it has been confirmed that the items packed match what was on the list, the draft transaction can be finalized on the SMT and the final issue voucher printed, signed, and attached to the supplies, as a waybill.
- STEP 1. Log in as a store operator and click on the “Issuing” tab to see the list of transactions.

- STEP 2. Scroll down, use the page navigation buttons or the filtering option to locate the draft transaction you want to print. Then click the “Print Issue” button on the right.

- STEP 3. Review the details on the issue voucher and click on the “Print” button on the top right corner of the screen.
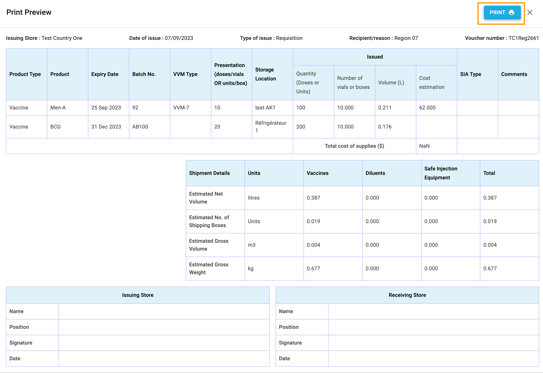
Registering wastage
The issuing functionality allows operators to register the details of products that have been taken out of their vaccine stock. It can be used to:
- Register the distribution of products to another store (e.g. requisition from a lower store)
- Register products being discarded as wastage (e.g. due to expiry, VVM change, etc)
This section describes the process of registering wastage. The process of issuing supplies to another store is described in section 5.4.2. Registering distribution of supplies to other stores.
- STEP 1. Access the SMT as a store operator. Click on the “Issuing” tab on the top menu.

- STEP 2. Review the list of wastage transactions already registered to avoid creating duplicates. If the transaction is not on the list and you want to register it, click on the “Issue New Stock” button.
- STEP 3. On the new window, select “Wastage” as the issue type and then complete the rest of transaction details. The fields Issue Type, Issue Date and Reason, in red, are mandatory, the other fields are optional and can be completed for future reference or left blank.
(1/2)
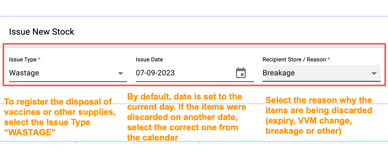
(2/2)
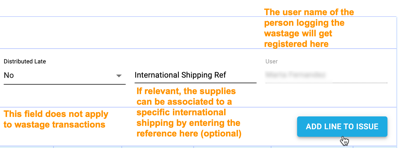
- STEP 4. After the generic details have been completed, click on “Add Line to Issue”.
- STEP 5. Enter the details of each product that has been discarded, following the example below. The product type, name and batch number are linked to the list of stock available on your store, so you must select from a given list of options.
The fields marked in red are mandatory.
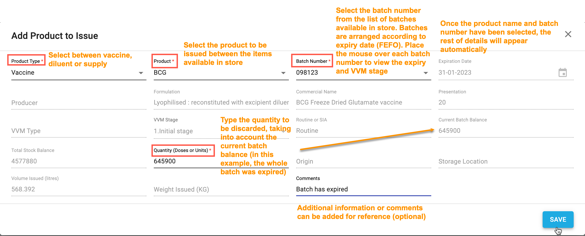
- STEP 6. Once all the relevant information has been completed, click on “Save”.
- STEP 7. Repeat the Steps 4-6 for additional products if needed. Note that if different batches of the same product have been discarded, each batch must be registered as a separate wastage line.
- STEP 8. After entering all the product lines have been correctly registered, the transaction is ready to be saved.
Click on “Save as a draft and go back” if you wish to save the information but want to be able to edit it at a later stage. The data will be saved on the issuing screen, but the products will not be subtracted from the stock while the wastage is on draft stage.
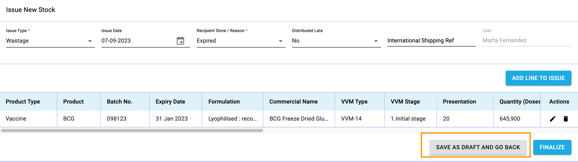
Click on “Finalize” if you are sure that the wastage information entered on the screen is correct and you want the stock levels of your vaccine store to be updated accordingly. Once a transaction has been finalized, the data cannot be edited or deleted.
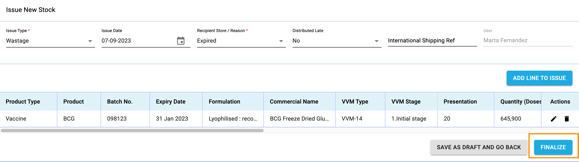
- STEP 9. On the Issuing main screen, verify that the transaction that you have registered has been added to the list with the correct issue type (i.e. wastage), wastage reason (e.g. expired, breakage, etc.) and transaction status (i.e. Draft or Completed).

Remember that while the transaction stays in draft mode it can still be modified. However, the stock details will not be updated on the stock overview until the transaction is finalized and marked complete.
- STEP 10. If the transaction is completed, click on “Stock overview” to verify that the product wastage has been correctly reflected and the stock levels of your vaccine store are updated accordingly.
Editing issues
If an issue (requisition or wastage) has been saved as a “Draft”, it is possible to retrieve it and modify its details. Once the transaction has been finalized and is registered as “Complete” it can no longer be edited. However, it is possible to add notes and comments to it.
Note: For online SMT, store operators can see and edit transactions entered by themselves and other operators from the same store. For offline SMT, each operator will only be able to see and modify their own transactions, until each user completes synchronization with the online system.
- STEP 1. Log in as a store operator and click on the “Issuing” tab to see the list of previously registered transactions.

- STEP 2. Scroll down, use the page navigation buttons or the filtering option to locate the draft transaction you want to modify. Then click the “Edit” button on the right.

If the transaction is already marked as complete, the edit button will not be available. Click on the “View” button instead.

- STEP 3. On the transaction screen, review the details and modify them as needed. To review and modify specific product lines, click on the “Edit” button of each line.
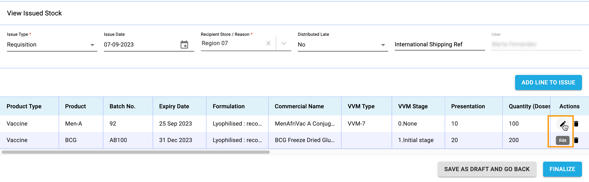
- STEP 4. Edit the details of each product line as needed, then click “Update” when finished.
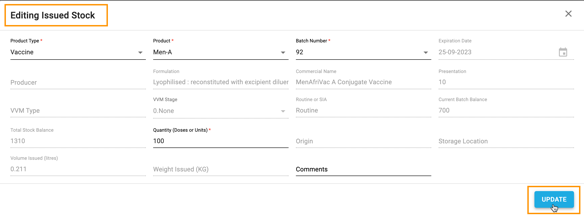
For “draft” transactions, all details can be edited and updated. For transactions with status “complete”, only notes and comments can be added.
- STEP 5. After the updates have been made, click on “Finalize” to complete the transaction. (or save again as draft if more modification will be needed)
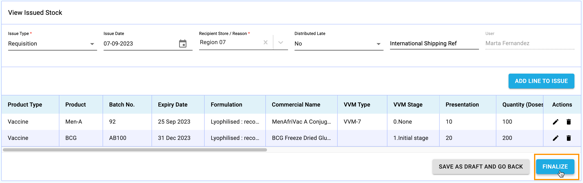
- STEP 6. On the Issuing main screen, verify that the edited transaction is now showing on the list with the correct status.

- STEP 7. If the transaction is completed, click on “Stock overview” to verify that the movement of supplies is correctly reflected on the stock levels of your vaccine store.
Deleting issues
If an issuing transaction has been saved as a “Draft”, it is possible to retrieve it and delete it fully or partly. Once an issue (requisition or wastage) has been finalized and is registered as “Complete” it can no longer be deleted.
Note: For online SMT, store operators can delete draft transactions entered by themselves and other operators from the same store. For offline SMT, each operator will only be able to see and delete their own draft transactions, until each user completes synchronization with the online system.
- STEP 1. Log in as a store operator and click on the “Issuing” tab to see the list of previously registered transactions.
- STEP 2. Scroll down, use the page navigation buttons or the filtering option to locate the draft transaction you want to delete.

- STEP 3
- To completely delete the draft transaction, click the “Delete” button on the right.

Note: if the transaction is already marked as complete instead of draft, the delete button will not be available.
- To delete only specific product lines, click on the “Edit” button first,

then click the “Delete” button on the product line.
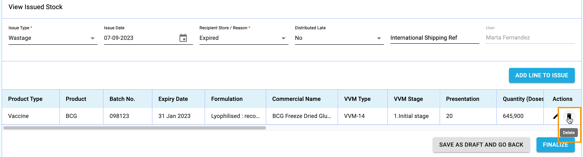
- STEP 4. After clicking on the delete button the SMT will ask for confirmation. Click on the “Yes” button to continue with the deletion process, otherwise cancel.
A green pop-up window with the message “Data deleted successfully” should appear.
- STEP 5. On the Issuing main screen, verify that the deleted transaction has been removed from the list.
TEMPERATURE LOGGING
The temperature logging functionality allows SMT users to keep and monitor records of key data points related to their cold chain equipment, such as minimum and maximum temperature and temperature alarms.
It is important to note that this functionality does not allow daily recording of temperatures or continuous monitoring. Store operators must use their temperature logging devices to closely monitor temperature excursions and must use the real time information available in their devices to make operational decisions.
The purpose of the SMT temperature functionality is to keep basic records of temperature excursions and alarms per month, which can be used later to identify trends and potential issues with cold chain functionality and/or management.
Registering temperature records
- STEP 1. At the end of each month, collect the necessary 4 key data points from your temperature devices, for each cold chain equipment:
- Minimum temperature recorded during the month
- Maximum temperature recorded during the month
- Number of alarms triggered during the month due to low temperature
- Number of alarms triggered during the month due to high temperature
- STEP 2. Log into the SMT as a store operator and click on the “Temp Logging” tab.

- STEP 3. By default, the screen will show the current year. Click on the “Select Year” dropdown menu to choose a different period. It is possible to enter data for the current year and the one immediately before (e.g. in January 2024 you can register data for December 2023). Additional records from the years before can be visualized but not modified.

- STEP 4. On the first column on the left, the list of cold chain equipment registered for your store will display. Scroll down to find the equipment for which you want to register temperature records.
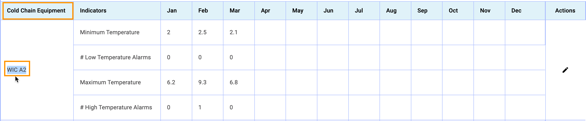
- STEP 5. On the Actions column on the right, click on the “Edit” button.
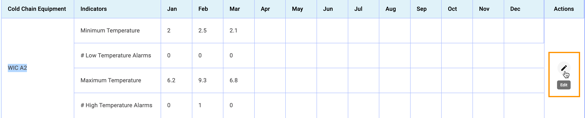
- STEP 6. Type in the data for the relevant month: The minimum temperature recorded during the month and total number of low temperature alarms; and the maximum temperature recorded during the month and total number of high temperature alarms.
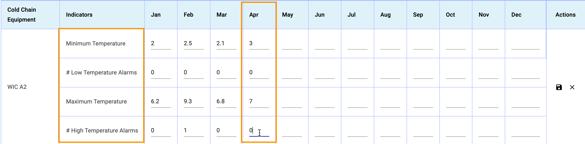
- STEP 7. When finished, click on the “Save” button under the Actions column on the right.
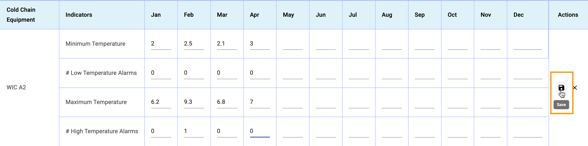
A green pop-up window with the message “Data saved successfully” will appear.
Note: To reduce data entry errors, the data validation system will warn the user if the data entered does not meet the logic requirements. For example, if the value for minimum temperature is higher than the value entered for maximum temperature.

If this message appears, review your data and enter it again.
- STEP 8. Repeat the process until you have entered the data for all cold chain equipment and storage space in your vaccine store for the corresponding month(s).
PHYSICAL COUNT AND ADJUSTMENTS
The physical count & adjustments functionality allows store operators to correct stock balances of supplies in their vaccine store. This functionality can be used to:
- Verify or modify stock balances after conducting a physical count in the store
- Modify stock balances after founding a discrepancy due to a data entry error
Registering a physical count
This section describes how to proceed to register in the SMT the results of inventory counts conducted in the vaccine store, using the Physical Count functionality.
- STEP 1. Log into the SMT as a store operator and click on the “Physical Count & Adjustment” tab.

- STEP 2. On the dropdown menu called “Adjustment type”, select the “Physical Count” option.

- STEP 3. On the screen, you will see the full list of vaccines, diluents and supplies available on your store, with the batch numbers and the quantity of each batch. This is the information that you will use for reference while conducting the physical count.
You can use the “Export” button next to your username to download this list in pdf or Excel format. You can print this list and use it to record the count of supplies on paper, if preferred.
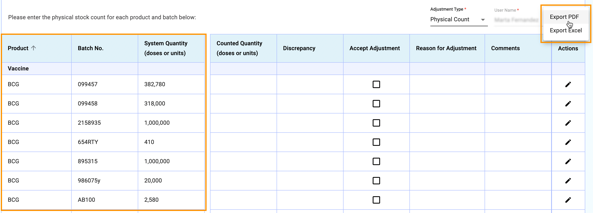
- STEP 4. Conduct the count of each item on the list and take note of the counted quantity for each batch of each product. If the counted quantity does not match the SMT quantity, conduct a recount and verify across different storage locations that the full batch has been counted. Take note of any additional relevant information that can justify the count discrepancy.
- STEP 5. After the count is completed, back on the SMT screen, clicking on the “Edit” button for each batch line.
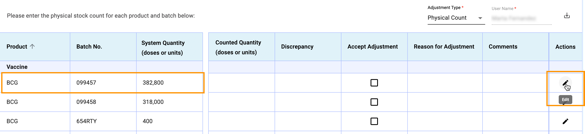
- STEP 6. Enter the counted quantity for each batch on the “Stock Quantity” field. The discrepancy between the SMT quantity and the counted quantity will be automatically calculated.
If the quantities match and the discrepancy is zero, you can proceed to save the value.
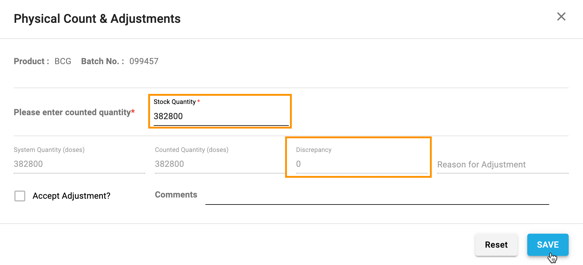
If the quantities do not match, the SMT will populate the field “Reason for adjustment” as “missing” or “surplus”, depending on whether the discrepancy is positive or negative.
The user will be required to verify that the data entered is correct by clicking “Accept Adjustment”. The “Comments” field also becomes mandatory in this case.
After all the fields have been verified and completed, you can proceed to save the data. A pop-up window with the message “Data saved successfully” will appear.
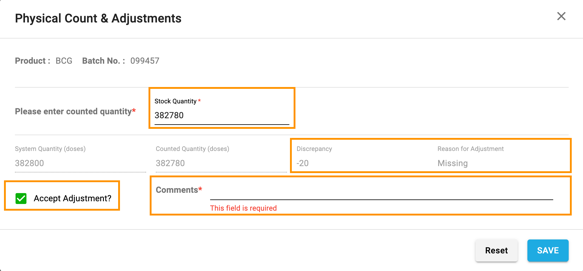
- STEP 7. After saving the information, the data will be reflected on the list. Repeat the process with each batch line until the full list is completed.
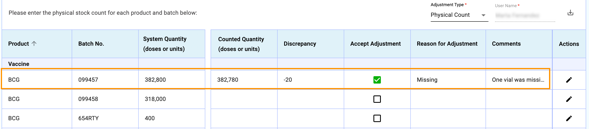
- STEP 8. Once the full count has been registered on the SMT screen, click the “Finalize” button at the bottom of the screen.

The SMT will ask for confirmation. If you are sure that all the information entered is correct and you want that the stock levels get updated accordingly, click “OK”, otherwise cancel.
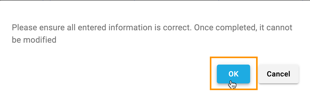
A pop-up window with the message “Data updated successfully” will appear.
- STEP 9. Verify that the new values for each batch number are now correctly reflected on the screen.
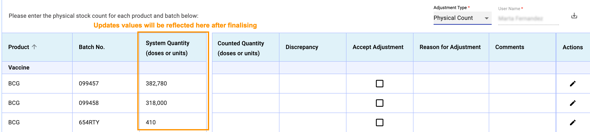
Notes:
- The new stock balances will also be reflected accordingly on the “Stock Overview” screen.
- The discrepancies registered will also get automatically logged on the Arrivals and Issuing screens depending on whether they are positive or negative quantities (i.e. positive discrepancy = surplus = will show in arrivals screen / negative discrepancy = missing = will show in issuing screen)
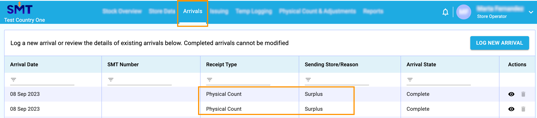

Registering adjustments
This section describes how to proceed correct stock balances caused by data entry errors using the Adjustment functionality.
- STEP 1. Log into the SMT as a store operator and click on the “Physical Count & Adjustment” tab.

- STEP 2. On the dropdown menu called “Adjustment type”, select the “Adjustment” option.

- STEP 3. On the screen, you will see the full list of vaccines, diluents and supplies available in your store, with the batch numbers and the quantity of each batch. Scroll down to find the item and batch for which you wish to make a correction.
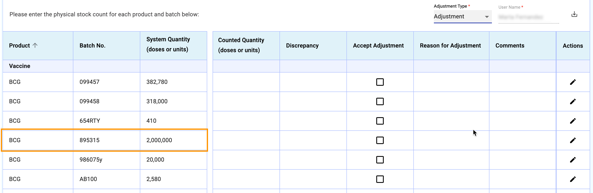
- STEP 4. Click on the “Edit” button for the specific batch line.
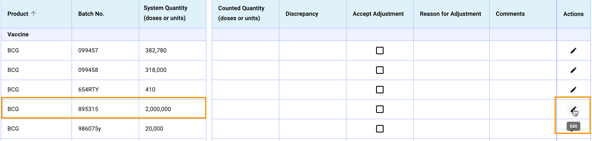
- STEP 5. Enter the correct quantity for the batch on the “Stock Quantity” field. The discrepancy between the SMT quantity and the correct quantity will be automatically calculated.
To proceed, click on “Accept adjustment” and add a comment to explain the reason for the correction.
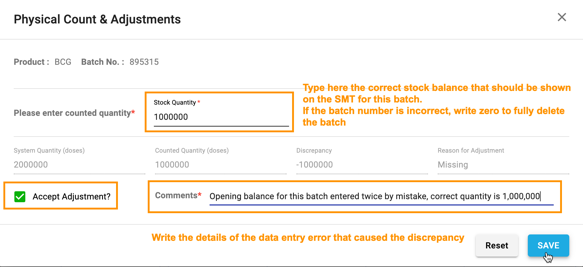
After all the fields have been verified and completed, you can proceed to save the data. A pop-up window with the message “Data saved successfully” will appear.
- STEP 6. After saving the information, the corrected data and comments will be reflected on the screen.
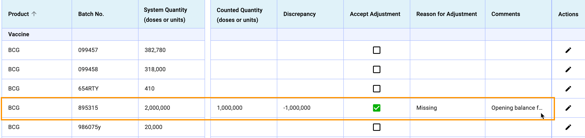
- STEP 7. If another item needs to be corrected, repeat the process, otherwise scroll down, and click the “Finalize” button at the bottom of the screen.

The SMT will ask for confirmation. If you are sure that all the information entered is correct and you want that the data gets updated accordingly, click “OK”, otherwise cancel.
A pop-up window with the message “Data updated successfully” will appear.
- STEP 8. Verify that the new value is now correctly reflected on this screen and on the Stock Overview.
Adjustment screen:
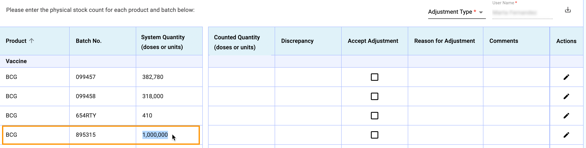
Stock overview screen:
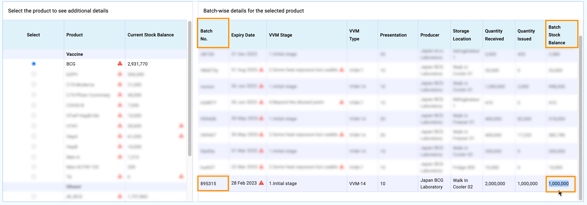
Notes:
- The discrepancy will also get automatically logged on the Arrivals and Issuing screens depending on whether it was a positive or negative quantity (i.e. positive discrepancy = surplus = will show in arrivals screen / negative discrepancy = missing = will show in issuing screen)

- STEP 9. If the discrepancy was caused by a data entry error, identify and locate the erroneous transaction on the arrivals or issuing screen, and add a comment to it (e.g. “disregard this line, duplicated by error”). This will help users filter out wrong data entries on the reports.
Refer to section 5.3.4. Editing arrivals or 5.4.5. Editing issues to learn more about adding comments to transactions.
- STEP 10. (optional) If the error was related to the batch information and the stock quantity was registered as zero, the adjustment process serves only to delete this wrong batch. However, the process of correcting the data has to be completed by re-entering the batch with the correct information through the arrival functionality.
Refer to section 5.3.2. Registering new arrivals (manual process) for more information.
REPORTS
Contents of this chapter:
6.3. PHYSICAL COUNT & ADJUSTMENTS REPORT 129
6.4. STOCK MANAGEMENT SUMMARY REPORT 133
6.6. STORAGE STATUS REPORT 141
6.7. ISC PERFORMANCE REPORT 145
6.8. SUPPLY ADEQUACY REPORT 163
6.9. COLD CHAIN EQUIPMENT REPORT 167
The “Reports” functionality in the SMT platform allows users to generate and export different types of data sets in multiple formats, such as tables, charts, and graphs. The purpose of this functionality is to support decision making processes by facilitating analysis of stock data and monitoring of different indicators related to supply performance.
This functionality can be accessed by all types of users (i.e. administrators, store operators, read-only users). The number and types of reports that can be generated by each user will only depend on the level of access:
- Store operators and administrators (including read-only users) at national level can generate reports for all stores and supply chain levels across the country.
- Store operators and administrators (including read-only users) at subnational level (e.g. region, district, etc.) can generate reports for stores and supply chain levels within their location.
There are currently 9 different types of reports in the SMT platform, each one described in each of the sections within this chapter. Depending on the data sets managed, some reports can only be generated for individual vaccine stores, while others can aggregate data for multiple stores at a time.
Report name | Data aggregation format |
Arrivals | Single store report |
Issues | Single store report |
Physical count & adjustments | Single store report |
Stock Management Summary | Single store report & multi-store report |
Stock Status | Single store report & multi-store report |
Storage Status | Single store report & multi-store report |
iSC Performance | Single store report & multi-store report |
Supply Adequacy | Single store report & multi-store report |
Cold Chain Equipment | Single store report & multi-store report |
Refer to the specific section for more information on each report type.
ARRIVALS REPORT
The arrivals report allows users to generate a historic list of arrival transactions that have occurred at a particular vaccine store during a given time period.
Arrival reports (and transactional reports in general) can only be generated for one vaccine store at a time and cannot be aggregated.
- STEP 1. Access the SMT and click on the “Reports” tab on the top menu, then select “Arrivals”.

- STEP 2. Click on “Select store” and choose the location for which you want to generate the report. You should be able to see your own vaccine store and also all vaccine stores below you.
The dropdown list is arranged according to supply chain level, and alphabetically within each level.
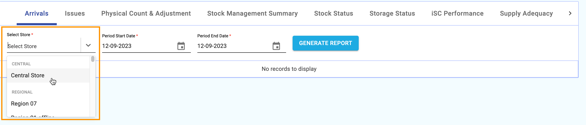
If you place your mouse on top of the name of a store, the name of the corresponding parent store will display (e.g. placing your mouse over the name of a district store, a small window will display which region that store belongs to)
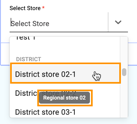
It is also possible to type and search the name of a specific store directly on the “Select store” field.
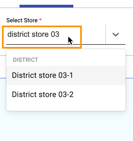
- STEP 3. Use the “Period Start Date” and “Period End Date” to choose the time period for which you want to generate the report.

Click on the calendar sign to open the calendar, then select the start/end date and click “OK”.
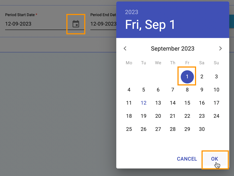
It is also possible to manually type the date in the field provided (dd-mm-yyyy)

- STEP 4. When finished with the selection of stores and dates, click on “Generate Report”.

A table with the list of arrivals at the selected store within the selected time period will display on the screen. The transactions are disaggregated per product line.
(1/2)
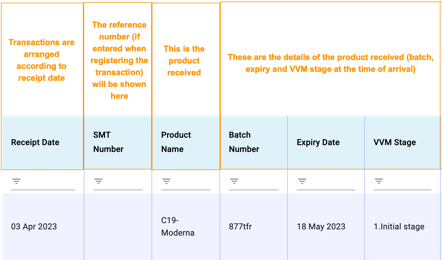
(2/2)
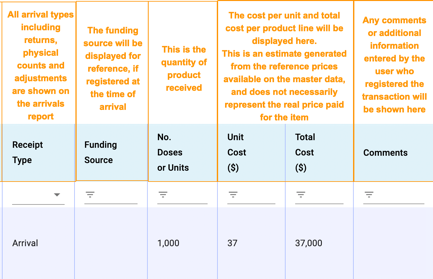
- STEP 5. Use the navigation buttons on the bottom right of the page to view more rows or pages if needed.

To look for specific transactions, use the filter fields to search by date, product, batch number, etc. It is also possible to filter specific types of arrivals.
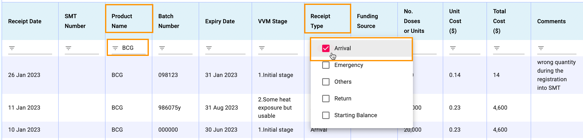
- STEP 6. (optional) To further analyze or share the information, it is possible to export the report in pdf or Excel form. Click on the “Export” button and select the preferred file format. The file will be automatically downloaded into your computer.
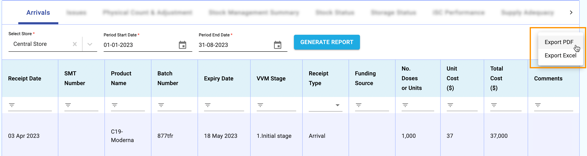
ISSUES REPORT
The issues report allows users to generate a historic list of issuing transactions that have occurred at a particular vaccine store during a given time period.
Issues reports (and transactional reports in general) can only be generated for one vaccine store at a time and cannot be aggregated.
- STEP 1. Access the SMT and click on the “Reports” tab on the top menu, then select “Issues”.

- STEP 2. Click on “Select store” and choose the location for which you want to generate the report. You should be able to see your own vaccine store and also all vaccine stores below you.
The dropdown list is arranged according to supply chain level, and alphabetically within each level.
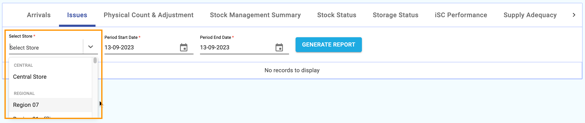
If you place your mouse on top of the name of a store, the name of the corresponding parent store will display (e.g. placing your mouse over the name of a district store, a small window will display which region that store belongs to)
It is also possible to type and search the name of a specific store directly on the “Select store” field.
- STEP 3. Use the “Period Start Date” and “Period End Date” to choose the time period for which you want to generate the report.

Click on the calendar sign to open the calendar, then select the start/end date and click “OK”.
It is also possible to manually type the date in the field provided (dd-mm-yyyy)
- STEP 4. When finished with the selection of store and dates, click on “Generate Report”.
A table with the list of issues at the selected store within the selected time period will display on the screen. The transactions are disaggregated per product line. (1/2)
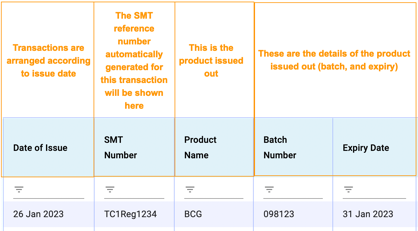
(2/2)
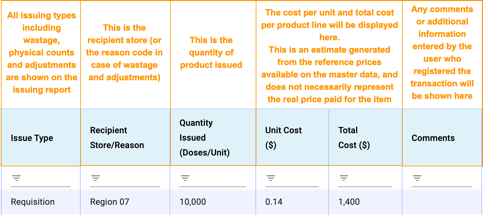
- STEP 5. Use the navigation buttons on the bottom right of the page to view more rows or pages if needed.

To look for specific transactions, use the filter fields to search by date, product, batch number, recipient store, etc. It is also possible to filter specific types of issuing transaction.

- STEP 6. (optional) To further analyze or share the information, it is possible to export the report in pdf or Excel form. Click on the “Export” button and select the preferred file format. The file will be automatically downloaded into your computer.
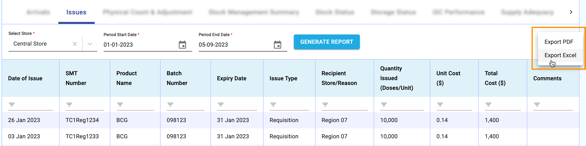
PHYSICAL COUNT AND ADJUSTMENTS REPORT
The physical count and adjustments report allows users to generate a historic list of stock corrections that have occurred at a particular vaccine store during a given time period.
Physical count and adjustments reports (and transactional reports in general) can only be generated for one vaccine store at a time and cannot be aggregated.
Note: Stock corrections can be positive (stock added) or negative (stock subtracted). Depending on the nature of the correction, these transactions can also be found on the arrivals and issues reports described on sections 6.1 and 6.2 respectively.
- Positive stock corrections can be found on the arrivals report.
- Negative stock corrections can be found on the issuing report.
- All stock corrections (positive and negative) can be found at the physical count and adjustments report. Confirmation of stock quantities (i.e. the user verifies that the quantity on the system matches the physical count, correction is zero) will also be shown in this report.
- STEP 1. Access the SMT and click on the “Reports” tab on the top menu, then select “Physical Count & Adjustment”.

- STEP 2. Click on “Select store” and choose the location for which you want to generate the report. You should be able to see your own vaccine store and all vaccine stores below you.
The dropdown list is arranged according to supply chain level, and alphabetically within each level.
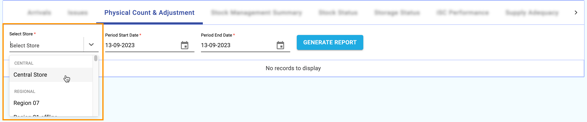
If you place your mouse on top of the name of a store, the name of the corresponding parent store will display (e.g. placing your mouse over the name of a district store, a small window will display which region that store belongs to)
It is also possible to type and search the name of a specific store directly on the “Select store” field.
- STEP 3. Use the “Period Start Date” and “Period End Date” to choose the time period for which you want to generate the report.

Click on the calendar sign to open the calendar, then select the start/end date and click “OK”.
It is also possible to manually type the date in the field provided (dd-mm-yyyy)
- STEP 4. When finished with the selection of stores and dates, click on “Generate Report”.
A table with the list of stock corrections at the selected store within the selected time period will display on the screen. The transactions are disaggregated per product line.
(1/2)
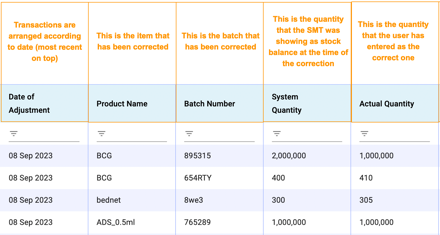
(2/2)
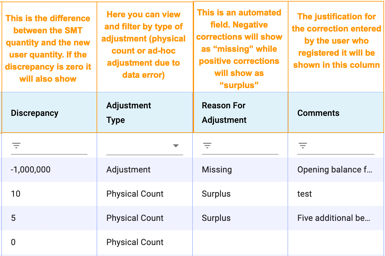
- STEP 5. Use the navigation buttons on the bottom right of the page to view more rows or pages if needed.

To look for specific transactions, use the filter fields to search by date, product, batch number, etc. It is also possible to filter specific types of correction (e.g. physical count vs. ad-hoc adjustment / missing vs. surplus).

- STEP 6. (optional) To further analyze or share the information, it is possible to export the report in pdf or Excel form. Click on the “Export” button and select the preferred file format. The file will be automatically downloaded into your computer.
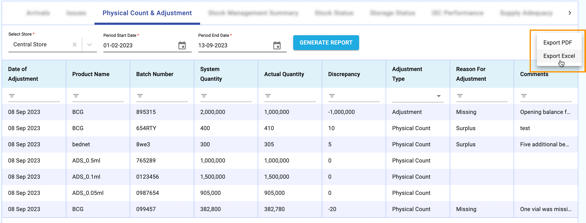
STOCK MANAGEMENT SUMMARY REPORT
The stock management summary report allows users to generate an aggregated summary of transactions that have occurred at a particular vaccine store during a given time period.
Unlike the transactional reports described in previous sections, the stock management summary report does not show individual transaction lines, therefore it does not contain detailed information such as the transaction date or the product details (bath numbers, expiry, etc.). The stock management summary aggregates total quantities per product.
It is possible to generate the stock management summary report for one individual store at a time, or to include lower-level stores (e.g. report for region A can include only the regional store, or the regional store plus all the district stores in that region).
- STEP 1. Access the SMT and click on the “Reports” tab on the top menu, then select “Stock Management Summary”.

STEP 2. Click on “Select store” and choose the main location for which you want to generate the report. You should be able to see your own vaccine store and all vaccine stores below you. The dropdown list is arranged according to supply chain level, and alphabetically within each level.
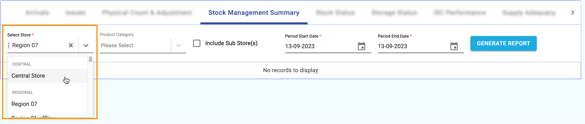
If you place your mouse on top of the name of a store, the name of the corresponding parent store will display (e.g. placing your mouse over the name of a district store, a small window will display which region that store belongs to)
It is also possible to type and search the name of a specific store directly on the “Select store” field.
- STEP 3 (optional). If you want the report to also include the stores below the main location, tick the box “Include Sub Store(s)”, otherwise leave blank.

- STEP 4 (optional). Use the “Product Category” menu to choose only specific type(s) of product(s) to be displayed on the report. For a full report including all items, leave this field blank.

- STEP 5. Use the “Period Start Date” and “Period End Date” to choose the time period for which you want to generate the report.

Click on the calendar sign to open the calendar, then select the start/end date and click “OK”.
It is also possible to manually type the date in the field provided (dd-mm-yyyy)
- STEP 6. When finished with the selection of store(s), product(s) and dates, click on “Generate Report”.

A table with the summary of stock movements at the selected store within the selected time period will display on the screen. The transactions are grouped per product category and the quantities aggregated per product.
(1/2)
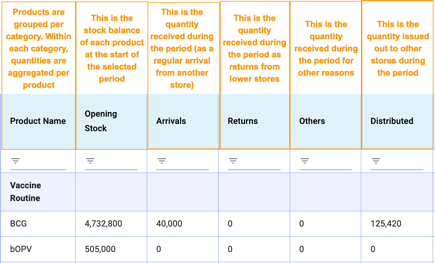
(2/2)
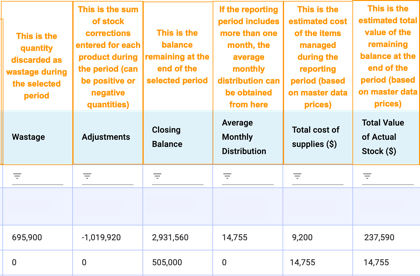
Note: If sub-stores are included in the report, two additional columns will show on the left of the table, to help the user differentiate which product lines belong to which level and store.
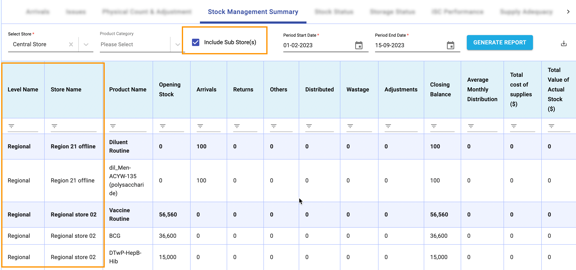
- STEP 7. Use the navigation buttons on the bottom right of the page to view more rows or pages if needed.

To look for specific transactions, use the filter fields to search by level, store, product name or quantity.

- STEP 8. (optional) To further analyze or share the information, it is possible to export the report in pdf or Excel form. Click on the “Export” button and select the preferred file format. The file will be automatically downloaded into your computer.
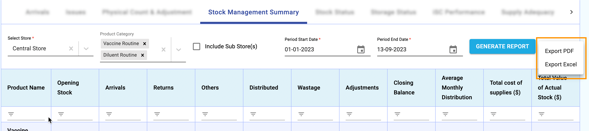
STOCK STATUS REPORT
The stock status report allows users to generate an overview of the current stock situation and potential stock risks at their own supply chain level or stores below.
Unlike other reports that offer the possibility to review and analyze historical data, the stock status report offers a snapshot of the situation at the present time, and a projection for the future, but does not offer any visibility over past transactions.
It is possible to generate the stock status report for one individual store at a time, or to include lower-level stores (e.g. report for region A can include only the regional store, or the regional store plus all the district stores in that region).
- STEP 1. Access the SMT and click on the “Reports” tab on the top menu, then select “Stock Status”.

- STEP 2. Click on “Select level” to choose the supply chain level of the main store for which you want to generate the report.

After the level is selected, click on “Select Store” to choose the specific vaccine store.

- STEP 3 (optional). If you want the report to also include the stores below the main location, tick the box “Include Sub Store(s)”, otherwise leave blank.

- STEP 4. Use the “Product Category” menu to choose the type of products to be displayed on the report. It is mandatory to select at least one, but it is also possible to select multiple categories.
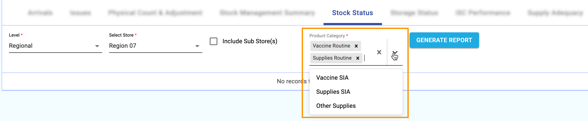
- STEP 5. When finished with the selection of store(s) and product(s), click on “Generate Report”.

The report generated will have a different format depending on whether it includes a single store or multiple stores, as described below.
- Single store report
On the right side of the screen, a table with the stock situation of the selected product categories will display.

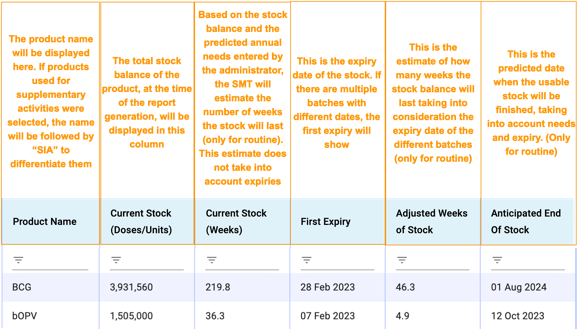
On the left side of the screen, a stock status chart will display. If the chart does not appear automatically, click on “Display full screen stock status chart” to visualize it.

This chart will show the key information from the stock status table (adjusted weeks of stock and anticipated end of stock) in a visual format, to facilitate interpretation.
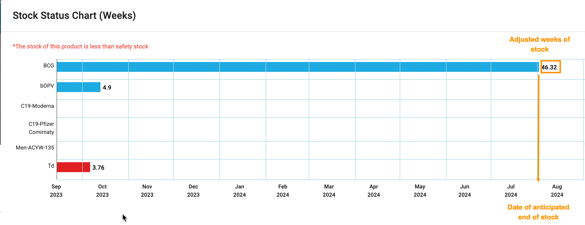
- Multiple store report
If the user selects to include sub-stores in the report, the summary table will look different than the single store report.
For the multiple store report, the columns on the left will indicate the supply chain level and the store name. The data for each store will be displayed across a single line.
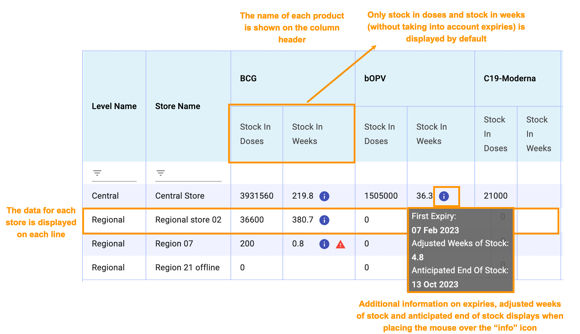
- STEP 6. Use the navigation buttons on the bottom right of the page to view more rows or pages if needed.
To look for specific items, use the filter fields to search by product name or quantity.
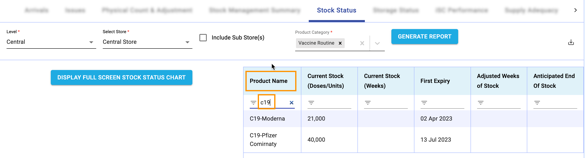
- STEP 7. (optional) To further analyze or share the information, it is possible to export the report in pdf or Excel form. Click on the “Export” button and select the preferred file format. The file will be automatically downloaded into your computer.

STORAGE STATUS REPORT
The storage status report allows users to generate an overview of the current storage availability and potential risks associated with lack of storage space at their own supply chain level or stores below.
The storage status report offers a snapshot of the situation at the present time, but does not offer any visibility over past storage availability or estimated projections into the future.
It is possible to generate the storage status report for one individual store at a time, or to include lower-level stores (e.g. report for region A can include only the regional store, or the regional store plus all the district stores in that region).
- STEP 1. Access the SMT and click on the “Reports” tab on the top menu, then select “Storage Status”.

STEP 2. Click on “Select level” to choose the supply chain level of the main store for which you want to generate the report.

After the level is selected, click on “Select Store” to choose the specific vaccine store.

- STEP 3 (optional). If you want the report to also include the stores below the main selected location, tick the box “Include Sub Store(s)”, otherwise leave blank.

- STEP 4. Use the “Storage Temperature” menu to choose the type of storage to be displayed on the report. It is mandatory to select at least one category, but it is also possible to select multiple ones.

- STEP 5. When finished with the selection of store(s) and storage categories, click on “Generate Report”.

The report generated will have a different format depending on whether it includes a single store or multiple stores, as described below.
- Single store report
On the right side of the screen, a table with the storage situation of the selected temperature categories will display.
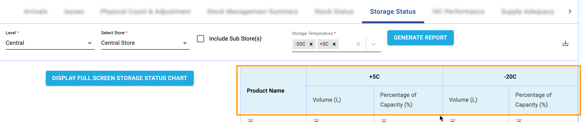
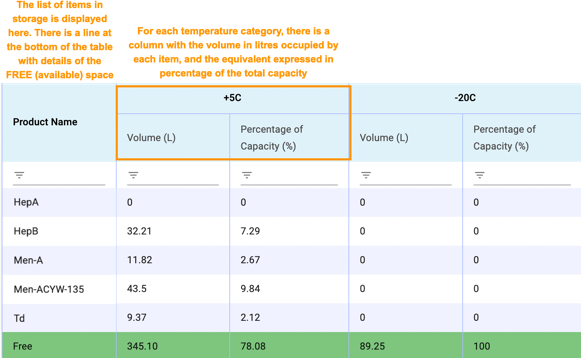
On the left side of the screen, a storage status chart will display. If the chart does not appear automatically, click on “Display full screen storage status chart” to visualize it.
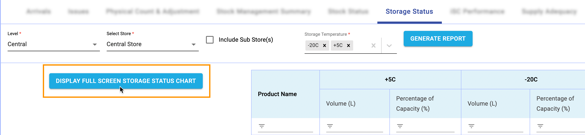
This chart will show the key information from the storage status table (space occupied by each item and space available for each temperature) on a visual format, to facilitate interpretation.
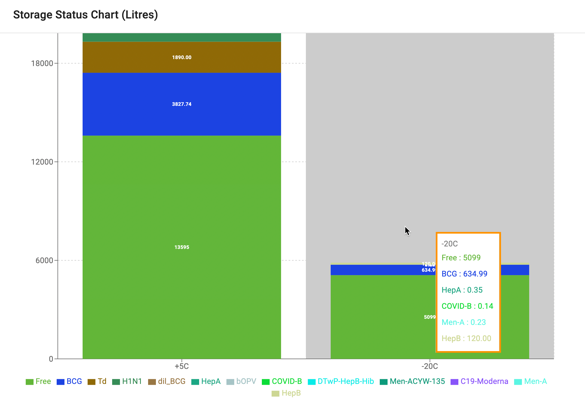
- Multiple store report
If sub-stores are included in the report, two additional columns will show on the left of the table, to help the user differentiate which product lines belong to which level and store. 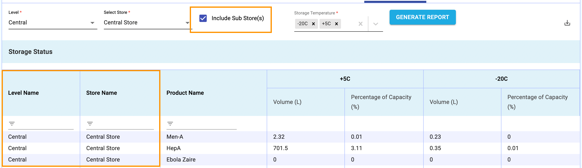
- STEP 6. Use the navigation buttons on the bottom right of the page to view more rows or pages if needed.

To look for storage occupied by one specific item, or free capacity, use the filter fields of the product name column.
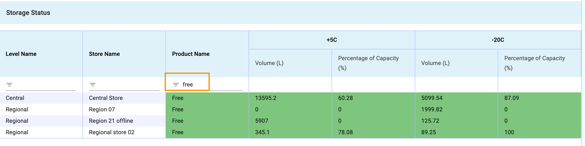
- STEP 7. (optional) To further analyze or share the information, it is possible to export the report in pdf or Excel form. Click on the “Export” button and select the preferred file format. The file will be automatically downloaded into your computer.
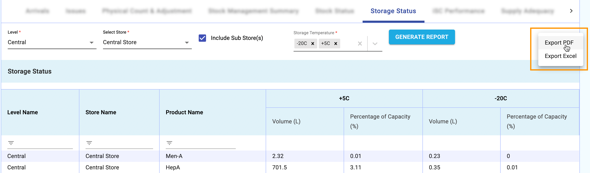
ISC PERFORMANCE REPORT
The iSC performance report is a combination of charts and dashboards that helps users monitor multiple key performance indicators related to the immunization supply chain. The following KPIs are included in this report:
- Temperature excursion and alarm rate
- Cold Chain Equipment Functionality
- Closed Vial Wastage
- Full Stock Availability
- Stock Out Days
- Stocked According to Plan
- Forecasted Demand vs Issues
These KPIs are an adaptation of the global DISC indicators[1], and they collectively provide an overview of the performance of the essential elements of the immunization supply chain.
To generate the iSC performance report, follow the steps below.
- STEP 1. Access the SMT and click on the “Reports” tab on the top menu, then select “iSC performance”.

- STEP 2. Click on “Level” to choose the supply chain level of the main store for which you want to generate the report.

After the level is selected, click on “Select Store” to choose the specific vaccine store.

- STEP 3 (optional). If you want the report to include the stores below the main selected location as well, tick the box “Include Sub Store(s)”, otherwise leave blank.

- STEP 4. Use the “Period Start Month & Year” and “Period End Month & Year” to choose the time period for which you want to generate the report.

Note that the KPIs on the iSC performance report are monthly indicators, therefore it is not possible to select specific dates, only months.
- STEP 5. When finished with the selection of store(s) and period, click on “Generate Report”.

To visualize the charts, use the menu buttons below to select/deselect which indicators to be displayed on the screen. It is possible to select one indicator at a time, so the chart will show at the top of the screen, or to select multiple indicators and then scroll down the screen to view each chart.

Note: If the user has clicked the “Include Sub Store(s)” box, the list of indicators will not include Stock Out Days (this is included within the Full Stock Availability chart) and Forecasted Demand vs Issues.
The subsections below provide more information on the meaning of each indicator and interpretation of the associated graphs and charts.
Temperature and temperature alarm rate
On the SMT iSC report, two separate but related temperature indicators can be monitored:
- Minimum and maximum temperatures registered in each equipment each month.
- Number of high and low temperature alarms registered by each equipment each month
These indicators are used as a proxy for measuring vaccine potency and safety, since exposure to temperatures outside the optimal range can indicate a risk of heat or freeze damage to sensitive vaccines. In addition, frequent temperature excursions can be used to identify potential equipment dysfunction or inadequate cold chain management practices.
- STEP 1. On the iSC performance report, select the button “Temperature”.

- STEP 2. Select the storage temperature category that you want to monitor (e.g. +5C, -20C, -70C). It is possible to select more than one category.

- STEP 3. Review the chart(s) to monitor temperature excursions and temperature alerts for each category and equipment. The temperature charts will display in different format depending on whether the report has been generated for an individual store or as an aggregated report.
- Single store report
For each storage equipment, a temperature graph will display. This graph will show 2 lines to represent min/max temperature values across the period. If any temperature alerts have been registered, the number of alerts will show in a bar graph.
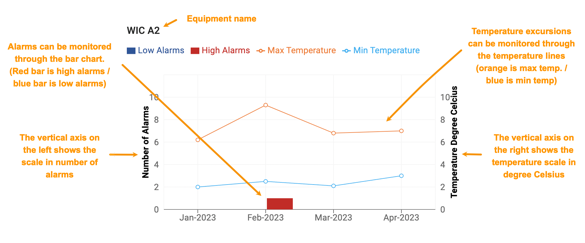
To obtain more detail on the data for one specific month, place your mouse on top of the graph and a pop-up window will display, showing the specific temperature and alarm values.
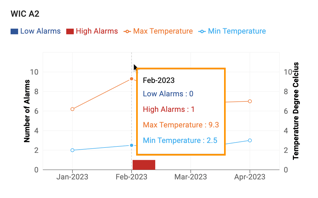
- Multiple store report
When generating a report that includes lower-level stores, a summary table with display instead of individual graphs.
This aggregated report does not include information on temperature readings but allows the user to have a general overview at the monthly alarm rate across stores. This table is color-coded to facilitate identification of stores that have registered temperature alarms.
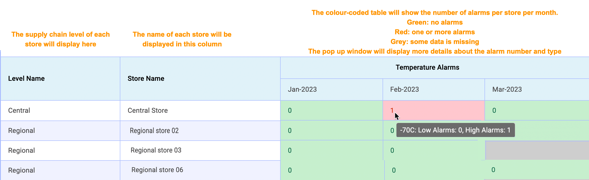
- STEP 4. (optional) To further analyze or share the information, it is possible to export the temperature charts in pdf form. Click on the “Export” button on the top right corner of the iSC dashboard. The pdf file containing the same information that is displayed on the screen will be automatically downloaded into your computer.
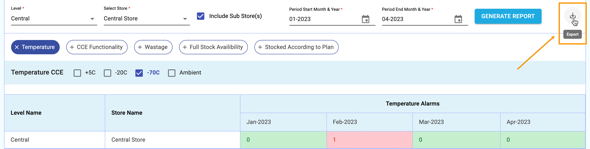
Cold Chain Equipment (CCE) Functionality
The Cold Chain Equipment Functionality indicator measures operational cold chain equipment to identify where maintenance is needed for maintaining vaccine quality. This indicator can be used for operational purposes, such as updating the maintenance plan, and for strategic purposes, such as to plan for replacement.
Note: functional status of CCE does not include a provision regarding the temperature maintained by the equipment; other indicators (such as Temperature and Temperature Alarm Rate, described in subsection 6.7.1.) must be used to fully understand the cold chain management system.
- STEP 1. On the iSC performance report, select the button “CCE Functionality”.

- STEP 2. Select the storage category that you want to monitor (e.g. for freezers and Walk In Freezers, select -20C). It is possible to select more than one category.

- STEP 3. Review the chart(s) to monitor the CCE functionality for each category. The charts will display in different formats depending on whether the report has been generated for an individual store or as an aggregated report.
- Single store report
For individual stores, a color-coded table will show the status of each equipment during the selected period.
If the item was fully functional during a month, the month will show green on the table, if the item was logged into the SMT as non-functional at any moment during the month, that month will display in orange color.

To add more information on the downtime period of the equipment, a second chart will display below the first table. This pie chart will show the percentage functionality of the selected items, calculated as number of days functional vs. number of days not functional, during the selected period.
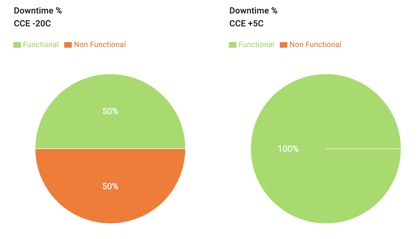
- Multiple store report
When generating a report that includes lower-level stores, a summary table with display the aggregated information for all equipment of each category at each location, instead of individual lines per equipment.
This aggregated report allows the user to have a general overview at the CCE functionality across stores. This table is color-coded to facilitate identification of stores that have registered nonfunctional CCE.
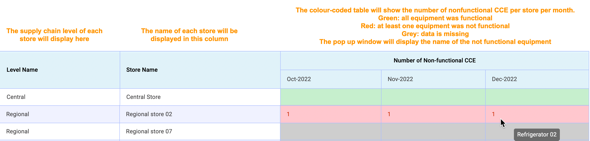
To add more information on the downtime period of the equipment, a second chart will display below the first table. This pie chart will show the percentage functionality of the selected items, calculated as number of days functional vs. number of days not functional, during the selected period.
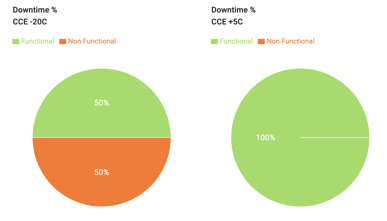
- STEP 4. (optional) To further analyze or share the information, it is possible to export the CCE functionality charts in pdf form. Click on the “Export” button on the top right corner of the iSC dashboard. The pdf file containing the same information that is displayed on the screen will be automatically downloaded into your computer.
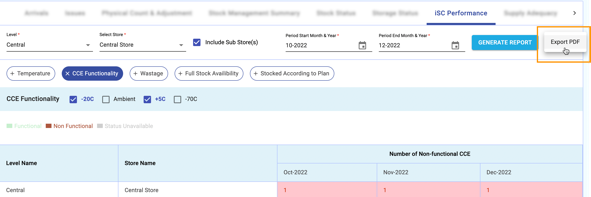
Closed Vial Wastage
This indicator is used to measure potential avoidable wastage during handling of vaccines. Closed vial wastage rates can be used to identify excessive ordering practices that are not well-aligned to actual consumption rates, vaccine exposure to heat or freezing temperatures, breakage and mishandling of inventory.
Note: Open vial wastage, related to the discard of unused vaccines in multi-dose vials during the provision of immunization services is not recorded or monitored in the SMT.
- STEP 1. On the iSC performance report, select the button “Wastage”.

- STEP 2. Select the product that you want to monitor (e.g. BCG, bOPV, etc). Wastage is a product specific indicator, so it is only possible to select one item at a time.
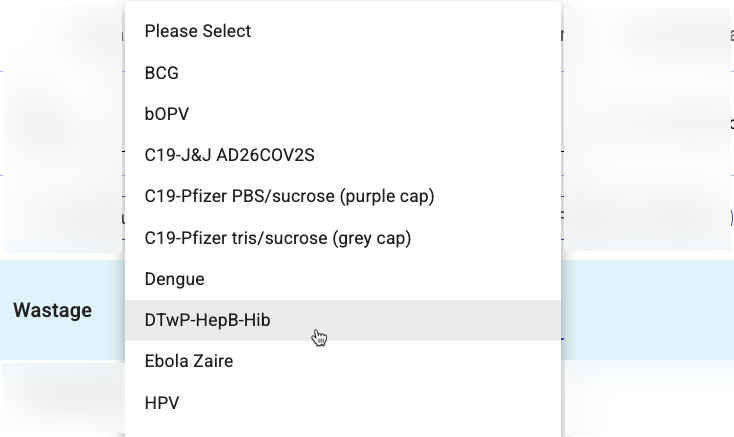
- STEP 3. Review the chart(s) to monitor the closed vial wastage percentage registered monthly for each vaccine . The charts will display in different formats depending on whether the report has been generated for an individual store or as an aggregated report.
- Single store report
For individual stores, a stacked bar chart will show the wastage percentage each month. The height of the bar represents 100% (total product managed in the store that month) and the section in yellow represents the percentage of the total that has been discarded as wastage during the period. When placing the mouse on top of each bar, a pop-up window will display the wastage value expressed in percentage.
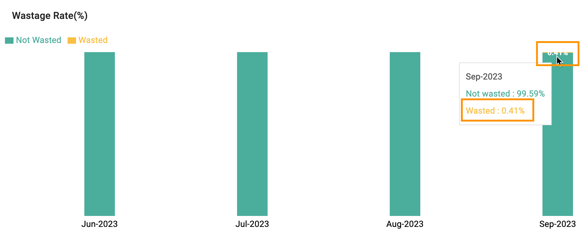
To add more information on the reasons for the wastage, a second chart will display on the right side of the screen. This pie chart will show the percentage of wastage attributed to each cause (i.e. breakage, expiry, VVM change, others).
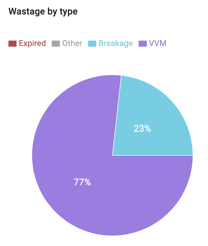
- Multiple store report
When generating a report that includes lower-level stores, a summary table with display. This table format allows the user to have a general overview at the wastage rates across stores. The table is color-coded to facilitate identification of stores that have registered wastage (in red). When placing the mouse over a wastage value, a pop-up window will show the percentages of wastage attributed to each cause.
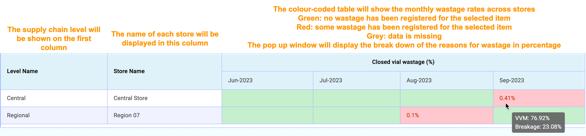
- STEP 4. (optional) To further analyze or share the information, it is possible to export the wastage charts in pdf form. Click on the “Export” button on the top right corner of the iSC dashboard. The pdf file containing the same information that is displayed on the screen will be automatically downloaded into your computer.
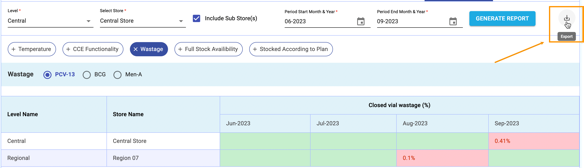
Full Stock Availability
Full Stock Availability or FSA is an indicator that measures the continuous availability of immunization products, which is essential to reach immunization program targets. FSA is defined as no stock-out in the storage facility at any point during the time period.
Note: FSA indicator only considers whether there is product in stock or there is a stock-out (zero balance), but does not measure whether the quantities in stock are adequate or the duration of stockouts. Other indicators (such as Stock Out Days, described in subsection 6.7.5. and Stocked According to Plan, described in subsection 6.7.6.) can be used in combination to FSA to fully understand the potential impact of stock unavailability.
- STEP 1. On the iSC performance report, select the button “Full Stock Availability”.

- STEP 2. Review the chart(s) to monitor the availability of vaccines in the selected store(s). The charts will display in different formats depending on whether the report has been generated for an individual store or as an aggregated report, as described below.
- Single store report
For individual stores, a color-coded table will show the list of vaccines and the availability of each item across the selected months. Full Stock Availability during the period would be represented as the full table in green color. If a stock out has been registered at any point for any of the vaccines, the table will display orange color for that product and month.
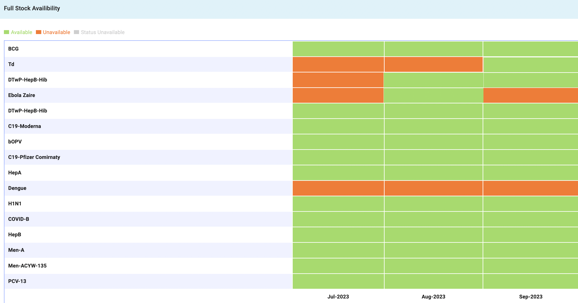
- Multiple store report
When generating a report that includes lower-level stores, a different summary table with display. This table format allows the user to have a general overview at the Full Stock Availability across stores during the selected period. The table is color-coded to facilitate identification of stores that have registered stock-outs (in red). When placing the mouse over a cell showing a stock-out, a pop-up window will display additional information on the name of the item(s) unavailable and the duration of the stock-out in days.
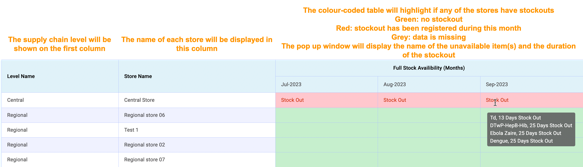
- STEP 4. (optional) To further analyze or share the information, it is possible to export the Full Stock Availability charts in pdf form. Click on the “Export” button on the top right corner of the iSC dashboard. The pdf file containing the same information that is displayed on the screen will be automatically downloaded into your computer.
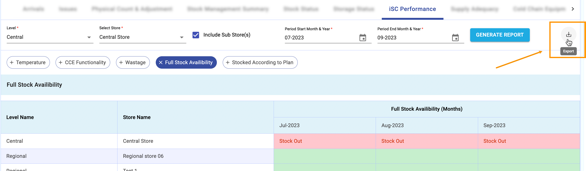
Stock Out Days
Stock Out Days is an indicator that measures the duration of a stock-out (i.e. zero balance) of essential immunization products. This indicator is often used in combination with the Full Stock Availability indicator and can serve to estimate the severity and potential impact of a stock out on the provision of immunization services.
- STEP 1. On the iSC performance report, select the button “Stock Out Days”.

Note: This button will only be visible if the iSC performance report has been generated for a single store. For aggregated reports that include sub stores, the information regarding number of days out of stock is provided on the same chart as the Full Stock Availability Indicator. Refer to subsection 6.7.4 , multiple store report, for more details.
- STEP 2. Select the vaccine that you want to monitor. Stock out days is a product specific indicator, so it is only possible to select one item at a time.

- STEP 3. Review the bar chart to monitor the number of days per month that the product was available or out of stock, during the selected period. Place your mouse on top of each bar and a pop-up window will display the details.
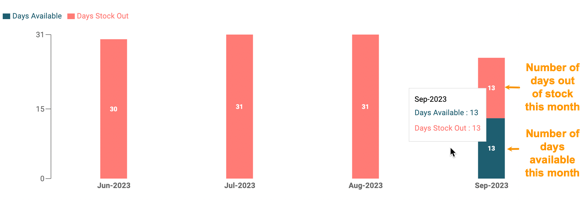
- STEP 4. (optional) To further analyze or share the information, it is possible to export the Stock Out Days charts in pdf form. Click on the “Export” button on the top right corner of the iSC dashboard. The pdf file containing the same information that is displayed on the screen will be automatically downloaded into your computer.
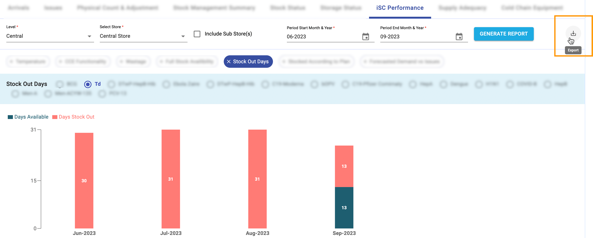
Stocked According to Plan
The Stocked According to Plan or SATP is an indicator that measures whether the vaccine store(s) maintain appropriate levels of vaccine and immunization product stock during a particular time frame.
Stocked according to plan (SATP) is defined as stock levels between set minimum and maximum levels, which are defined by local policies and entered in the SMT platform by the national or subnational administrators.
Diversions from the planned stock levels can help users identify risk of stock-outs (if stock balance significantly below the minimum level) or closed vial wastage (if stock balance significantly above the maximum level).
- STEP 1. On the iSC performance report, select the button “Stocked According to Plan”.

- STEP 2. Select the product that you want to monitor (e.g. BCG, bOPV, etc). SATP is a product specific indicator, so it is only possible to select one item at a time. Then select the activity type (routine or supplementary).
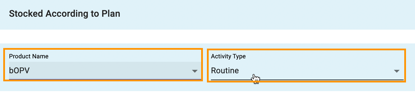
Note: By default, the chart will show all stock (routine plus supplementary) and compare it to the minimum and maximum levels. To compare only routine stock, select this activity type. To view only supplementary stock, select this activity type, but note that minimum and maximum recommended levels are not shown for supplementary stock.
- STEP 3. Review the chart(s) to monitor whether the stock balances during the selected period are within recommended min and max values. The charts will display in different formats depending on whether the report has been generated for an individual store or as an aggregated report, as described below.
- Single store report
For individual stores, the information will display in the format of an area graph. The blue shaded area represents the stock balance available on the selected store at the end of each month.
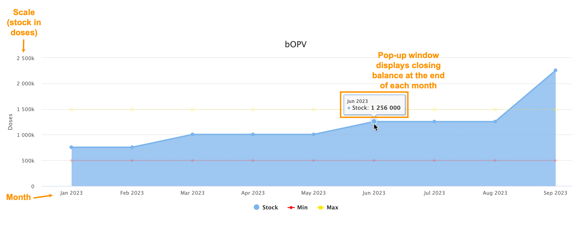
The available stock balance can be compared with the reference minimum and maximum reference levels for the selected vaccine, represented as red and yellow lines respectively.
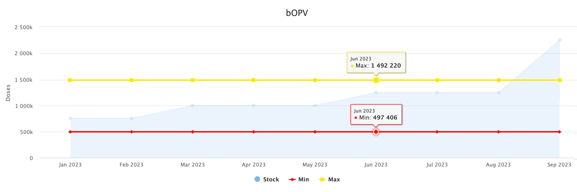
- Multiple store report
When generating a report that includes lower-level stores, a summary table with display. This table format allows the user to have a general overview of stock balances rates across stores. The table is color-coded to facilitate identification of stores that have registered stock below minimum or above maximum.
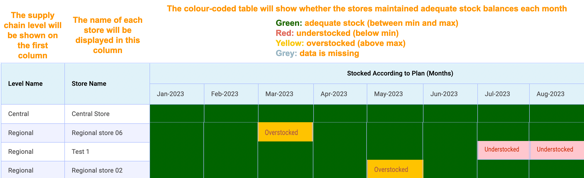
- STEP 4. (optional) To further analyze or share the information, it is possible to export the SATP charts in pdf form. Click on the “Export” button on the top right corner of the iSC dashboard. The pdf file containing the same information that is displayed on the screen will be automatically downloaded into your computer.
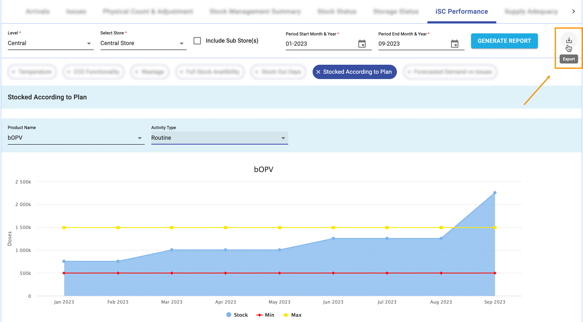
Forecasted Demand vs Issues
This indicator is used to validate and improve forecasting practices and assumptions (e.g., target population, coverage, wastage) in order to increase forecasting accuracy. It compares the needs forecasted for a particular period with the actual quantity issued out of that product for the same period. Issues of stock are used as proxy for consumption data, since actual administration of vaccines to target population is not registered in the Stock Management Tool.
The longer the period or review, the more informative this indicator will be. A rolling year, half year or quarter are recommended period lengths to monitor this indicator.
- STEP 1. On the iSC performance report, select the button “Forecasted Demand vs Issues”.

- STEP 2. Select the product that you want to monitor (e.g. BCG, bOPV, etc). This is a product specific indicator, so it is only possible to select one item at a time.

- STEP 3. Review the chart to monitor the forecast accuracy. The chart will display in the format of a bar graph. Each blue bar represents the quantity issued per month, and the blue dotted line is the moving average (taking into account the previous 3 months).
The forecasted monthly need, used for reference, will be represented as a horizontal green line.
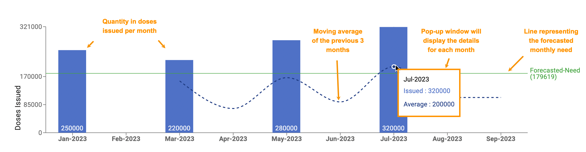
If the average of monthly issues is consistently below the green line, it indicates that the store is “consuming” (i.e. issuing) fewer vaccines than expected, while average monthly issues consistently above the forecasted need line indicate that usage of vaccines at this level is higher than what was predicted.
- STEP 4. (optional) To further analyze or share the information, it is possible to export the Forecasted Demand vs Issues charts in pdf form. Click on the “Export” button on the top right corner of the iSC dashboard. The pdf file containing the same information that is displayed on the screen will be automatically downloaded into your computer.
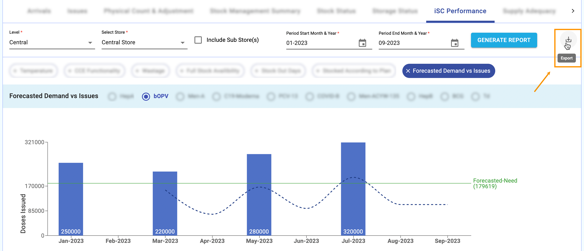
SUPPLY ADEQUACY REPORT
The supply adequacy report allows users to monitor whether the quantities of stock received are sufficient to meet the needs of a vaccine store.
This report compares the annual needs of each product at each location (calculated based on immunization plans, population and coverage estimates, entered in the platform by the administrators) with the actual quantities received at that location (based on arrivals registered by the store operators).
It is possible to generate the supply adequacy report for one individual store at a time, or to include lower-level stores in the same report (e.g. report for region A can include only the regional store, or the regional store plus all the district stores in that region).
- STEP 1. Access the SMT and click on the “Reports” tab on the top menu, then select “Supply Adequacy”

- STEP 2. Click on “Level” to choose the supply chain level of the main store for which you want to generate the report.
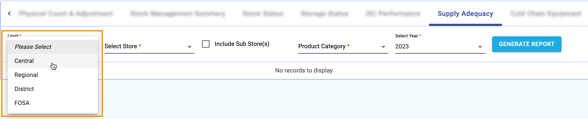
After the level is selected, click on “Select Store” to choose the specific vaccine store. The dropdown list is arranged according to supply chain level, and alphabetically within each level.

- STEP 3 (optional). If you want the report to also include the stores below the main location, tick the box “Include Sub Store(s)”, otherwise leave blank.

- STEP 4. Use the “Product Category” menu to choose the category of items for which you want to generate the report. Only one category can be selected at a time.

- STEP 5. Use the “Select Year” menu to choose the period of the report. The supply adequacy report compares the annual needs of the store(s) with the quantities received up to date, therefore it is generated as an annual report.

- STEP 6. When finished with the selection of store(s), product category and year, click on “Generate Report”.

The report generated will have a different format depending on whether it includes a single store or multiple stores, as described below.
- Single store report
Once the report is generated for a specific product category (e.g. vaccines routine) , use the dropdown menu to select the specific item you want to visualize.
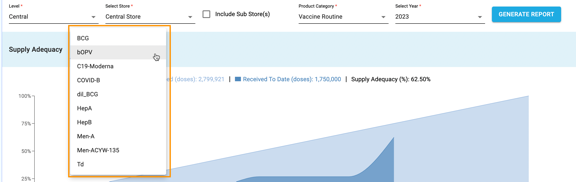
A graph will display a comparison of the annual need for that specific item vs. the total quantity of the item received up to date.
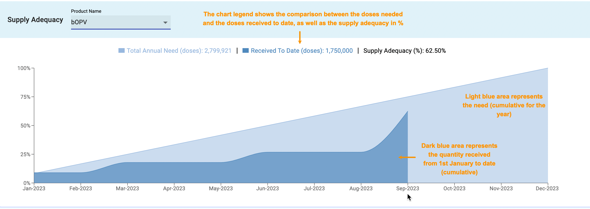
Note: This report does not consider actual stock in the store or actual utilization of vaccines.
- Multiple store report
Once the report is generated for a specific product category (e.g. vaccines routine) , use the dropdown menu to select the specific item(s) you want to visualize. You can choose one or more than one product at a time.
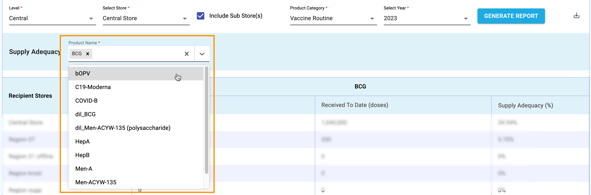
Once the products are selected, a table will display with a comparison of the annual need for each specific item vs. the total quantity of the item received up to date, as well as a calculation of the supply adequacy in %. The table will display one separate line per vaccine store.
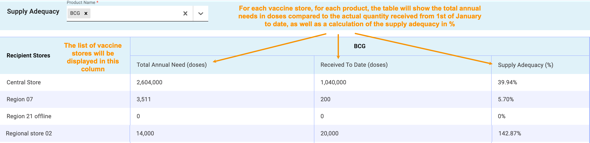
Note: This report does not consider actual stock in the store or actual utilization of vaccines.
- STEP 7. (optional) To further analyze or share the information, it is possible to export the report in pdf or Excel form. Click on the “Export” button and select the preferred file format. The file will be automatically downloaded into your computer.
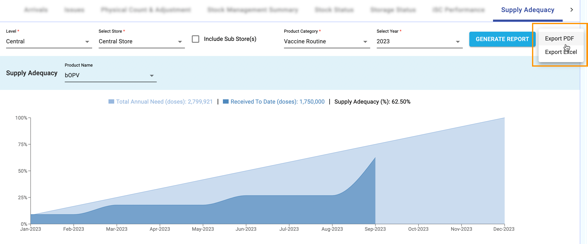
Note that the export will only show the graph and data for the selected product.
COLD CHAIN EQUIPMENT REPORT
The cold chain equipment report allows users to generate an inventory list of all the storage equipment available across vaccine stores.
This report can be generated for one single vaccine store at a time or for multiple levels.
- STEP 1. Access the SMT and click on the “Reports” tab on the top menu, then select “Cold Chain Equipment”.

- STEP 2. Click on “Level” to choose the supply chain level of the main store for which you want to generate the report.

After the level is selected, click on “Select Store” to choose the specific vaccine store. The dropdown list is arranged according to supply chain level, and alphabetically within each level.

- STEP 3 (optional). If you want the report to also include the cold chain inventory of lower-level stores below the main location, tick the box “Include Sub Store(s)”, otherwise leave blank.

Note: Unlike in other reports that only include the supply chain level immediately below, in the Cold Chain Equipment report, all lower-level stores in the selected location will be included.
For example, if the main store selected is Region A, and the user ticks the “Include Sub Store(s)” box, all stores in that region (districts, health facilities, etc.) will be included in the inventory report. If the main store is selected in the Central Store, when the user ticks the “Include Sub Store(s)” box, the report will include all facilities in the country.
- STEP 4. When finished with the selection of store(s), click on “Generate Report”.

A table with the full list of storage equipment and spaces at the selected location(s) at the time of the report will display on the screen.
(1/2)
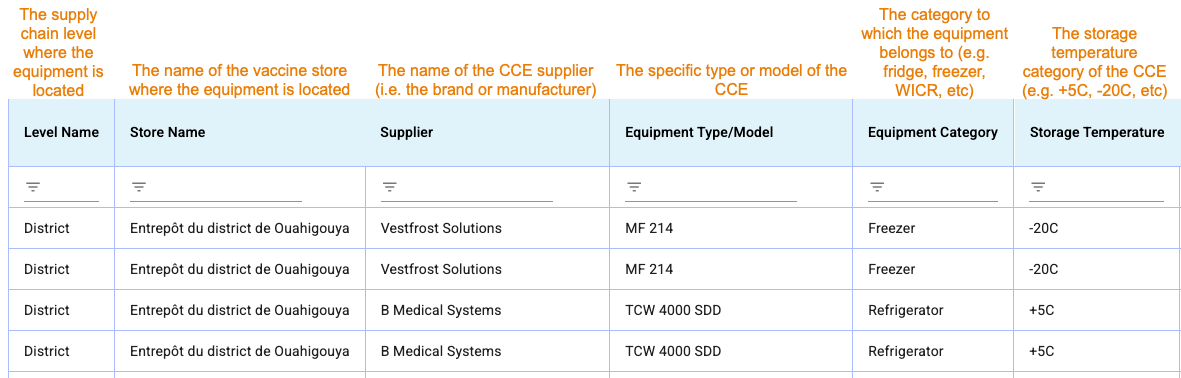
(2/2)
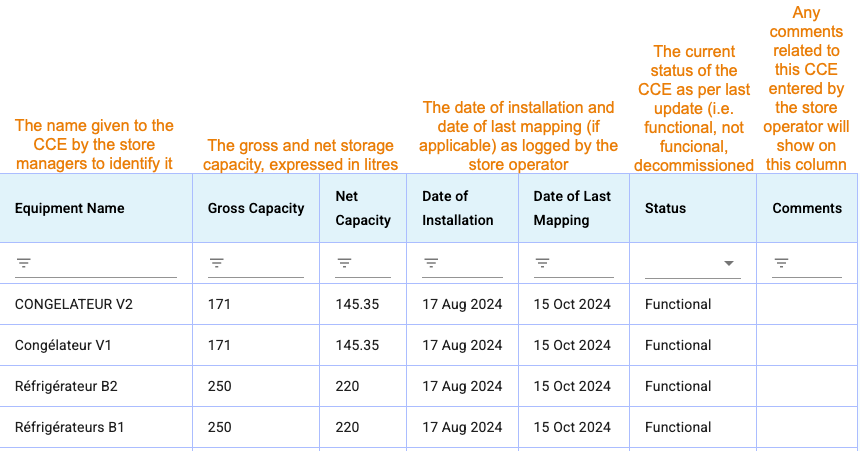
Note: The Cold Chain Equipment report is an inventory report that shows the functionality status at the current time. To monitor CCE functionality in the past or over a specific time period, refer to the iSC Performance report, CCE Functionality indicator, described in sub-section 6.7.2.
- STEP 5. To look for specific items, use the filter fields to search by store, equipment or temperature category, functionality status, etc.

- STEP 6. (optional) To further analyze or share the information, it is possible to export the report in pdf or Excel form. Click on the “Export” button and select the preferred file format. The file will be automatically downloaded into your computer.

TROUBLESHOOTING
CONTENTS OF THIS CHAPTER:
7.1. TROUBLESHOOTING ACCESS TO SMT 170
7.2. TROUBLESHOOTING ADMIN FUNCTIONS 176
7.3. TROUBLESHOOTING OPERATOR FUNCTIONS 177
7.4. TROUBLESHOOTING REPORTS 180
This section describes and explains the most common issues reported by SMT users and how to solve them. If you experience any unexpected problem when using the SMT application, kindly review this section to find out whether your problem is listed and possible solutions.
If the problem you are experiencing is not listed in this section or the solution provided by this guide does not solve it, get in touch with the local SMT administrator in your region or country for technical support.
If you are the SMT country administrator and need to escalate a problem that cannot be solved at local level, get in touch with the global SMT support team at smt@unicef.org
TROUBLESHOOTING ACCESS TO SMT
when i try to log in, i get a message that idon’t have a user account
When trying to log into the SMT platform, it is possible to see a message like this:
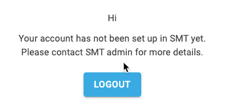
The most common reasons for this are:
- The SMT administrator(s) in your country or location have not yet created an account for you. If an account has been created, you should have received an email notification with the details of your user profile. If you have not received this email, get in touch with the SMT administrators to request the creation of your user account.
- The SMT administrator(s) in your country or location have created an account for you, but there was a spelling error when entering your email address. This is a very common mistake. If the administrator has informed you that your account is created but you have not yet received the email notification, verify with them that the email address used is correctly spelled.
- You are trying to log into the SMT with an email address different than the one used for your user account. If you have multiple email addresses (e.g. government email, Gmail, etc.) it is possible that the administrator has created your SMT account using one of them, and you have tried to log in with another one. Review your mails to verify in which email you have received the account creation notification and try again to log in using the correct account. (Note that the email might have been received in your Spam/Junk inbox). If you have not received the email notification, get in touch with the SMT administrator(s) in your country or location to verify you have an account.
Refer to sections 4.4.1. Viewing the user list and 4.4.2. Creating new user accounts for additional information.
when i try to log in, i get a message that my account is inactive
When trying to log into the SMT platform, it is possible to see a message like this:
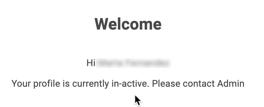
The message contains your username, which means your account is successfully created in the system, however, it is marked as “inactive”. This means that either during the process of account creation, or at a later date, a user with an administrator role has manually deactivated your account, either by mistake or for a specific reason. If you have administrator rights, it is possible that you might have deactivated your own account by mistake.
To reactivate your account, contact the SMT administrator(s) in your location or country to check whether there is a reason why your access to the SMT has been revoked. If it was deactivated by mistake, the administrator can edit your account to mark it as “active” again.
Refer to sections 4.4.5. Deactivating user accounts for additional information.
i have forgotten my password
As described in section 2.3. How to access the SMT for the first time, account and password management will be different depending on the type of email address associated with your SMT user account.
- For UNICEF, Google and Microsoft email addresses: Users log into the SMT platform using a SSO (Single Sign On) process, which means that the password for accessing the SMT platform is the password used for accessing the email account. If you have one of these types of emails, and you have forgotten your password, you will need to follow the password recovery process with your respective email provider.
- On the SMT login page, click on the button for your type of email address (e.g. Google button for a Gmail account):
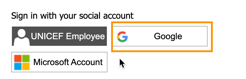
- Click on “Forgot password?” and follow the instructions of your email provider to recover your password:
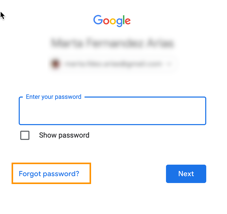
- For other types of email addresses (e.g. Yahoo): Users with email accounts that don’t use a SSO (Single Sign On) process need to create their own password for the SMT. If this was your case, and you created a specific SMT password that you have now forgotten, you can recover it by using the “Forgot my password” option on the SMT login page.
- Click on the “Forgot your password?” link above the password field, on the SMT login page
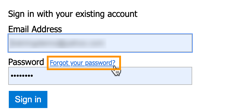
- Type your email address and click on “Send verification code”
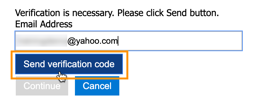
- Go to your email inbox and locate an email from “Microsoft on behalf of UNICEF” with a 6-digit verification code. (Note that the email might have been received in your Spam/Junk inbox)
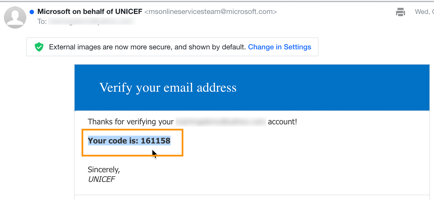
- Type or copy-paste your numeric code in the field provided, then click “Verify code”
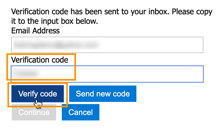
- Once your email address is verified with the code, click “Continue”
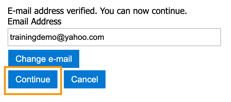
- You can now create a new password for your SMT account and click “Continue”. This is the password that you will use to log into the SMT platform from this moment on.
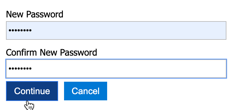
i can log in, but i cannot see the functionalities i am looking for
If you are a user with more than one role, when logging into the SMT you will be requested to select which role you wish to access (administrator or store operator).
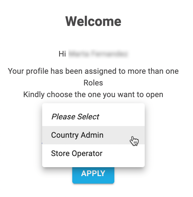
Depending on the type of role selected at the time of log in, the menus and functionalities you have access to will be different. If you are logged into the platform but you cannot see the menus and functionalities that you expected (e.g. store operator functions), it is possible that you are logged in with a different user role (e.g. administrator).
To find out which user role you are using, click on your name on the top right corner of the screen. Your user details will display.
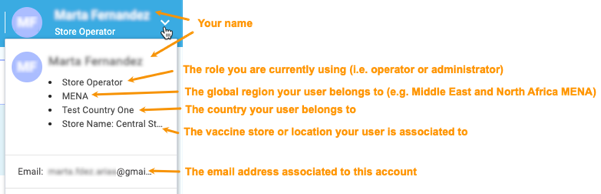
Review your user details to verify whether you are logged in using the correct account and user role.
- If you are logged in using the correct email address, but the user role you wish to use is different than the current one (e.g. you are logged as store operator but you want to use the administrator functions), simply click on “Change settings”, select the correct user role, then click “Apply”.
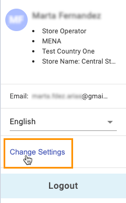
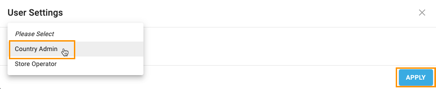
- If you have several user accounts with different email addresses, and the account you are currently using is not the correct one, simply click “Log out” and then follow the log in process again to access the SMT with your other email account.
If, after following the process above, you are still not able to access the correct location or functionalities, get in touch with the SMT administrator in your location or country to ensure your user account is correctly set up.
TROUBLESHOOTING ADMIN FUNCTIONS
master data. the producer is not on the list
When creating a new country specific vaccine or supply in your master list, you will be required to enter the details of the item, including the producer/manufacturer.
If the producer/manufacturer is not listed on the dropdown menu, you will need to manually add it as a new country specific producer before adding any vaccines or supplies associated to it. Refer to section 4.1.2. Adding country specific items to the national master data for a detailed description of this process.
store hierarchy import fails
When trying to import an Excel file with the store hierarchy for your country, it is possible that you receive an error message, and the file import does not work.

This message means that there are errors with the data introduced in the Excel file. Review the following common errors:
- Data in one of the mandatory columns is missing. On the “Locations” tab of the Excel file, review columns C, E and F (columns with red header) to ensure the mandatory information is completed. (Note: the parent store of the central store is an exception, and this cell can be left blank on column C)
- Facilities do not have the correct parent stores. Review column E “Facility name” together with column C “Parent facility name” to ensure there are no stores reporting to themselves (i.e. facility name and parent store cannot be the same).
- Supply chain level codes are incorrect. Review column F, “Supply Chain Level Code” to ensure the right format is used. Only numbers from 1 to 5 should be used for the supply chain level. Letters or other numbers are not allowed.
- The format of the population figures is incorrect. Review column K “Total Population” to ensure that no symbols (such as commas or dots) are used.
- The header titles for each column have been modified. If the titles of each column (text on row 1) are changed, the SMT platform might not be able to recognize the data. If you are unsure as to whether the text has been edited, download the hierarchy file again and copy-paste the data into the new template.
- The import file and the platform are in a different language. If the file has been downloaded while using the platform in a specific language, the same language needs to be used when importing the file back into the platform. Switch the platform language to match the language of the file or download the template again in the language you wish to use and copy-paste the data.
TROUBLESHOOTING STORE OPERATOR
stock overview is blank
When logging into the SMT as a store operator, you will land on the stock overview page, which should display a list of all the items in stock at your vaccine store. If this page is blank, try the following:
- Refresh the page using the refresh button on the browser.
- If you have been using the SMT platform for several hours/days without closing it, log out of the platform and log in again.
- If the above does not work, clear the cache on your browser.
Clear cache in Chrome / Clear cache in Firefox / Clear cache in Safari / Clear cache in Edge
- Check your user details on the top right corner to ensure you are logged in the correct vaccine store.
- Review the arrivals page to ensure that stock balances have been successfully logged in as “completed”.
stock overview data is incorrect
The stock overview page displays a list of all the items in stock at your vaccine store and their details. The data on this screen reflects what the user(s) have entered through the arrivals and issuing functionality. If the information shown on this screen does not match the reality, it is possible that there has been an error at the time of the data entry process. Try the following:
- Review the arrivals page to ensure that stock balances have been successfully logged in as “completed”. Transactions that are on “draft” or “pending” stage are not reflected on the stock overview.
- If the errors are related to a specific item or batch number, go to the reports section and search for transactions related to that item on the arrivals and issuing reports to identify any erroneous transactions. Refer to section 6.1. Arrivals report and 6.2. Issuing report for more information.
- If erroneous transactions have been identified through the reports, locate the transactions on the arrivals/issuing screens and add a comment to clarify the transaction details.
- If needed, use the Adjustments functionality to correct the details of the items you have in stock. Refer to section 5.6.2. Registering adjustments for details on this process.
issuing out supplies, invalid date
When issuing out supplies, it is possible to select an issues date in the past. This is to allow users to register in the SMT transactions that have already been completed.

However, it is possible that when selecting an issue date in the past, the transaction cannot be completed and a message like this will appear:

This error message is triggered when the selected issue date for a specific product and batch is earlier than the arrival date of that specific product and batch in the vaccine store (i.e. the user is trying to issue stock at a time when that item was not in store). For example:
- BCG vaccine batch 987368, arrival in central store 18th June
- BCG vaccine batch 987368, issue date from central store before 18th June -> invalid
- BCG vaccine batch 987368, issue date from central store 18th June or later -> valid
If you see the error message above, review the arrival and issuing dates of the item(s) to ensure the transaction gets registered on the correct dates.
physical count and adjustments: i cannot save the data
When registering a physical count and/or adjustment, the data will be saved when clicking the button “Finalize” on the bottom right corner of the “Physical Count & Adjustments” page. However, in some instances, this button can be inactive.

If the Finalize button remains inactive and the data cannot be saved, review the items lines to ensure that, if discrepancies have been recorded, the box “Accept adjustment” is showing a green tick mark.
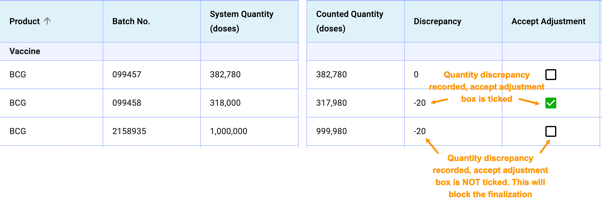
If some items do not have the “Accept Adjustment” ticked, click the edit button to review and complete the information.
- If the quantity discrepancy was entered by error, re-enter the correct counted quantity to ensure the discrepancy shown is zero.
- If the counted quantity entered was correct and there is indeed a discrepancy that needs to be recorded, click the “accept adjustment” box and enter a comment in the mandatory comment box, then save.
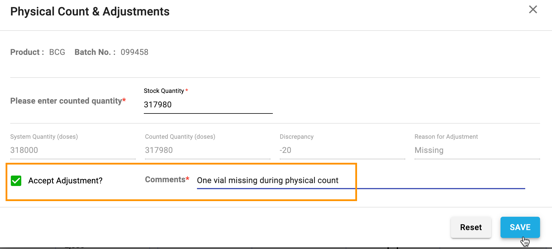
Once all the lines with discrepancies have been correctly completed, the “Finalize” button at the end of the page will become active and you will be able to save the physical count and/or adjustment.

TROUBLESHOOTING REPORTS
I cannot find a specific transaction on the arrivals / issuing reports
When generating transactional reports or searching for specific transactions through the arrivals and/or issuing reports, it is possible that some transactions that the user was expecting to see, are “missing”. If this is the case, verify the following:
- Ensure that the store you have selected is correct, especially if there are several store(s) with similar names.
- Ensure that the start date and end date for the report are correct. If you are unsure of the exact date of the arrival/issuing transaction, increase the time period for the report. It is also possible that the transaction was registered on the wrong date by user error.
- Ensure that all the filter fields (right above the first row of the report) are empty so all data is showing.
- Use the navigation buttons on the bottom right corner to see more rows and/or pages.
- Go back to the arrivals/issuing pages and search for “draft” and “pending” lines. Transactions whose status is not “Completed” will not show on the reports. If relevant, finalize registering those transactions.
stock status report: number of weeks of stock is blank
On the stock status report, a table shows the current stock per item (in doses / pieces) and also a calculation of:
- The current stock (in number of weeks)
- The current stock (in number of weeks) adjusted by expiry date
- The date when the stock is expected to end
In some cases, these 3 calculations might be blank.
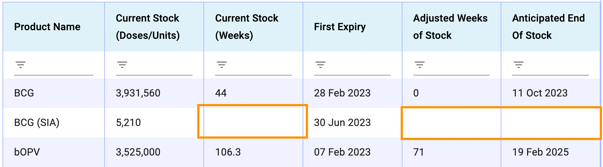
If these data points are blank on the table, the data will also be missing from the stock status bar chart.
If you encounter this situation, verify the following:
- The vaccines or supplies for which you have generated the report, are registered as products for routine immunization. For supplementary activity items, number of weeks of stock and anticipated end of stock is not calculated.
- The item has been registered on the list of routine immunization products under the program Data for the current year. If you have administrator rights, review the list of the “Program Data” tab, otherwise, request support from your SMT administrator.
- The population data for your store and target groups percentage is completed. If you have administrator rights, review the tables under the “Store Data” > “Population & Demographics” tab, otherwise, request support from your SMT administrator.
- The expected vaccine coverage for all items and supply chain levels is completed. If you have administrator rights, review the tables under the “Store Data” > “Vaccine coverage” tab, otherwise, request support from your SMT administrator.
isc performance, stocked according to plan report: the minimum and maximum lines do not show
On the Stocked According to Plan report, the user can monitor the stock during a selected period by comparing it to the minimum and maximum recommended levels on the chart.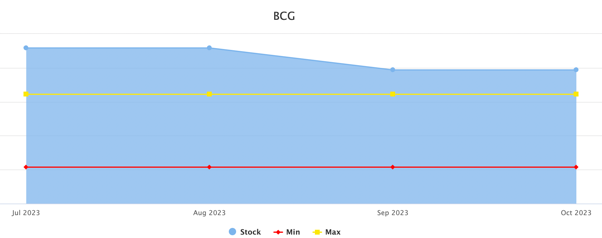
However, in some cases, the minimum and maximum levels might not show, or might show at zero.
If you experience this, verify the following:
- The activity type showing “Default” (routine + supplementary) or “Routine” has been selected. If the activity selected is “SIA”, the minimum and maximum lines will not show, as these parameters are not calculated for supplementary supplies.
- The item has been registered on the list of routine immunization products under the program Data for the current year. If you have administrator rights, review the list of the “Program Data” tab, otherwise, request support from your SMT administrator.
- The population data for your store and target groups percentage is completed. If you have administrator rights, review the tables under the “Store Data” > “Population & Demographics” tab, otherwise, request support from your SMT administrator.
- The expected vaccine coverage for all items and supply chain levels is completed. If you have administrator rights, review the tables under the “Store Data” > “Vaccine coverage” tab, otherwise, request support from your SMT administrator.
- The Safety Stock, Supply Interval and Lead Time values for all supply chain levels are completed. If you have administrator rights, review the tables under the “Store Data” > “Stock Levels & Lead Time” tab, otherwise, request support from your SMT administrator.
supply adequacy reports: the total annual need shows zero
The supply adequacy report should show a graph (single store report) or table (aggregated report) in which the user can compare the annual need of vaccine vs the quantity received up to the present date. However, in some cases, it is possible that the annual need of vaccine shows zero, so it is not possible for the user to make any comparison.
The reason for the annual need to show zero is usually that some data is missing from the SMT settings entered by the administrator (program data and store data) to the platform is not able to make the calculation. Verify the following:
- The item has been registered on the list of routine or supplementary immunization products under the program Data for the current year. If you have administrator rights, review the list of the “Program Data” tab, otherwise, request support from your SMT administrator.
- The population data for your store and target groups percentage is completed. If you have administrator rights, review the tables under the “Store Data” > “Population & Demographics” tab, otherwise, request support from your SMT administrator.
- The expected vaccine coverage for all items and supply chain levels is completed. If you have administrator rights, review the tables under the “Store Data” > “Vaccine coverage” tab, otherwise, request support from your SMT administrator.
[1] The DISC (Data for Immunization Supply Chain) indicators were developed and approved by the Gavi Alliance Partners in 2015 to monitor in-country immunization supply chains. More information can be found on the link: https://isc.technet-21.org/en/resources/indicator-reference-sheets